You already know GoDaddy isn’t cutting it anymore. Pages load slowly. You can’t touch the server configuration. The builder won’t let you export your own content. What keeps you on the platform isn’t satisfaction — it’s fear that when you transfer your website from GoDaddy, you’ll break the rankings and organic traffic you spent years building.
A website migration from GoDaddy won’t destroy your rankings if you follow this three-phase protocol: audit, execute, validate. The move is controlled and reversible at each stage.
Key Takeaways
- Capture a full baseline before touching anything: crawl data, keyword rankings, backlink profile, and Core Web Vitals. You can’t prove a migration succeeded without a “before” snapshot.
- Preserve every on-page SEO element (title tags, meta descriptions, canonical tags, structured data).
- GoDaddy Website Builder sites cannot be exported; migration means a full rebuild on a new platform, typically 4–8 weeks.
- 301 redirects are the backbone of SEO-safe migration. Every changed URL needs a 1:1 redirect map, implemented server-side.
- SSL must be installed on the new host before DNS cutover. Dropping from HTTPS to HTTP costs ranking signals and triggers browser security warnings.
- Monitor Search Console and analytics aggressively post-migration. Rankings that bounce back within 1–2 weeks indicate a clean migration; continued decline after two weeks means something is broken.
- Separate the hosting migration from the domain transfer. Move files first, verify stability, then transfer the domain registration if needed.
Why Sites Outgrow GoDaddy (And Why That’s Not a Bad Thing)
GoDaddy gets millions of sites online quickly and affordably. But the features that make it accessible for beginners become constraints as a site matures.
Performance ceilings are usually the first sign. Shared hosting packs hundreds of sites onto a single server, and the resource allocation reflects that. Server response times climb, caching control is limited, and there’s no way to configure a CDN at the server level. Core Web Vitals are a confirmed Google ranking signal, and those constraints have measurable SEO consequences — particularly for Largest Contentful Paint (LCP), which is heavily influenced by server response time (TTFB).
Builder lock-in is the more serious problem. GoDaddy Website Builder stores content in a proprietary format only GoDaddy can interpret. There is no export function — no way to download your site as HTML, CSS, or PHP files. If you’re on Website Builder, “migration” means rebuilding from scratch on a new platform.
Limited server access compounds the issue. Lower-tier plans restrict .htaccess control, don’t offer SSH, and limit PHP version management. You can’t implement server-side redirects with precision or fine-tune the performance optimizations that modern SEO demands.
None of this means GoDaddy failed you. It means your site has outgrown what the platform was designed to do. For a deeper look at the risks involved in any website migration process, see our full guide on best practices to avoid migration-related traffic loss.
Phase 1: Pre-Migration Audit and Planning
Everything in this phase happens before anyone touches a DNS record or uploads a file. You cannot prove a migration succeeded if you didn’t measure what existed before it happened.
Auditing Your Current Site Performance
The pre-migration audit creates your “before” snapshot — the baseline you’ll compare against after the move to prove nothing was lost.
Crawl your existing site to capture every indexable page, including paginated URLs, parameterized URLs, and pages only reachable through internal links. This crawl becomes your master URL list — the document that defines exactly what must exist on the new host.
Export your organic performance data from Google Search Console and GA4 — traffic figures, keyword rankings, and top-performing landing pages. GoDaddy’s built-in analytics are insufficient for this baseline. If you don’t have Search Console and GA4 installed and collecting data, that’s step zero. Set them up and let them collect at least two weeks of data before proceeding.
Document your backlink profile — referring domains, top linked pages, anchor text distribution. Backlinks are the hardest SEO asset to rebuild if they break during migration, so you need to know exactly where they point.
Record Core Web Vitals (LCP, INP, CLS) as a performance baseline. These should improve after migration, not degrade.
Flag existing technical debt. Orphan pages, redirect chains, crawl errors, and broken internal links should be cleaned up during migration rather than carried to the new host.
| Pre-Migration Baseline | Where to Capture | Notes |
| Full URL inventory | Site crawl | Include paginated, parameterized, and orphan pages |
| Organic traffic & keyword rankings | Google Search Console + GA4 | Export at least 90 days of data |
| Backlink profile | Search Console Links report | Record top linked pages and referring domains |
| Core Web Vitals (LCP, INP, CLS) | PageSpeed Insights / CrUX | Document both mobile and desktop scores |
| Existing crawl errors | Site crawl + Search Console | Flag redirect chains, 404s, and orphan pages |
Download our migration checklist template to plan your site move systematically.
Evaluating Your New Hosting Environment
Before committing to a new host, verify it actually solves the problems that prompted the move.
Confirm it offers SSH access, full .htaccess control, and PHP 8.2+ version management. Check for CDN compatibility, server-side caching, and HTTP/2 or HTTP/3 support. Ask about Brotli compression — it delivers meaningfully better ratios than gzip for text-based assets, achieving roughly 14–21% smaller files depending on content type. A staging environment is non-negotiable: you need a place to verify the site works before pointing your domain at it. And confirm SSL provisioning (Let’s Encrypt or equivalent), because your GoDaddy SSL certificate will stop working after migration.
Many GoDaddy migrants move specifically to managed WordPress hosting. A WordPress migration is one of the most common paths, and managed environments address the exact limitations that drive people away from GoDaddy. If that’s your destination, our guide on migrating your site to WordPress covers the platform-specific considerations.
Backing Up Everything Before You Touch Anything
The backup process differs by GoDaddy hosting tier. This is where generic migration guides fall short.
| GoDaddy Hosting Tier | Files | Database | DNS Records | |
| cPanel Hosting | cPanel → Backup Wizard (full backup) | Included in cPanel backup, or export via phpMyAdmin | Export forwarders and filters via cPanel | Screenshot or export from DNS Management |
| Managed WordPress | Built-in backup tool or WordPress Tools → Export | Export via phpMyAdmin | Via GoDaddy email management | Screenshot or export from DNS Management |
| Website Builder | No export available — manually save all page text and download images individually | Not applicable (proprietary system) | Via GoDaddy email management | Screenshot or export from DNS Management |
A backup you haven’t verified is not a backup. Download the archive, unzip it, spot-check that files and database tables are intact. This takes fifteen minutes and prevents catastrophic data loss.
For every tier: screenshot or export all DNS records — A, CNAME, MX, TXT, SPF, and DKIM entries. These must be replicated exactly on the new host. Missing even one MX record can silently break your email.
Setting Your Migration Timeline
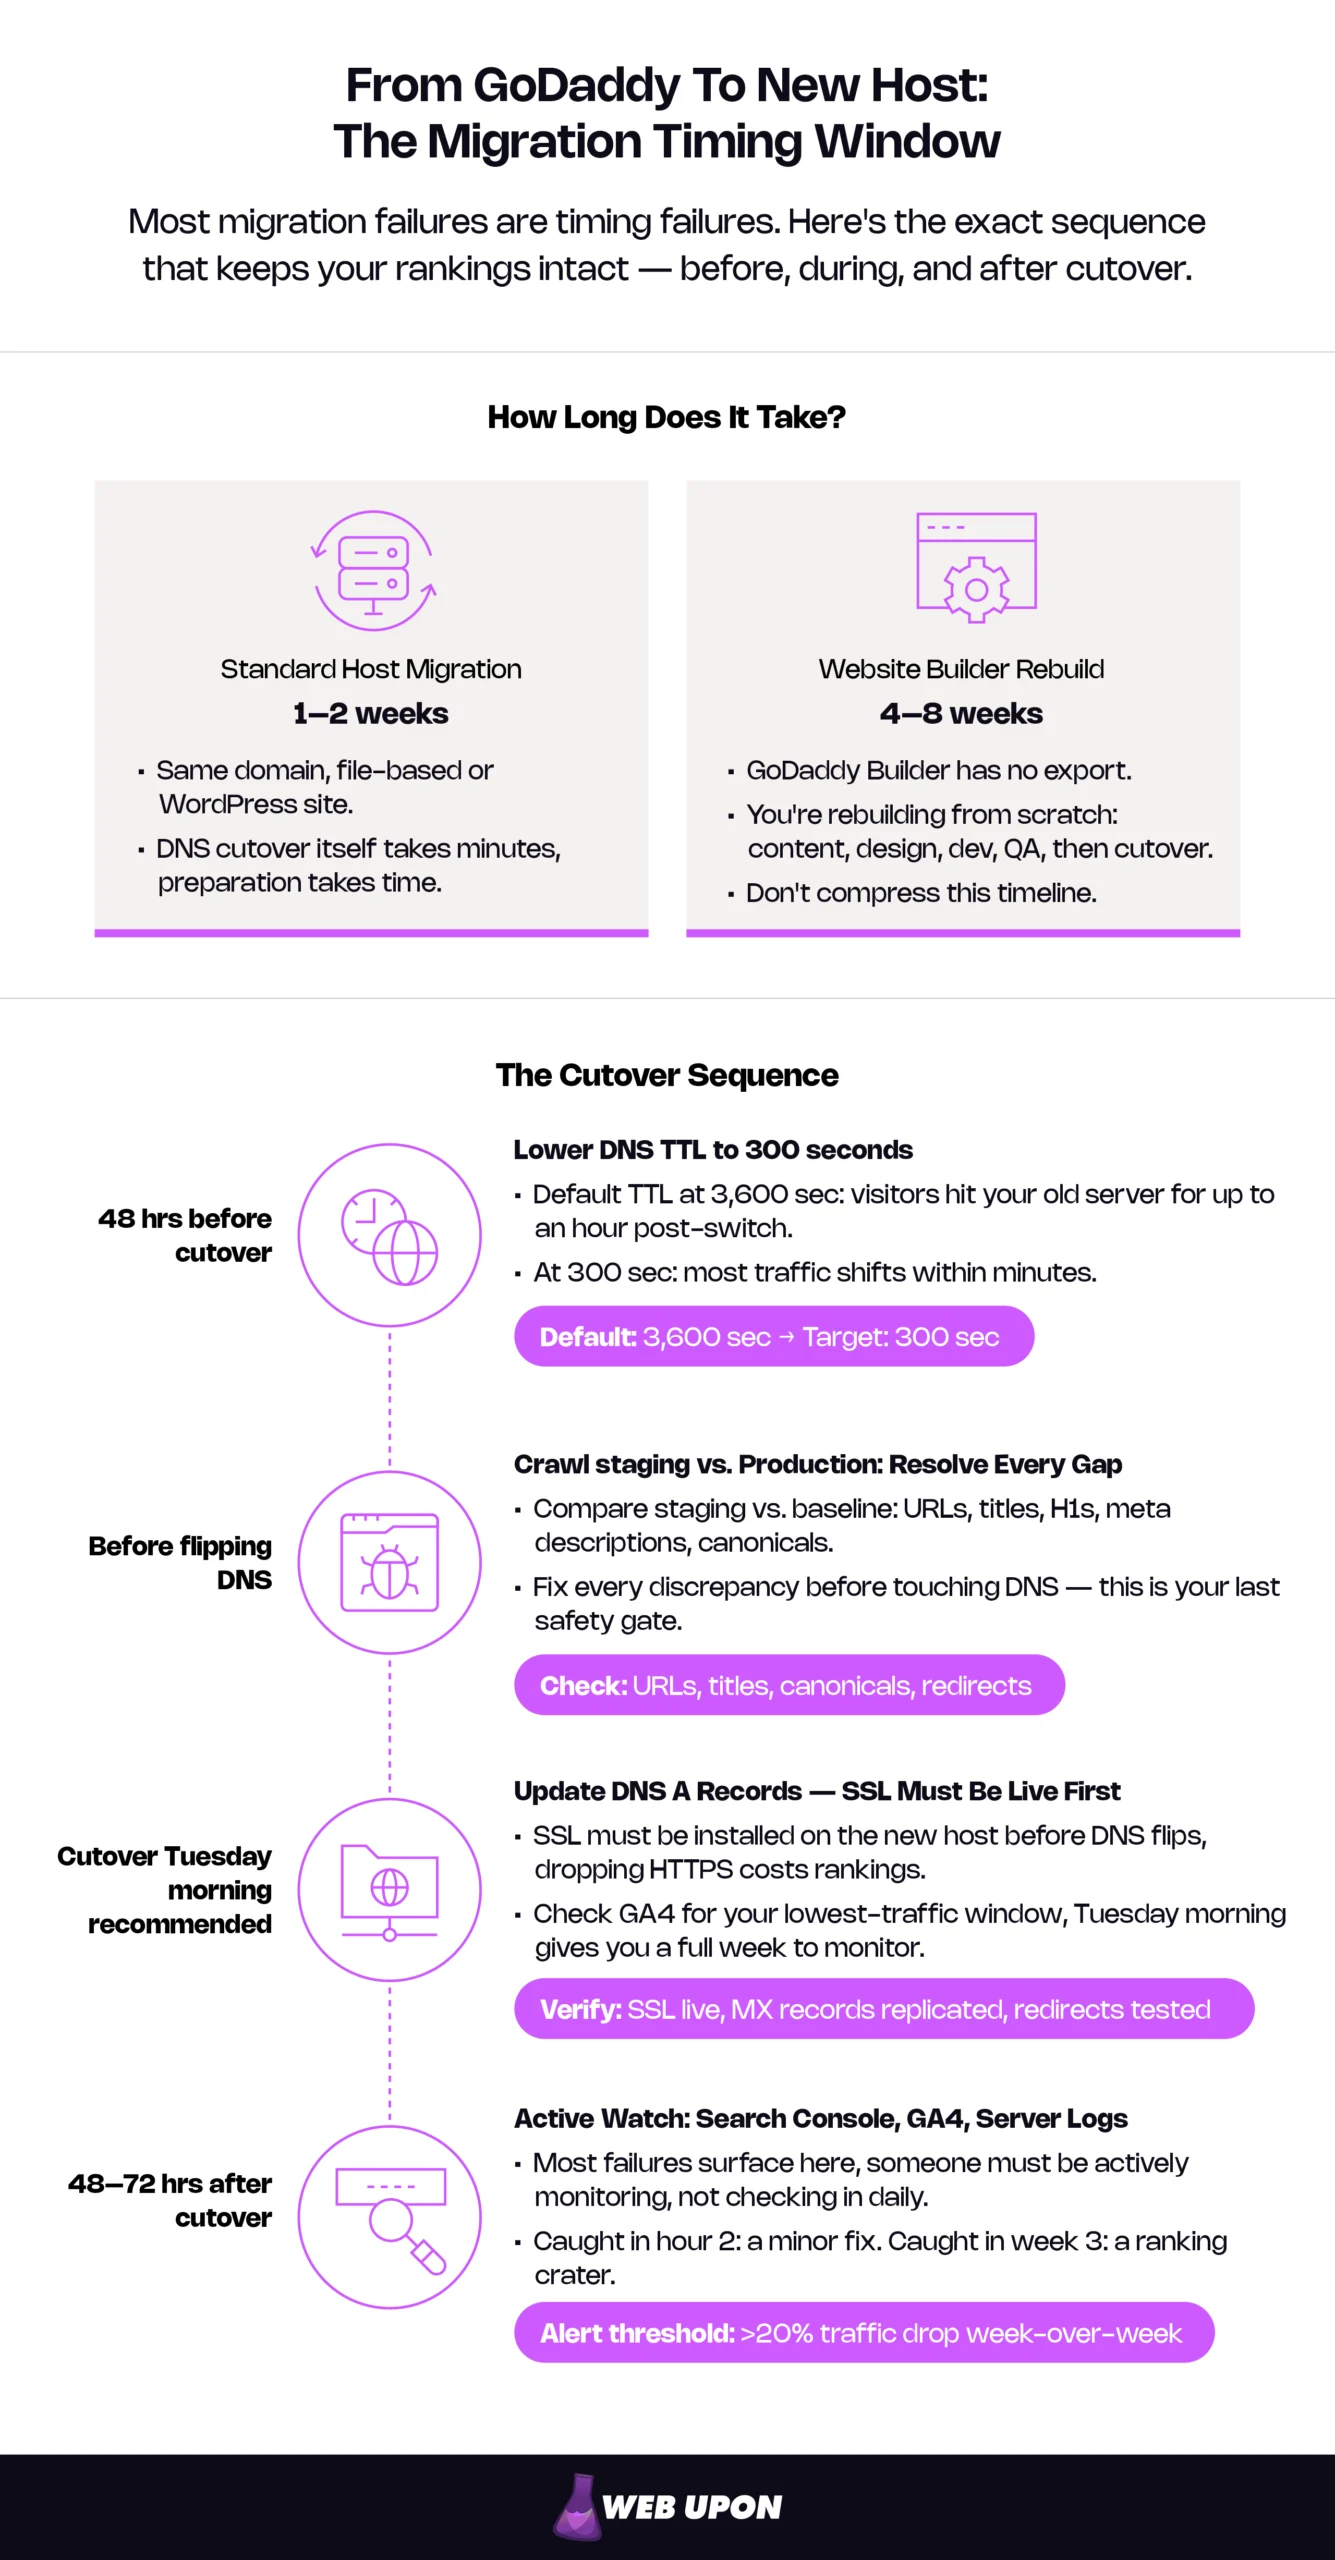
- Standard host migration (file-based or WordPress site): 1–2 weeks from audit to post-migration verification. The DNS cutover itself takes minutes; preparation and testing require the time.
- Website rebuild (GoDaddy Website Builder to a new platform): 4–8 weeks. You’re rebuilding from scratch — content inventory, design, development, QA, then cutover. Don’t compress this timeline.
- Schedule the cutover during your lowest-traffic window. Check GA4 for day-of-week and hour patterns. A Tuesday morning switch gives you the full workweek to monitor before weekend traffic arrives.
- Lower DNS TTL values to 300 seconds at least 48 hours before migration. TTL tells DNS resolvers how long to cache your current records. At the default 3600 seconds, some visitors will keep hitting your old server for hours after you switch. At 300 seconds, the vast majority of traffic shifts within minutes.
- Build in a 48–72 hour post-migration watch window — someone actively monitoring Search Console, GA4, and server logs. The first 72 hours reveal most migration failures, and catching them early is the difference between a minor fix and a ranking crater.
If this audit reveals more complexity than expected — hundreds of redirects, fragmented URL structures, or missing analytics baselines — it may be worth consulting a website migration specialist before proceeding.
Phase 2: Executing the Migration
Baseline documented, backups verified, timeline locked. Every step in this phase has a specific sequence — reordering them creates problems.
Transferring Your Domain and Updating DNS
Updating DNS records and transferring domain registration are separate operations. For most migrations, you should not do both simultaneously.
Scenario A — Keep the domain at GoDaddy, point DNS to the new host (recommended):
This is simpler and lower risk. Your domain stays registered at GoDaddy; you just change where it points.
- Update A records (or nameservers) to the new host’s server IP.
- Replicate every existing DNS record — MX, CNAME, TXT (including SPF and DKIM). Missing a single MX record is one of the most common causes of post-migration email failure.
- Monitor DNS propagation. With TTL pre-lowered to 300 seconds, most traffic should shift within minutes, but full global resolution can take up to 24 hours.
Scenario B — Transfer the domain to a new registrar:
A GoDaddy domain transfer can happen after the site is stable on the new host. Unlock the domain in GoDaddy’s Domain Manager, request the EPP/authorization code, and initiate the transfer at the new registrar (typically 5–7 business days). Confirm the domain isn’t nearing expiration — some registrars won’t process transfers on domains close to their renewal date. ICANN policy also prevents transfers within 60 days of initial registration or a previous registrant change.
The recommended approach: execute the hosting migration first (Scenario A), verify everything works, then transfer the domain (Scenario B) once the site is stable. Doing both at once doubles your troubleshooting variables.
Migrating Website Files and Databases
The migration method depends on your GoDaddy hosting tier.
| GoDaddy Hosting Tier | Migration Method | Estimated Time | Complexity |
| cPanel → new cPanel host | Download full backup; restore via new host’s cPanel. Or FTP transfer + phpMyAdmin database import. | 2–4 hours (sites under 5GB) | Moderate |
| Managed WordPress → new WP host | Automated migration plugin or concierge migration from new host. Update wp-config.php credentials post-transfer. | 1–3 hours | Low–Moderate |
| Website Builder → any platform | Full rebuild. Document every page (text, images, metadata, forms, navigation) in a content inventory spreadsheet. Recreate on new platform. | 4–8 weeks | High |
After transferring files, run a side-by-side comparison before touching DNS. Crawl the staging site and compare URL inventory, page titles, meta descriptions, H1 tags, and canonical tags against your Phase 1 baseline. Any discrepancies must be resolved before cutover. This comparison is your last safety gate.
Mapping and Implementing 301 Redirects
The redirect map is the backbone of website migration SEO. If URLs are changing at all — even a trailing slash difference — every old URL must map to its new equivalent via a 301 redirect.
If URLs are staying identical (same domain, same permalink structure), you may not need redirects. But verify parity anyway — CMS platform changes often alter URL structures in subtle ways, adding /blog/ prefixes, changing category slugs, or stripping trailing slashes.
Build a redirect map spreadsheet: Old URL | New URL | Status Code (301). Implement redirects server-side via .htaccess (Apache), nginx config, or your host’s redirect manager. Don’t create redirect chains — each old URL points directly to its final destination. If existing redirects from previous changes are already in place, collapse the chain so the original URL resolves in a single hop.
Test every redirect before DNS cutover. For sites with 500+ URLs, automate testing with a crawl — manual spot-checking at that scale guarantees missed redirects.
On 301 vs. 302: 301 (permanent) remains the correct migration signal because it tells search engines to update their index. A 302 can delay index consolidation, leaving the old URL in search results longer than necessary.
Installing and Verifying SSL Certificates
SSL failures are among the most common post-migration SEO problems and the easiest to prevent. Google has used HTTPS as a ranking signal since 2014, so a site that drops from HTTPS to HTTP after migration will see ranking drops and browser security warnings that crater user trust.
- Install SSL on the new host before DNS cutover so it’s ready when traffic arrives.
- Verify every page loads over HTTPS without mixed content warnings (HTTP resources on an HTTPS page).
- Confirm HTTP → HTTPS redirects are configured on the new server, not carried over from GoDaddy.
- Update canonical tags, sitemap URLs, and hardcoded internal links to HTTPS.
- If your site used GoDaddy’s bundled SSL, it will stop working after migration — the new host needs its own certificate provisioned.
With files transferred, redirects in place, and SSL verified, the migration itself is done. The most critical phase is what comes next: proving nothing was lost.
If you’re mid-migration and hitting redirect conflicts, SSL errors, or DNS issues you can’t resolve, Web Upon’s migration team can step in and troubleshoot.
Phase 3: Post-Migration Validation and Monitoring
A migration isn’t confirmed the moment DNS switches over. It’s confirmed 90 days later, when traffic, rankings, and site functionality match or exceed your pre-migration baseline.
Running a Post-Migration Technical Audit
This is your post-migration counterpart to the Phase 1 baseline.
- Crawl the live site and compare against your pre-migration URL inventory. Every URL should either exist at the same address or redirect properly. Look for missing pages, broken internal links, and new 404 errors.
- Test Core Web Vitals (LCP, INP, CLS) — performance should improve on better infrastructure. If it doesn’t, investigate server configuration and caching before looking elsewhere.
- Verify robots.txt is not blocking crawlers. Carrying over a staging robots.txt with Disallow: / is a surprisingly common mistake that can deindex an entire site.
- Check the XML sitemap — accessible, accurate, and submitted to Google Search Console.
- Test all functionality individually: forms, e-commerce checkout, third-party integrations, analytics tags, CRM connections.
- Verify canonical tags point to correct URLs on the new host, not the old GoDaddy server.
Monitoring Rankings and Organic Traffic
Even a perfectly executed migration may see ranking fluctuations for a few days as Google recrawls and reprocesses. This is normal. What matters is recovery speed — rankings that bounce back within 1–2 weeks indicate a clean migration. Continued decline after two weeks means something is broken.
- Monitor Search Console daily for 2 weeks — index coverage, crawl stats, new errors. A spike in “Excluded” or “Error” pages in the Pages report is an early warning sign.
- Compare organic traffic week-over-week and month-over-month in GA4 against Phase 1 baselines.
- Track your top 20–50 keywords. Drops exceeding 5 positions warrant immediate investigation.
- Submit the updated XML sitemap to Search Console to accelerate reindexing.
- If the migration involved a domain change, use Search Console’s Change of Address tool to notify Google directly.
- Set automated alerts for traffic drops exceeding 20% week-over-week on key landing pages.
If rankings don’t recover within two weeks, work through this diagnostic sequence: redirects (resolving correctly?) → crawl errors (unexpected status codes?) → index coverage (pages dropping from index?) → canonical conflicts (old URLs competing with new?). The cause is almost always in the first two steps.
For the complete post-launch SEO protocol, see our new website SEO checklist.
Verifying Backlink Integrity
Backlinks are the SEO asset you can least afford to lose. Every link pointing to your site is a signal of authority — if those links suddenly hit 404 pages or cycle through redirect chains, that authority evaporates.
- Re-crawl your backlink profile and compare against Phase 1. Identify links now pointing to 404s or redirect chains.
- Verify 301 redirects for high-authority links are resolving to the correct final destination — not an intermediate page, not a homepage catch-all.
- If the migration involved a domain change, reach out to your top 20–30 referring domains to request updated links. For same-domain host migrations, properly implemented redirects handle this automatically.
- Watch referral traffic in GA4. A sudden drop from a specific source usually indicates a broken backlink.
Google’s documentation on managing site moves provides additional guidance on preserving link signals.
Confirming DNS Resolution and Email Functionality
DNS and email issues are the most common “forgotten” migration failures. They often don’t surface until someone realizes they haven’t received an email in two days.
- Verify DNS propagation is complete — the domain should resolve to the new server from multiple geographic locations.
- If MX records changed, test email send and receive on every account. Send a test and reply to confirm both directions work.
- If keeping GoDaddy email but moving hosting, verify MX records still point to GoDaddy’s mail servers. This is one of the most common email misconfigurations in a GoDaddy hosting migration — switching nameservers causes GoDaddy’s MX records to stop applying. Recreate them at your new DNS provider.
- If migrating email to a new provider, treat it as a separate workstream with its own timeline and testing.
Keep your baseline comparison data accessible for at least 90 days. Watch for delayed-onset issues — gradual ranking erosion or broken functionality that only surfaces under specific conditions.
When to Bring In Professional Migration Support
Not every migration needs professional help. A straightforward host migration for a small WordPress site — fewer than 100 pages, clean URL structure, no complex redirects — is well within reach for someone comfortable with cPanel and DNS basics.
The risk profile shifts when the stakes escalate:
- Your site generates revenue and downtime carries a direct financial cost.
- The migration involves a domain change, URL restructuring, or platform switch.
- The site has 500+ pages or multiple subdomains.
- No one on your team is comfortable with DNS configuration and redirect implementation.
- The site’s backlink profile is fragile — high-authority links that would take months to rebuild if they break.
In any of those scenarios, you may want to reach out to professional help. If you’d rather have an experienced team handle the technical move while you focus on your business, Web Upon’s migration specialists can execute the migration and monitor your SEO through the transition. Learn more about our migration expertise and services.

