Your Squarespace site still earns its keep: organic traffic and leads arrive every week. But the template now decides what your campaign pages, case studies, and content program are allowed to be, and every plan to replace it stalls on one question. Will migrating from Squarespace to Webflow hurt our SEO?
The short answer: it doesn’t have to. Search equity survives when you control three risks: unmapped URLs, lost on-page signals, and an uncontrolled launch. There’s no automatic import, so every Squarespace to Webflow migration is a rebuild. To carry your rankings across, document every URL and signal first, rebuild pages at the same addresses with the same metadata, load permanent redirects before the domain switches, and change nothing else on launch day. Expect some ranking movement for several weeks while search engines recrawl; a sustained drop on a specific page isn’t normal, and with a baseline, it’s traceable and fixable.
That rebuild is also the upgrade. Nothing moves automatically, so nothing broken has to come with you.
Key Takeaways
- It’s a rebuild. Nothing imports automatically, so every page and signal is recreated by hand.
- Audit, then map. Baseline the old site, then map every old URL to its Webflow destination.
- Rebuild signals exactly. Match slugs, metadata, headings, and alt text.
- Redirect before DNS. Load single-hop 301s before the switch and keep them at least a year.
- Launch as one variable. Change where the domain points and nothing else.
- Judge against the baseline. A modest sitewide dip is settling; a sharp drop on one page is fixable.
What a Disciplined Plan Protects
- Search equity: every indexed or linked URL forwards to its new home in a single hop.
- Architecture: content structures built around your business, not a template’s page types.
- Control: SEO settings your team manages directly, down to individual pages and CMS fields.
- Speed potential: a clean hosting foundation that gives performance work room to pay off.
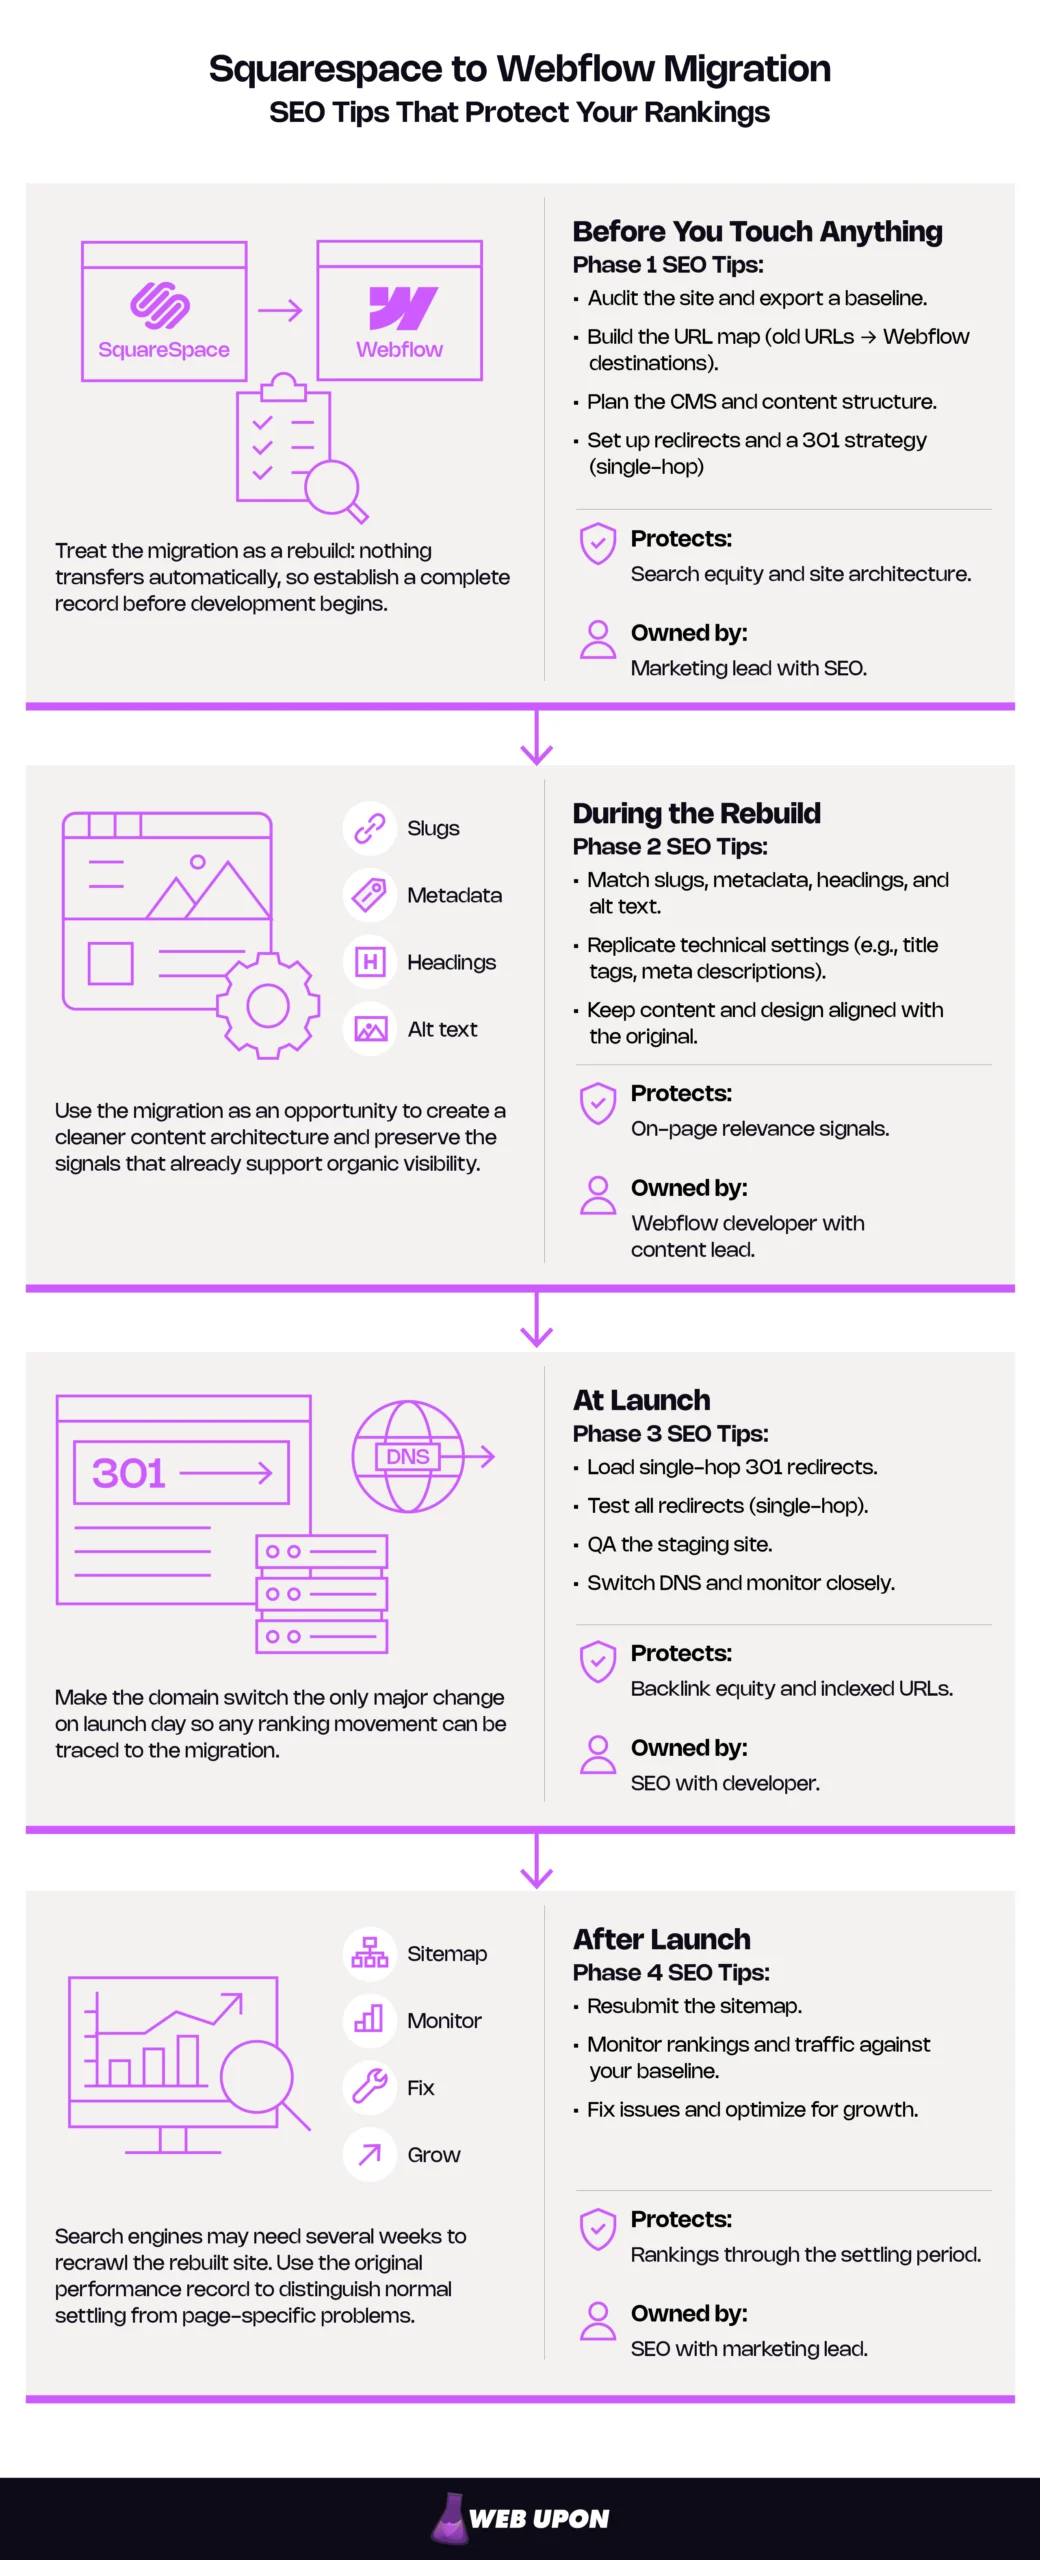
In this guide:
- Why It’s a Rebuild
- Phase 1: Before You Start
- Phase 2: During the Rebuild
- Phase 3: At Launch
- Phase 4: After Launch
- Common Questions
- Checklist and Next Steps
Why a Squarespace to Webflow Migration Is a Rebuild, Not a Transfer
There’s no automated way to move a Squarespace site into Webflow. Webflow’s own migration guide calls the move a rebuild rather than a transfer: layouts, styles, CMS structure, and interactions are recreated by hand, with the old site as your reference.
The Squarespace export helps less than most teams expect. It’s a WordPress-format XML file of content only, and Squarespace’s export documentation lists more page types that stay behind than come along.
What Squarespace Exports vs. What You Rebuild
| Content | Exports From Squarespace? | What Happens in Webflow |
| Layout pages | Yes, as text and images in a WordPress-format XML file (no design). | Rebuild the layout; move the content in. |
| One blog and its posts | Yes, one blog only; drafts stay behind. | Convert to CSV and import into a CMS collection. |
| Additional blogs | No. | Capture from your crawl and import. |
| Portfolio, index, album, and calendar pages | No. | Rebuild, often as CMS collections. |
| Gallery pages | Yes, on version 7.0 sites. | Rebuild as a collection or static page. |
| Products | Not in the XML file; exported separately as CSV. | Import into Webflow Ecommerce or the CMS. |
| Images | No bulk export; downloaded one at a time. | Download, optimize, and re-upload. |
| Design, styles, and custom CSS | No. | Rebuild in Webflow’s style system. |
| SEO titles, descriptions, alt text, and existing redirects | Don’t rely on the export. | Capture in your audit and re-enter. |
Website migration SEO problems usually trace back to one of three failures:
- Unmapped URLs: old addresses that return errors instead of forwarding to the new page.
- Lost on-page signals: titles, descriptions, headings, and alt text that never reached the new build.
- An uncontrolled launch: too many changes at once, so no one can trace what broke.
Google’s site migration best practices explains why isolating changes matters. A platform switch already changes the CMS and the design at once, so everything else, from the domain to your best pages’ metadata, should hold still.
Size Up Your Migration
| Site Type | Biggest SEO Risk | Plan For |
| Service or brochure site | Missed redirects for backlinked and legacy URLs | Exact-match redirects for every URL |
| Content-heavy blog | URL patterns and metadata at volume | CSV imports, pattern redirects, sampled QA |
| Agency portfolio | Case studies built on page types that don’t export | A case-study CMS collection and image re-hosting |
| Squarespace Commerce store | Product URLs and variants | A separate ecommerce plan (outside this article’s scope) |
Site type shapes the schedule, too; our breakdown of how long a website migration takes gives realistic ranges by site size.
Because nothing transfers automatically, Phase 1 is about writing down everything you’re about to rebuild.
Phase 1 — Before You Touch Anything: Build Your Migration’s SEO Foundation
Everything in this phase happens before anyone opens Webflow’s Designer. The documents you create here govern every decision that follows.
Conduct a Full SEO Audit of Your Squarespace Site Before Migration Begins
An SEO audit is the spreadsheet that records everything your current site has earned in search. You can’t protect what you haven’t documented, and this one becomes both your migration inventory and your evidence after launch.
- Crawl the whole Squarespace site with an SEO crawler to capture every indexable URL, including orphaned pages the navigation hides. Then cross-check the crawl against the Squarespace sitemap (the file listing pages you want search engines to find) and Search Console’s indexed pages.
- Document every title tag, meta description, H1, canonical tag (which tells search engines the official version of a page), Open Graph tag, and alt text in one spreadsheet.
- Identify your highest-traffic, highest-converting, and most-linked pages so they become priorities, not afterthoughts.
- Export Search Console performance data for pages and queries, plus key analytics metrics, as your pre-migration baseline.
- Flag existing indexing errors, crawl issues, and duplicate content so they don’t follow you into Webflow.
- Record every redirect in Squarespace’s URL Mappings panel, plus analytics, tag manager, and custom code snippets.
Then sort the rows into three priority tiers. Tier 1 is any page with backlinks, meaningful organic traffic, or conversions; Tier 2 is indexed pages with modest traffic; Tier 3 is low-value pages to consolidate or retire. Let your own data set the cutoffs: a page that drives demo requests is Tier 1 whatever its traffic.
Search Console’s interface exports only 1,000 rows, so larger sites should pull their baseline through the Search Console API or a connected reporting tool. Capture at least the last three months plus the same period last year, so seasonality can’t pose as migration damage. Search Console keeps only 16 months of data, so export it before it ages out.
Audit Capture Checklist
| Data Point | Where to Find It | Why It Matters |
| Every indexable URL | SEO crawl, Squarespace sitemap, Search Console | Becomes the old-URL column of your mapping sheet |
| Titles and meta descriptions | Crawl export | Re-entered in Webflow, kept unchanged on Tier 1 pages at launch |
| H1s and heading structure | Crawl export | Preserves each page’s topical focus |
| Image alt text | Crawl export | Has no import path and must be rebuilt by hand |
| Backlinks | A backlink tool and Search Console’s link data | Identifies URLs that must never break |
| Search Console performance | Performance report (API for more than 1,000 rows) | Your baseline for post-launch comparison |
| Existing redirects | Squarespace’s redirect settings | Must be carried over and flattened |
| Tracking and custom code | Squarespace code injection settings and code blocks | Must be rebuilt in Webflow before launch |
For marketing leads: this baseline is your defense in the post-launch review. It lets you answer with page-level data instead of a guess.
If this inventory looks like a project of its own, that’s because it is. A pre-migration SEO audit delivers the crawl, the baseline, and the tiers before design starts.
The audit shows what you have. The URL map decides where each piece goes.
Map Every URL Path Before a Single Page Goes Live in Webflow
A URL map is a spreadsheet with two columns that matter most: every old Squarespace address on the left, its new home on the right.
- Build a mapping sheet pairing every Squarespace URL (pages, posts, products, hosted files, and legacy redirects) with its Webflow destination.
- Audit your Squarespace slug structure (the slug is the last part of a URL, identifying the page) and decide page by page whether to replicate or improve it. Keep URLs unchanged unless the gain is clear; the SEO impact of changing URLs explains why.
- Identify pattern changes caused by Webflow’s CMS, where every item lives at /collection-url/item-slug, and plan pattern-based 301 redirects (permanent forwarding rules) to match.
- Cross-reference the map against your backlink profile so no high-authority link ends up pointing at a dead page.
- Carry over legacy Squarespace redirects, pointing each straight at its final destination so old rules don’t stack into redirect chains (one redirect leading to another before the final page).
- Treat the mapping sheet as a living document from the audit through post-launch QA.
Know Webflow’s URL rules before promising identical addresses. CMS items can’t sit at the domain root, and a URL can carry static parent folders but only one dynamic segment. Hosted files change too: Webflow serves uploads from its content delivery network, not your domain, so every Squarespace-hosted PDF gets a new address and its own row.
One refinement for retired pages: if a page has no backlinks and no genuine replacement, a clean 404 beats a homepage redirect, which Google may treat as a soft 404 (a page that looks missing to search engines even though it loads).
Mapping Sheet Template Example
| Old URL | New URL | Page Type | Baseline Organic Clicks | Referring Domains | Priority Tier | Rule Type (Exact or Pattern) | Status (Keep, Redirect, Retire) | QA Result |
| /our-services | /services | Static page | [from baseline] | [from backlink tool] | Tier 1 | Exact | Redirect | [post-launch check] |
Common Squarespace URL Patterns
These patterns are examples; confirm them against your own crawl, since they vary by Squarespace version and settings.
| Squarespace Pattern (Example) | Typical Webflow Destination | Action |
| Older date-based blog posts (/blog/2019/5/12/post-title) | /blog/post-title | Pattern redirect |
| Store product pages (/shop/p/product-name) | Webflow Ecommerce product page (confirm path in your project) | Pattern redirect |
| Blog category and tag filter URLs (query strings) | Category collection page or blog index | Redirect using escaped query-string syntax |
| Hosted file links (path varies, confirm in your crawl) | The page that now hosts the file | Exact-match redirect |
With every URL accounted for, the next step is planning where the content itself will live.
Inventory Your CMS Structure and Plan Its Rebuild in Webflow
Squarespace sorts content into fixed page types; Webflow lets you design the structure yourself. This is where the rebuild pays off.
- Export everything Squarespace allows (one blog as XML, products as CSV), then capture portfolio items, additional blogs, and images from your crawl.
- Audit where the template has bent your architecture: case studies forced into blog posts, services buried in index pages.
- Design Webflow CMS collections that mirror your content taxonomy and leave room to scale.
- Map custom fields for SEO title, meta description, Open Graph image, alt text, and schema-ready attributes (schema markup is code that describes your content to search engines).
- Define every CMS slug by hand to match the mapping sheet, never accepting auto-generated slugs.
- Budget time to download and re-host every image and file, since Squarespace has no bulk image export. Then confirm no page still loads images from Squarespace’s servers; those links break when the subscription ends.
Decide whether each piece of content migrates, merges, or retires, and record every retirement in the map, with its redirect target where one exists. If that list runs long, content audit services can make the calls with performance data.
Check your plan’s CMS item limit before designing collections; since May 2026, Webflow’s Premium plan includes 20,000 items. Disable template pages for collections used only inside other pages, such as testimonials, so those collections never generate thin pages. Webflow’s Schema markup field also can’t bind Reference, Multi-reference, or Multi-image fields, so store schema-ready attributes in plain-text, option, number, or date fields.
Content Mapping Example
| Squarespace Content | Webflow Collection | Key Fields | URL Pattern |
| Blog posts | Blog Posts | Title, slug, body, category, publish date, SEO title, meta description, Open Graph image | /blog/post-slug |
| Case studies or portfolio items | Case Studies | Client, services, results, gallery, SEO fields | /work/case-study-slug |
| Services | Services | Summary, body, related case studies, SEO fields | /services/service-slug |
| Testimonials | Testimonials (template page disabled) | Quote, name, company, related service | None |
For agencies: the case-study collection is often the biggest upgrade in the move. Fields for client, services, and results make every case study consistent, filterable, and easier to optimize.
With the inventory, the mapping sheet, and the CMS plan complete, you have a blueprint. Phase 2 turns it into a working site.
Phase 2 — During the Rebuild: Recreate Every SEO Signal Inside Webflow
The rebuild is where search signals are carried forward or quietly lost. Work from the audit spreadsheet, not from memory.
Replicate and Upgrade Every On-Page SEO Element Inside Webflow
On-page elements are the signals inside each page that tell search engines what it’s about. Every title, description, heading, and alt text in your audit spreadsheet needs a home in Webflow before launch.
- Transfer all title tags and meta descriptions, using Page settings for static pages and SEO fields bound to each Collection template for CMS items.
- Write unique, keyword-targeted metadata for each page and item instead of relying on global defaults.
- Rebuild all alt text from the audit, since it doesn’t travel with re-uploaded images.
- Restore every internal link, pointing it at the final Webflow path instead of leaning on redirects.
- Use Webflow’s semantic HTML controls to keep one H1 per page and a logical heading hierarchy.
The rebuild tempts you to improve everything at once. That’s the trap. Keep Tier 1 metadata unchanged at launch so any later movement has a traceable cause, improve weak Tier 2 and Tier 3 metadata during the rebuild, and revisit Tier 1 once rankings settle. The site still gets better; launch day just stays a one-variable change.
On-Page Transfer Checklist
| Element | Static Pages (Where in Webflow) | CMS Items (Where in Webflow) | Source Column in Audit Sheet |
| Title tag | Page settings > SEO settings | Collection template’s SEO settings, bound to an SEO title field | Title |
| Meta description | Page settings > SEO settings | Collection template’s SEO settings, bound to a meta description field | Meta Description |
| Open Graph title and image | Page settings | Collection template’s Open Graph settings, bound to fields | OG Title, OG Image |
| H1 | Heading element in the Designer | Heading bound to the item name or a dedicated field | H1 |
| Image alt text | Image settings or the Asset panel | Alt text field bound to the image | Alt Text |
| Internal links | Link settings on each element | Links in rich text and reference fields | Internal Links |
Before QA, run Webflow’s Audit panel to catch missing alt text and heading gaps early. It skips CMS-bound images, so check their alt text in your staging crawl.
On-page signals tell search engines what a page is about. Technical settings tell them how to crawl it.
Configure Webflow’s Technical SEO Settings Before Going Live
Technical settings are the sitewide switches that decide what search engines crawl, index, and display. Most take minutes to set, and any one of them can undermine an otherwise perfect rebuild.
- Enable Webflow’s auto-generated XML sitemap and verify it includes every intended page and CMS item, and no noindexed ones; use each page’s Sitemap indexing toggle to keep noindexed pages out.
- Set the Global canonical tag URL in Site settings > SEO, including https:// (and www, if your default domain uses it) and omitting the trailing slash. Override it only where a static page needs a different canonical.
- Turn off Staging indexing in Site settings > SEO > Indexing so the webflow.io address stays out of search while production stays fully crawlable. Staging indexing, like the Schema markup field, requires a paid Site plan or paid Workspace.
- Add schema markup in each page’s Schema markup field, bind CMS fields on Collection templates, and keep structured data in one place.
- Validate Open Graph tags, X (formerly Twitter) card metadata, and social sharing previews before launch.
- Rebuild analytics, tag manager, and Search Console verification in Webflow; if Squarespace verified Search Console with an HTML tag, re-add it before the cutover.
Settle one question before you type the canonical: which host does Google index today, www or the bare domain? Make that host Webflow’s default domain and the base of your global canonical. Get it wrong, and a same-URL migration quietly becomes a sitewide URL change.
Never inject canonical tags through a tag manager while Webflow’s global canonical is set. Duplicate canonicals give search engines a reason to ignore both, as Webflow’s canonical tag documentation warns.
Webflow SEO Settings Reference
| Setting | Where in Webflow | What “Done” Looks Like |
| XML sitemap | Site settings > SEO (Sitemap section) | /sitemap.xml lists every intended URL and no noindexed pages. |
| Global canonical tag URL | Site settings > SEO | Protocol and host match the indexed host; no trailing slash. |
| Default domain | Site settings > Publishing > Production | Matches the host Google indexes today. |
| Staging indexing | Site settings > SEO > Indexing | Off, so the webflow.io address serves a blocking robots.txt. |
| Schema markup | Page settings > Schema markup | Validates cleanly; no duplicate markup in custom code. |
| Social previews | Page settings | Correct title, description, and image in a social preview debugger. |
| Tracking and verification | Site settings > Custom code, Search Console | Analytics fires on staging; verification method confirmed for cutover. |
The site is built and configured. What remains is the only irreversible step: switching the live domain.
Phase 3 — At Launch: Redirect, Verify, and Cut Over With Minimal Disruption
Everything up to now can be undone quietly. This phase can’t, so it runs on checklists.
Implement 301 Redirects Completely and Correctly Before DNS Cutover
A 301 redirect is a permanent forwarding instruction from an old URL to a new one: the change-of-address card that tells search engines and visitors where your content lives now. Load your redirects before the domain switches, not after.
- Enter every redirect pair from your mapping sheet in Site settings > Publishing > 301 redirects before the domain goes live, using CSV import for volume. Export existing rules first, because an import overwrites them.
- Prioritize forwarding rules for pages with backlinks, high organic traffic, and indexed visibility.
- Use exact-match rules for Tier 1 pages and capture-group pattern rules for URL families. Add specific rules before broad wildcards, because Webflow runs rules in creation order, oldest first.
- Validate the list before import, and schedule spot-tests of every Tier 1 redirect for launch hour.
- Avoid redirect chains: every old Squarespace URL should reach its final Webflow destination in one hop. Our platform migration checklist explains why chains often appear after launch, not before.
- Send retired pages to their closest relevant replacement, not to the homepage.
- Understand that missing one high-authority redirect can cause a measurable ranking drop for that page.
Redirects need a paid Webflow plan. Webflow recommends about 1,000 rules at most, since every rule is written into a file that visitors’ browsers download; pattern rules keep larger sites well under the line.
Escaping is where many imports fail. Old paths must escape certain characters with %, including hyphens and underscores, so nearly every slug needs escaping. A single invalid row fails the entire CSV import. Check your syntax against Webflow’s redirect documentation before uploading.
Google’s site-move guidance recommends keeping redirects in place as long as possible, generally at least a year.
Redirect mapping is where migration risk concentrates, and it’s the step most worth having a professional SEO team check before launch.
With redirects loaded, run one final pass on staging before anything goes live.
Run a Pre-Launch QA Pass on Your Webflow Staging Site
Your Webflow staging site is the webflow.io copy of the rebuild, open to your team and closed to search engines. It’s your last chance to fix mistakes privately.
Pre-Launch QA Checklist
- Crawl the webflow.io staging site with your SEO crawler, configured to ignore the staging robots.txt block, and compare the results with your original audit. Owner: SEO
- Confirm every Tier 1 page exists at its mapped URL with its title, meta description, H1, and alt text intact. Owner: SEO
- Check that no page carries an accidental noindex tag and that canonical tags point to production URLs. Owner: SEO
- Test forms, tracking scripts, and key conversion paths across desktop, tablet, and mobile. Owner: Developer
- Run lab page speed tests on your main templates to catch oversized images or heavy scripts before launch. Owner: Developer
- Freeze content changes on the Squarespace site so the old site and the rebuild don’t drift apart. Owner: Marketing lead
Our new website SEO checklist covers broader launch checks, from custom 404 pages to sitemap hygiene.
For marketing leads: assign one named sign-off owner. “Who approved launch?” should have a one-word answer.
When QA passes, you’re ready to switch the domain.
Execute the DNS Cutover With Minimal Indexing Disruption
DNS is the system that connects your domain to the servers hosting your site, and the cutover is the moment you point it at Webflow. Treat that moment as one variable: change where the domain points and nothing else.
- Time the cutover for a low-traffic window, away from campaign launches and seasonal peaks, as Google’s site-move guidance also recommends.
- Lower your domain’s TTL (how long DNS settings are cached) at least one full TTL period ahead so the change propagates quickly; Webflow’s DNS migration guide suggests the lowest available value, typically 30 seconds.
- Update DNS records wherever the domain’s DNS is managed, whether that’s Squarespace Domains or a third-party registrar. Use the exact records shown in Webflow’s Site settings, including the verification TXT record. Leave other records alone, from email to Google site verification; a Search Console property verified through DNS survives only if its record does.
- Verify HTTPS as soon as DNS points to Webflow, which issues the SSL certificate only after the records point to it, typically within minutes. Check beforehand for CAA records (DNS entries limiting which authorities can issue certificates) that could block issuance; they must allow both Let’s Encrypt and Google Trust Services.
- Verify uptime, redirects, page rendering, and forms the moment the cutover completes.
- Make no other changes during the cutover window: no content edits, no domain change, no registrar transfer.
Launch-Day Runbook
- T-minus 48 hours or more: Lower TTL; confirm the redirects are loaded and the QA sign-off is complete.
- T-minus 1 hour: Freeze content; notify stakeholders.
- T-0: Update DNS records; publish to the custom domain.
- T+15 minutes: Confirm HTTPS, the homepage, and Tier 1 pages.
- T+1 hour: Spot-test Tier 1 redirects; submit a test form; confirm analytics is firing.
- T+24 hours: Run a full crawl of old URLs; check Search Console; restore the normal TTL once stable.
Keep the Squarespace subscription active until every file is re-hosted and the migration is verified. Skip Search Console’s Change of Address tool; it applies only to domain changes.
The domain is live on Webflow. The next few weeks decide whether rankings settle or slip, and the difference is how closely you watch.
Phase 4 — After Launch: Validate, Defend, and Grow Your Rankings
Post-launch work has two jobs: confirm that search engines see the new site correctly, and catch real problems while they’re still small.
Resubmit Your Sitemap and Reclaim Your Search Console Presence
Search Console is where Google reports how it’s crawling and indexing the new site. The first 48 hours are about prompting a recrawl and catching errors while they’re still few.
- Submit your Webflow XML sitemap in Google Search Console immediately after the cutover.
- Request indexing for Tier 1 pages with the URL Inspection tool, within Search Console’s daily limits.
- Confirm Search Console is reading the Webflow sitemap, and remove any old Squarespace sitemap submissions that no longer resolve.
- Monitor the Page indexing report daily for the first two weeks to catch and resolve indexing errors fast.
- Confirm Search Console verification and data collection continued uninterrupted through the cutover.
On the same domain, the sitemap usually keeps its /sitemap.xml address, so this step is often a resubmission rather than a new submission.
Indexing tells you whether Google can see the new site. Performance data tells you whether it trusts it.
Monitor Rankings, Traffic, and Crawl Health Post-Migration
Why did traffic drop after migrating? A gentle sitewide dip usually means search engines are still swapping old URLs for new ones; most pages on a small to medium site can take a few weeks to move. A drop concentrated on specific pages usually means something specific broke.
- Compare Search Console clicks and impressions against the baseline week over week, page by page for Tier 1.
- Use Google Analytics to spot pages with unexpected traffic loss, then cross-reference them with the mapping sheet and redirect list.
- Run a full post-launch crawl, including a list-mode crawl that checks every old Squarespace URL from your mapping sheet, to catch broken links, missing metadata, and redirect chains. Log each result in the sheet’s QA Result column.
- Watch for soft 404s, 404 spikes, and crawl anomalies in the days after the cutover.
- Distinguish expected settling from genuine SEO damage before taking action.
Suggested Monitoring Cadence
| Timeframe | What to Check | Who Checks It |
| Day 1 | HTTPS, Tier 1 pages and redirects, forms, analytics | SEO with developer |
| Weeks 1–2 (daily) | Page indexing report, 404s, sitemap status, Tier 1 clicks vs. baseline | SEO |
| Weeks 3–4 (weekly) | Page-level clicks and impressions vs. baseline; full crawl of old URLs | SEO with marketing lead |
| Months 2–3 (weekly) | Sitewide trend vs. seasonal baseline, begin Tier 1 metadata improvements once stable | Marketing lead with SEO |
Settling or Damage?
| What You See | Likely Cause | What to Do |
| A modest sitewide dip while Tier 1 positions hold | Normal recrawl settling | Keep monitoring against the baseline |
| One page loses most of its traffic | A missing or incorrect redirect, or lost metadata | Check the mapping sheet, fix the redirect or metadata, request indexing |
| Old URLs still appear in search results | Google hasn’t recrawled them yet | Confirm the 301s work, leave the redirects in place |
| A spike in 404s in the Page indexing report | Unmapped URLs (often files, filters, or legacy links) | Add redirects and update the mapping sheet |
| Growing “Crawled – currently not indexed” counts | Thin or low-value CMS pages | Noindex or disable thin template pages |
| “Duplicate, Google chose different canonical than user” statuses | Canonical conflicts | Review canonicals against the mapping sheet |
| Staging URLs appear in search | Staging indexing left on | Turn off Staging indexing and republish |
If more than one of the damage patterns above matches what you’re seeing, contact Web Upon and our team can trace the cause.
Once the numbers stabilize, the migration stops being a risk and becomes an advantage.
Leverage Webflow’s SEO Advantages to Grow Beyond Your Squarespace Ceiling
Once rankings hold steady, the control you gained in the rebuild becomes the reason you moved.
- Use Webflow’s hosting and clean code as a foundation for stronger Core Web Vitals (Google’s measures of how fast, responsive, and stable a page feels), then measure and optimize images, fonts, interactions, and third-party scripts. A common first win is getting the hero image discovered early, never lazy-loaded, and sensibly compressed, since Google’s field data shows download time is rarely the main delay; site speed optimization turns the rest of that potential into measured progress.
- Use Webflow’s granular SEO control for optimizations Squarespace limited, such as per-item indexing controls (a paid-plan feature) that keep thin items out of the index, and title templates that combine each item’s name with its category.
- Build out schema markup, structured data, and dynamic meta tags across CMS collections by binding them to fields, such as Article markup that pulls each post’s headline, image, and publish date automatically.
- Build internal linking at scale with reference fields, such as related posts on every article or case studies listed on the service pages they prove.
- Once rankings stabilize, fix the pre-existing issues your audit flagged, such as duplicate titles or thin tag pages, rather than replicating what existed before.
- Document every SEO configuration decision in an internal migration guide, so the next redesign starts from your notes instead of from zero.
A few questions come up in most migrations. Here are the quick answers.
Common Squarespace to Webflow Migration Questions
How long should I keep 301 redirects in place?
At least a year, and indefinitely for backlinked URLs. Google recommends keeping redirects as long as possible, generally at least one year, so it can recrawl old URLs and reassign their signals.For URLs other sites still link to, a permanent redirect costs little and protects referral traffic.
Can I keep my exact Squarespace URLs in Webflow?
Usually for static pages, and only sometimes for CMS content. Static pages can keep identical paths, including nested folders. CMS items keep their exact URLs only when they fit Webflow’s /collection-url/item-slug pattern, and everything else gets a mapped redirect.
Do I need to keep my Squarespace subscription after launch?
Yes, until the migration is verified. Squarespace has no bulk image export, so keep the site active until every image and file is re-hosted in Webflow and nothing on the new site still loads from Squarespace’s servers.
Should I change my domain or URL structure at the same time?
Avoid changing the domain during the move, because it stacks a second migration on top of the first. Change individual URLs only where the gain is clear, and map and redirect each one. If a domain change is unavoidable, plan it as its own project with a dedicated domain migration SEO process.
How long does it take rankings to settle after a migration?
It depends on your site’s size, how often search engines crawl it, and how complete your redirects are. Google’s site-move guidance says a small to medium-sized site can take a few weeks for most pages to move, and larger sites take longer. Google processes the move URL by URL, and the pace depends mainly on how many URLs you have and how quickly your server responds.
Is Webflow better than Squarespace for SEO?
Neither platform ranks a site on its own. Webflow offers more granular control over URLs, CMS fields, metadata templates, and schema, which matters once a site outgrows its template. Rankings still depend on how a site is built, written, and maintained, so the advantage is capacity rather than a guarantee.
Your Migration Checklist and Next Steps
The move from Squarespace to Webflow protects your rankings when you treat it as a rebuild, not a transfer: let the URL map govern every decision, rebuild every signal it lists, and change only one thing on launch day.
The 10-Step Migration Checklist
- Crawl the Squarespace site and export a Search Console and analytics baseline.
- Sort every URL into priority tiers.
- Build the URL map, including hosted files and legacy redirects.
- Design your CMS collections and set every slug by hand.
- Rebuild titles, descriptions, headings, alt text, and internal links from the audit.
- Configure the sitemap, canonical, default domain, Staging indexing, and schema.
- Load and validate every redirect before launch.
- Complete a staging QA pass with a named sign-off owner.
- Lower TTL, then cut over DNS as a single change.
- Resubmit the sitemap and monitor page by page against the baseline.
Contact our team and we will walk through your site with you. Web Upon can run the audit, build the URL map, and staff launch-day QA, so you get Webflow’s upside without carrying the migration risk alone.
The payoff is the one you moved for: a site with room to grow as fast as your work does, your search equity intact, and a QA column that reads clean from the first row to the last.