The new site goes live on a Thursday. By Monday, organic sessions are down 30 percent and nobody in the room can say why. That is the picture most marketing directors carry into a WordPress to Webflow migration.
Here is the part that defuses it. Your rankings do not live in WordPress. They live in three places: your URLs, your page-level metadata, and the backlinks pointing at both. Preserve those three and the platform underneath is interchangeable. Getting WordPress to Webflow SEO right is mostly a matter of not losing track of things you already have.
Key Takeaways
- Keep URLs identical wherever Collections allow it, and map every other changed URL to a single-hop 301, specific rules before wildcards.
- Move metadata verbatim, then optimize. Change one thing at a time.
- Rebuild schema natively in Webflow’s Schema markup field; FAQ and HowTo rich results no longer appear in Google.
- Validate on day one and monitor for 90 days, keeping redirects live for at least a year.
- Expect two to four weeks of volatility. Loss past 30 days traces to redirects, metadata, internal links, or page speed.
What a Successful WordPress to Webflow SEO Migration Looks Like
Before a single step, know what done looks like. A successful migration produces these outcomes:
- Zero orphaned high-value URLs. Every page that earns traffic or links either keeps its URL or has a verified 301.
- One-hop 301s for every changed URL, with no chains inherited from the old site.
- Metadata migrated verbatim, field for field, before anyone optimizes anything.
- Schema validated on staging, not patched after launch.
- Core Web Vitals improved and documented against a pre-migration baseline.
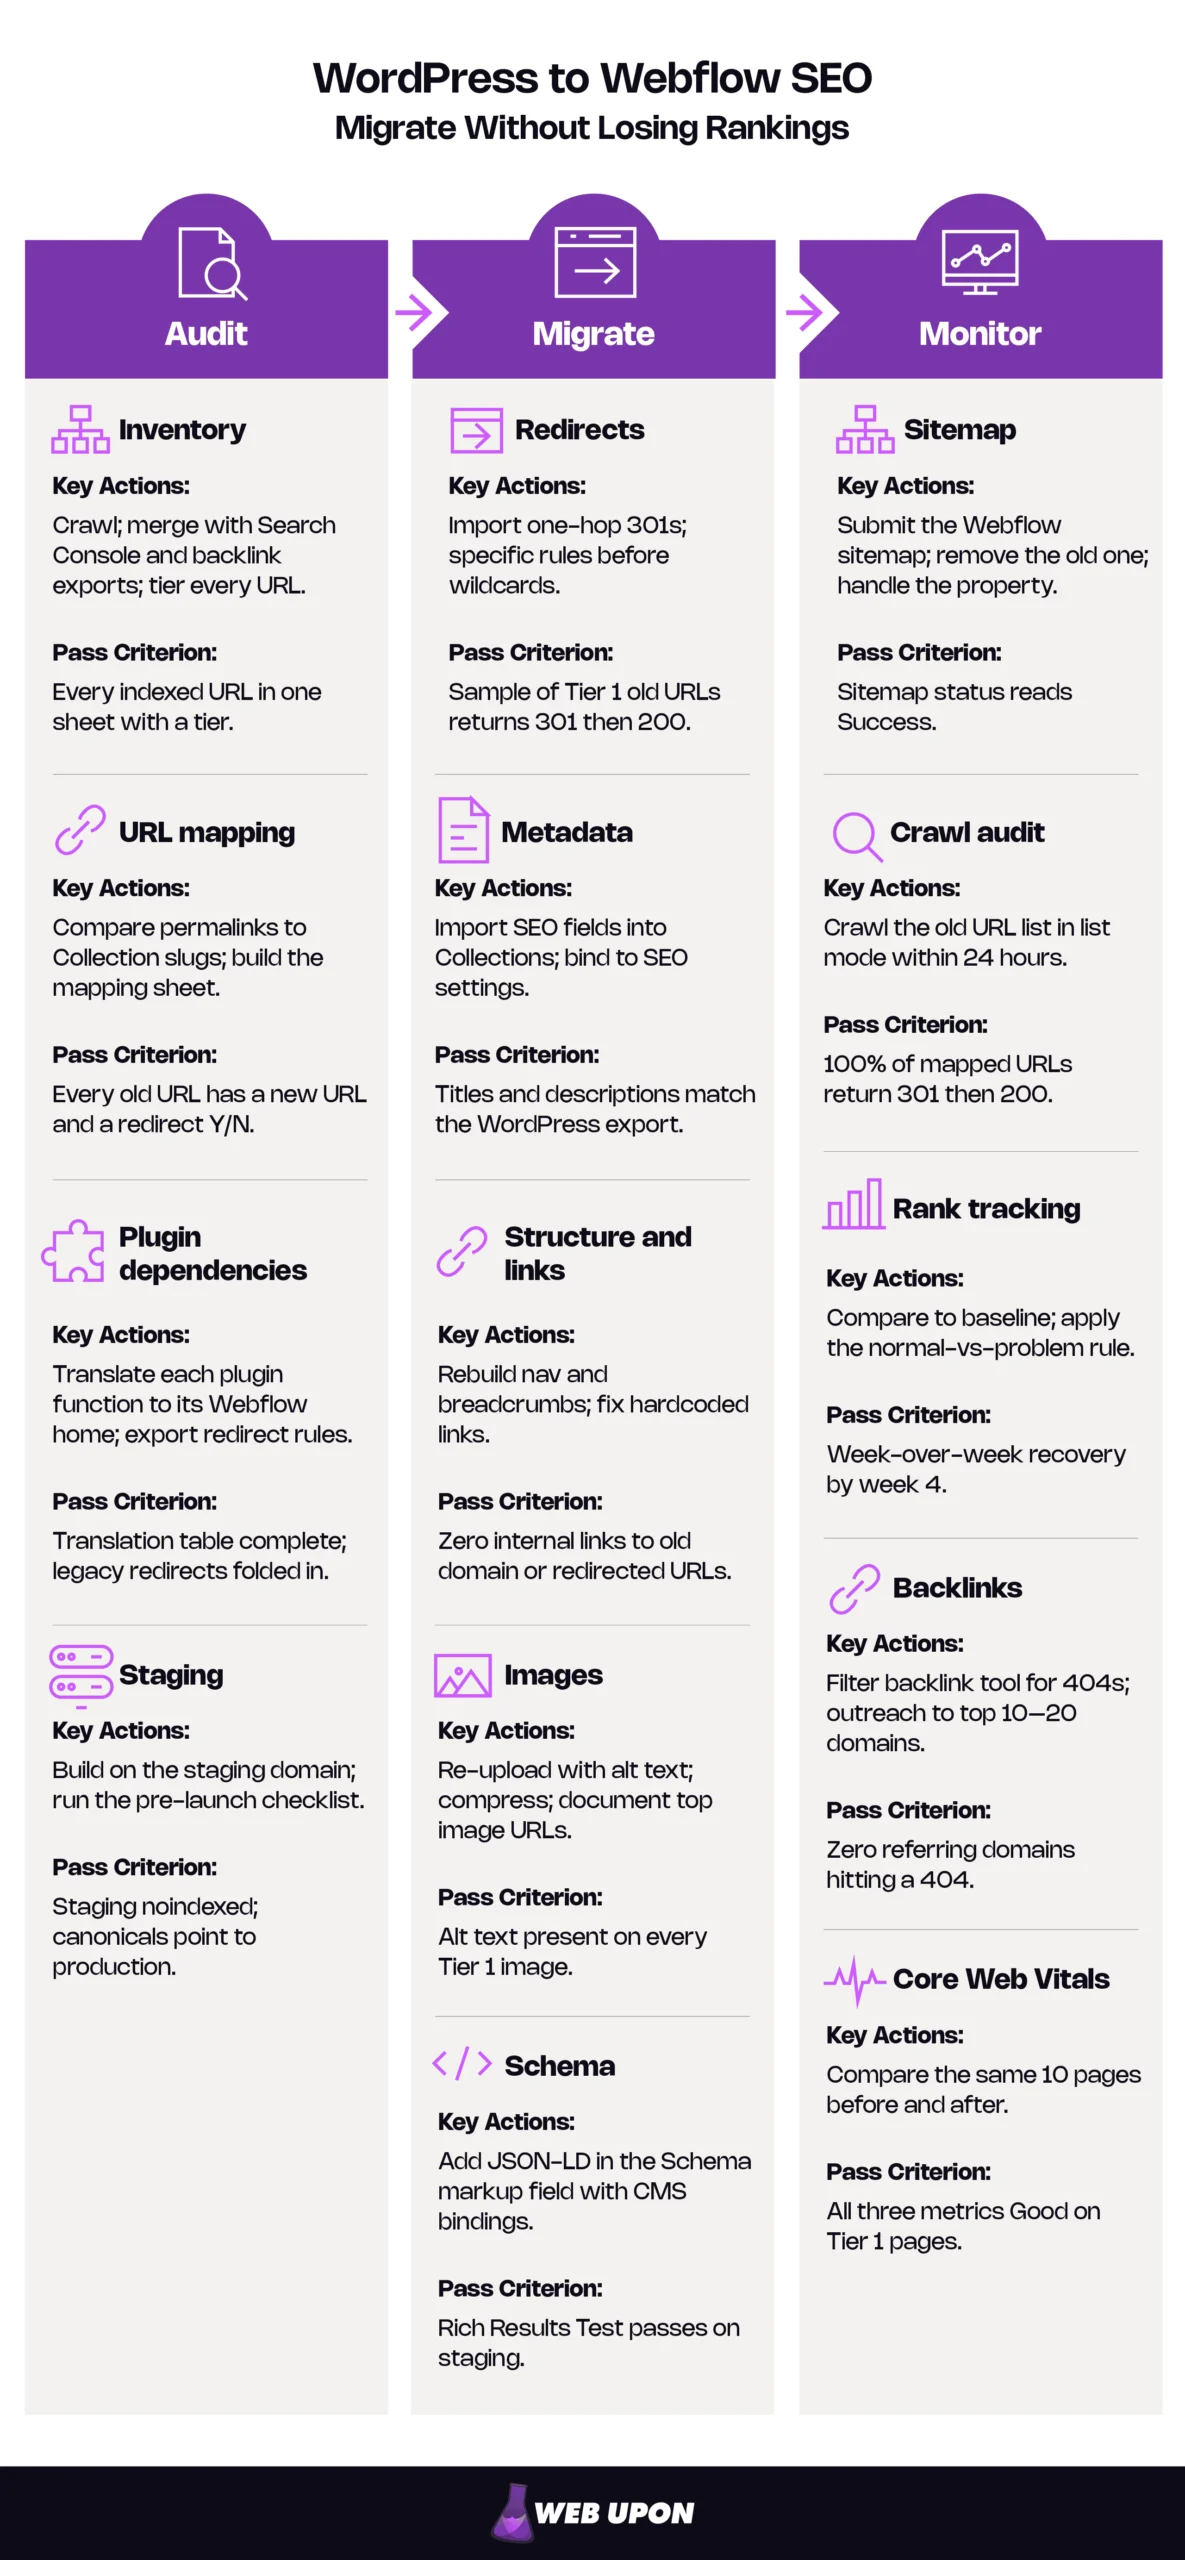
WordPress-to-Webflow SEO Migration Checklist
| Phase | Key Actions | Owner | Pass Criterion |
| Inventory | Crawl; merge with Search Console and backlink exports; tier every URL. | Dev crawls / Marketing tiers | Every indexed URL in one sheet with a tier. |
| URL mapping | Compare permalinks to Collection slugs; build the mapping sheet. | Dev | Every old URL has a new URL and a redirect Y/N. |
| Plugin dependencies | Translate each plugin function to its Webflow home; export redirect rules. | Dev | Translation table complete; legacy redirects folded in. |
| Staging | Build on the staging domain; run the pre-launch checklist. | Dev | Staging noindexed; canonicals point to production. |
| Redirects | Import one-hop 301s; specific rules before wildcards. | Dev | Sample of Tier 1 old URLs returns 301 then 200. |
| Metadata | Import SEO fields into Collections; bind to SEO settings. | Dev / Marketing QA | Titles and descriptions match the WordPress export. |
| Structure and links | Rebuild nav and breadcrumbs; fix hardcoded links. | Dev | Zero internal links to old domain or redirected URLs. |
| Images | Re-upload with alt text; compress; document top image URLs. | Dev / Marketing | Alt text present on every Tier 1 image. |
| Schema | Add JSON-LD in the Schema markup field with CMS bindings. | Dev | Rich Results Test passes on staging. |
| Sitemap | Submit the Webflow sitemap; remove the old one; handle the property. | Dev | Sitemap status reads Success. |
| Crawl audit | Crawl the old URL list in list mode within 24 hours. | Dev | 100% of mapped URLs return 301 then 200. |
| Rank tracking | Compare to baseline; apply the normal-vs-problem rule. | Marketing | Week-over-week recovery by week 4. |
| Backlinks | Filter backlink tool for 404s; outreach to top 10–20 domains. | Marketing | Zero referring domains hitting a 404. |
| Core Web Vitals | Compare the same 10 pages before and after. | Dev / Marketing | All three metrics Good on Tier 1 pages. |
Pre-Migration SEO Audit: Building the Foundation Before You Touch a Single URL
Everything that matters starts before any URL is touched. Most post-launch ranking loss is not caused at launch. It is caused here, by the tag archive nobody knew was indexed or the redirect plugin whose rules never got exported. A pre-migration SEO audit has four steps: inventory, mapping, plugin dependencies, and staging.
Conducting a Full Content and URL Inventory Before Migration Begins
Start with a crawl. Run a crawler such as Screaming Frog or Ahrefs across the entire WordPress site and export every indexed URL: blog posts, landing pages, category pages, and media files. Feed the crawler your XML sitemap and your Search Console URL list as seeds, not just the homepage. A crawl that starts at the homepage only finds pages that other pages link to, and the orphaned post that still ranks is exactly the one it misses.
One crawl is not an inventory. An inventory is three datasets joined on URL:
- The crawler export, which tells you what exists.
- A Search Console Performance export (Pages tab, longest date range available), which tells you what earns.
- A backlink tool export of referring domains per URL, which tells you what other sites depend on.
Any URL in the second or third dataset but not the first is an orphan Google still values.
Now identify your highest-value pages by organic traffic, backlink count, and keyword rankings. These are your non-negotiables during migration. Use a tiering rule and write it down. A workable one: Tier 1 is any URL in the top 20 percent of clicks, or with three or more referring domains, or ranking in the top ten for a target keyword. Tier 2 is everything else with clicks or links. Tier 3 has neither.
Flag orphaned pages, duplicate content, and low-value URLs that can be intentionally excluded or consolidated in the rebuild. WordPress creates more of these than most teams realize: tag archives, author archives, date archives, attachment pages (one per uploaded image, and often indexed), paginated archives, and feed URLs. Decide each type’s fate now.
| URL Tier | Definition | Migration Treatment |
| Tier 1 | Top 20% of clicks, or 3+ referring domains, or top-10 ranking | Migrate 1:1, URL unchanged wherever possible |
| Tier 2 | Any clicks or any links below Tier 1 thresholds | Migrate or consolidate into a stronger parent with a 301 |
| Tier 3 | Zero clicks, zero links | Retire, let it 404 |
| Archives with any inbound link | Tag, author, date, attachment pages | Retire with a 301 to the closest topical parent |
Webflow can’t serve a 410; a deleted page returns a 404, and 410 support is still an open Webflow Wishlist request at this time. That costs nothing: Google’s crawlers treat every 4xx except 429 the same. Retire thin archives with nothing pointing at them.
Finally, document all existing metadata for every page before any content transfer begins: meta titles, meta descriptions, canonical tags, and Open Graph fields. The crawler export already contains most of this. Keep it as columns in the same sheet.
Marketing owns: tiering.
Dev owns: the crawl and the metadata export.
Mapping Your Existing URL Structure to Webflow’s CMS Architecture
Open two windows. In one, your WordPress permalink structure: /blog/post-name, or /category/post-name, or a bare /post-name. In the other, Webflow’s Collection slug convention: /collection-slug/item-slug, optionally behind a static parent folder. Compare them now to surface structural conflicts before the build.
That structure is the hard constraint. Every Collection item lives under its Collection’s slug, and a Collection template can sit inside a parent folder, so /content/blog/post-name is possible. No Collection can place items at the root or vary a segment per item, such as a per-post category. This gives you two strategic choices:
- Keep the URLs. Name the Collection so its slug matches your WordPress path prefix. A Collection slugged blog produces /blog/post-name, and every post URL stays identical. No redirect, no latency, nothing to mis-map.
- Accept new URLs and redirect. Necessary for root-level posts and per-post category paths, which no Collection can reproduce.
Choose the first option everywhere it is available. An unchanged URL is the only URL that cannot break. The SEO impact of changing URLs is real even when redirects are perfect, because every hop adds a fraction of latency and a fraction of risk.
| WordPress URL Pattern | Webflow Equivalent / Required Action |
| /blog/post-name | Collection slugged blog; URL unchanged. |
| /post-name (root-level posts) | Cannot reproduce; redirect to /blog/post-name. |
| /blog/category/post-name | Cannot reproduce when the category varies per post; redirect to /blog/post-name. |
| /category/topic/ | Build a Category Collection at /topics/topic; redirect. |
| /tag/keyword/ | Usually retire; 301 to closest parent or let it 404. |
| /blog/post-name/ (trailing slash) | Verify on staging that both /path and /path/ resolve in one hop. |
| /?p=123 | Redirect with escaped query syntax (see redirects section). |
Now create the master URL mapping spreadsheet that pairs every old WordPress URL with its exact Webflow destination before a single page goes live. It serves as both your 301 redirect mapping and your validation log, so the columns matter.
Sample URL mapping spreadsheet pairing old WordPress URLs with Webflow destinations:
| Old URL | New URL | Redirect Needed | Tier | Referring Domains | Status Code Verified | Owner |
| /blog/webflow-migration-guide | /blog/webflow-migration-guide | N | 1 | 14 | Dev | |
| /webflow-vs-wordpress | /blog/webflow-vs-wordpress | Y | 1 | 22 | Dev | |
| /category/seo/ | /topics/seo | Y | 2 | 3 | Dev | |
| /tag/redirects/ | /topics/seo | Y | 3 | 0 | Dev | |
| /2023/04/old-announcement/ | (retired: 404) | N | 3 | 0 | Marketing |
Sort the sheet by referring domains, descending. URLs with significant link equity from external backlinks go to the top of the redirect work, because those are the ones where a mistake costs referral authority you cannot easily rebuild. Watch for four conflicts that surface here: category pages with no Webflow equivalent, trailing-slash differences, mixed-case or special-character slugs (Webflow lowercases page slugs and strips special characters), and query-string URLs.
Evaluating Your WordPress Plugin SEO Dependencies
Somewhere in your WordPress admin is a plugin doing SEO work that nobody has looked at in two years. Audit which functions are currently handled by plugins like Yoast SEO, Rank Math, or All in One SEO. Schema markup, XML sitemaps, redirects, and canonical tags all need native Webflow equivalents, and the plugin does not come with you.
Webflow handles the fundamentals natively. Advanced structured data used to require custom code embeds. As of 2026, Webflow provides a dedicated Schema markup field in Page settings that accepts JSON-LD and binds to CMS fields, so most schema now lives there. What the developer needs is a translation table:
| Plugin Function | Native in Webflow? | Where in Webflow | Notes |
| SEO title and meta description | Yes | Pages panel > Page settings > SEO settings | Dynamic fields on Collection pages |
| XML sitemap | Yes | Site settings > SEO, auto-generated | Serves at /sitemap.xml |
| 301 redirects | Yes | Site settings > Publishing > 301 redirects | CSV import and export |
| Canonical tags | Yes | Site settings > SEO > Global canonical tag URL; per-page override | Per-page override documented for static pages only |
| robots.txt | Yes | Site settings > SEO > Indexing | Once created, can be edited but not removed |
| noindex per page or item | Yes | Sitemap indexing toggle on pages and CMS items | Also removes from sitemap |
| Schema markup | Yes | Page settings > Schema markup | Or custom code, never both |
| Open Graph | Yes | Page settings, dynamic on Collection pages | Image picker shows JPG and PNG only |
| Breadcrumbs | No | Build as a component plus BreadcrumbList schema | Requires manual JSON-LD injection (Page Settings > Custom Code or Embed), schema must match visible trail exactly |
Then look past the SEO plugins to the ones with SEO side effects. Caching and CDN plugins disappear (Webflow’s hosting replaces them, which matters for your speed baseline). Image optimization plugins are replaced by Webflow’s own conversion tool. Breadcrumb plugins become a component. Redirect plugins are the dangerous one: every rule they hold is a live redirect that vanishes at cutover. Export every rule and fold each into the master mapping, resolving chains as you go. An old-A → old-B rule becomes old-A → new-B, one hop.
Document any custom robots.txt rules, noindex directives, or crawl budget configurations currently managed through plugins so they can be replicated natively. The Webflow SEO settings you need live in two places: per page in Page settings, and site-wide under Site settings > SEO.
Setting Up a Staging Environment to Test SEO Configurations
Every Webflow site ships with a staging domain at yoursite.webflow.io. Build and validate the entire site there before DNS changes, so live search visibility is untouched during development. Test all redirect rules, canonical tags, metadata fields, and sitemap generation on staging before cutover.
Keep Google out of it. In Site settings > SEO > Indexing, set Staging indexing to off and publish. Webflow then serves a subdomain-only robots.txt that disallows crawling, which prevents an incomplete duplicate of your site from being indexed. This setting requires a paid Site plan or paid Workspace, which you need for redirects anyway.
One leak catches teams: During the build, someone sets the global canonical to the webflow.io URL. At launch, every page then tells Google that the staging copy is the original. Canonical tags and Open Graph URLs must point to the production domain before you publish to it.
Run this checklist on staging the day before launch:
- Crawl the staging domain end to end. Zero 404s, zero pages missing a title or description.
- Confirm the staging robots.txt disallows crawling.
- Spot-check ten Tier 1 redirects. Redirects are relative to the root domain, so test /old-path on the staging host.
- Validate the sitemap: every Tier 1 URL present, no staging URLs.
- Confirm canonical tags self-reference the production domain.
- Confirm Open Graph URLs reference the production domain.
- Run the Rich Results Test on one page per template.
Web Upon runs the pre-migration SEO audit as a standalone engagement for teams that want a second set of eyes before the build begins.
Executing the Migration: Preserving Search Equity Through Every Technical Decision
The audit produced two artifacts: a mapping spreadsheet and a dependency list. This section turns both into a live Webflow site without leaking equity along the way. There are five build decisions in a WordPress to Webflow migration, and they arrive in this order: redirects, metadata, structure, images, schema.
Implementing a Bulletproof 301 Redirect Strategy
A 301 is a permanent redirect; it tells Google the page has moved for good and that its ranking signals should follow. Implement 301 redirects, not 302s, for every changed URL. A 302 says temporary, and Google may keep showing the old URL in its results, waiting for it to come back.
Use Webflow’s native redirect manager, found under Site settings > Publishing > 301 redirects, to load your mapping spreadsheet. Enter the old path and the redirect-to path, click Add redirect path, and publish. No third-party plugin is involved, which is the point. And you will not be entering 800 rows by hand: Webflow supports CSV import and export of redirects, so export the Old URL and New URL columns from the mapping sheet and import them directly.
Webflow 301 redirects come in two basic shapes, one-to-one and pattern, plus a few special cases:
| Redirect Type | Use When | Example |
| One-to-one | Tier 1 pages, any slug that changed | /webflow%-vs%-wordpress → /blog/webflow-vs-wordpress |
| Folder pattern | An entire archive maps predictably | /category/(.*) → /topics/%1 |
| Folder to single page | Retiring a whole archive to one parent | /tag/(.*) → /blog |
| Query string | Old ?p= or ?s= URLs | %?p%=123 → /blog/post-name |
| Domain-level | Changing domains | Connect both domains, set the new one as default |
Four things about the Webflow redirect manager are not obvious, and each one has broken a migration:
- Order matters. Webflow evaluates redirects in the order they were created, oldest first. Add your specific one-to-one rules before any wildcard, or the wildcard fires first and your Tier 1 redirects never run.
- Escape characters. In the old path, hyphens, question marks, equals signs, ampersands, underscores, parentheses, asterisks, plus signs, and percent signs must be escaped with a leading %. Hyphens are the one that catches most teams: /old-post is written /old%-post. Only the old path needs escaping, so escape the Old URL column before import.
- A live page blocks its redirect. A redirect will not fire for a path that still resolves to a published page or Collection item. Delete, draft, or re-slug the page first.
- Keep the count reasonable. There is no hard limit, but Webflow recommends 1,000 rules as a best-practice maximum because every rule ships in the site’s manifest file. Patterns are how you get there.
Prioritize fixing redirect chains. A redirect chain is a URL that redirects to a URL that redirects again; a redirect loop is a chain that circles back to its start. Googlebot follows up to 10 hops, but Google advises redirecting straight to the final destination. If a URL was already redirecting in WordPress, resolve the chain so the final Webflow URL receives a clean, single-hop 301.
Google’s own guidance on site moves with URL changes is to keep redirects live for as long as possible, generally at least a year. In practice, never remove them. Backlinks do not expire.
After launch, crawl the live Webflow site to verify every redirect resolves correctly and returns a 200 at the final destination. Broken chains silently drain ranking authority, and the method for catching them is in the post-migration section.
Never do this:
- No 302s, meta-refresh, or JavaScript redirects for permanent moves.
- No redirecting everything to the homepage. Google may treat it as a soft 404.
- No redirect loops.
- No chains inherited from WordPress.
Migrating and Normalizing SEO Metadata in Webflow CMS Collections
A blog post’s title tag is not part of the post in Webflow. It is a field. Build dedicated CMS Collection fields for SEO Title and Meta Description in every Collection, then bind them to Webflow’s native SEO settings panel: on the Collection page template, go to Pages panel > Page settings > SEO settings and click Add field. The same panel binds Open Graph title, description, and image, which are metadata too and travel with the post.
Getting the values in is a CSV job. Export posts from WordPress with the SEO fields included (SEO plugins export their title and description columns). Clean the sheet. In Webflow, open the Collection, click Import, and map each column to a field, creating fields during import where needed. Two details save you a bad afternoon. First, files are capped at 4 MB, so split large exports. Second, you must map the WordPress slug column to the Webflow slug field explicitly. Otherwise the CMS generates new slugs automatically, and your URLs will no longer match the mapping sheet. Get this import right, and most of your Webflow CMS SEO is already in place.
Hold the working ranges during transfer: 50 to 60 characters for meta titles, 150 to 160 for descriptions. They are conventions, not limits: Google truncates title links to fit the device width, and Webflow sets no limit on meta descriptions, so nothing enforces the range for you. Add a length formula in the spreadsheet before import and fix anything outside the range.
Migrate every existing metadata value exactly as it was before making any optimization changes. This is a rule, and here is the reason: Google’s site-move guidance is to change only one thing at a time. If you rewrite titles during the move, a ranking drop could be the migration or the rewrite, and you will never know which. Move verbatim, wait for the volatility window to close, then optimize with a clean baseline.
Replicate canonical tag configurations from WordPress, particularly for paginated content, filtered pages, or any URLs that previously required canonical consolidation. A canonical tag tells Google which URL is the original when several show the same content. In Webflow, the site-wide canonical is set under Site settings > SEO > Global canonical tag URL, and per-page overrides are documented for static pages only. List every URL that carried a non-self canonical in WordPress and decide whether it still exists at all.
| Metadata Field | WordPress Source | Webflow CMS Field | Target Length |
| SEO title | SEO plugin export | Plain text, bound to Title tag | 50–60 |
| Meta description | SEO plugin export | Plain text, bound to Meta description | 150–160 |
| Canonical URL | SEO plugin export | Global canonical, per-page override on static pages | n/a |
| OG title | SEO plugin export | Plain text, bound to OG title | Concise, no platform limit |
| OG description | SEO plugin export | Plain text, bound to OG description | Concise, no platform limit |
| OG image | Featured image | Image field (JPG/PNG recommended) | 1200×630, same size across the Collection |
| noindex | Plugin robots setting | Sitemap indexing toggle on the item | n/a |
Rebuilding Site Structure and Internal Linking in Webflow
Recreate the navigational hierarchy, breadcrumb structure, and internal linking patterns from WordPress. These are the crawl pathways Google used to discover and weight your content, and a rebuilt nav that drops a section changes how Google finds it. Google defines crawl budget as the set of URLs it can and wants to crawl, and its guidance, aimed mainly at million-page sites, warns that long redirect chains hurt crawling.
Audit all internal links in the migrated content and update hardcoded WordPress domain references to the new URLs. At scale, that is a four-step loop:
- Find-and-replace in the exported content before import: old domain to new, old path prefixes to new.
- Import.
- Crawl staging and filter the internal-link report for any URL containing the old domain, /wp-content/, an old path pattern, or any internal link whose target returns a 3xx.
- Fix at the source and re-crawl until the filter returns zero.
The last condition in step 3, internal links to 3xx targets, matters more than it looks. Every internal link should point to the final URL. A site whose own links route through its redirect table is paying redirect latency on every click and telling Google the redirected URL still matters.
Maintain logical content siloing by organizing Collections to reflect the topical clusters that drove organic visibility in WordPress. If the SEO category earned the rankings, an SEO Collection or a Category reference field keeps that cluster legible.
One caution on fidelity. Webflow rich text has no native table element; tables need custom code. Shortcodes will not render, and import may strip unsupported embed markup, so check anchor links and nested lists too. Spot-check your twenty longest posts after import. That is where structure most often breaks.
Optimizing Images and Media for Webflow’s Hosting Environment
Re-upload images with preserved or improved alt text. Do not trust a WordPress media library export to carry alt attributes intact; it often strips or garbles them. Carry alt text as a column in your CSV and map it to an alt field on the CMS image.
Two Webflow behaviors change the plan here. Webflow does not convert images automatically; it provides an image conversion tool in the Assets panel that converts JPG and PNG assets to WebP or AVIF on demand, replacing the originals. And responsive image variants, the srcset that serves a 500-pixel file to a phone, are only generated for images uploaded directly through the Assets panel or a CMS image field. Images imported via CSV or the API, and images inside rich text, do not get variants. For a blog migration, that is most of your images, and Webflow credits those variants with up to 10 times faster mobile loads. Compress and size them before import.
Your image URLs will change. Webflow serves uploaded assets from its global CDN rather than your domain, so everything under /wp-content/uploads/ gets a new address, and images ranking in Google Images or hotlinked by other sites lose that traffic. Prioritize by value: export the top image URLs from Search Console (Performance, search type Image) and re-embed those images on the same pages with the same file names and alt text.
The image checklist:
- Compress before upload; hero images under 200 KB.
- Use descriptive, hyphenated file names that say what the image shows.
- Carry alt text as a CSV column.
- Convert to WebP or AVIF after upload, but use WebP, not AVIF, for Open Graph images.
- Eager-load the one image above the fold; lazy-load the rest.
Configuring Schema Markup Without WordPress Plugins
Open Search Console’s Enhancements reports before you write a line of schema. They list which rich result types the site earns today. Migrate those first. Article, BreadcrumbList, and LocalBusiness are the common migration-critical types. Google stopped showing FAQ rich results on May 7, 2026, and dropped HowTo rich results in 2023, so neither is worth recreating for ranking purposes.
Webflow now has a native home for this. In the Pages panel, open a page’s settings and scroll to the Schema markup field. It accepts JSON-LD, outputs in the head, and works on Collection page templates, where you can bind CMS fields so Article schema populates per post without manual edits. Plain text, Image, Date, Link, and Number fields all bind; Reference, Multi-reference, and Multi-image fields do not. Custom code embeds still work if you already have them, but do not use both or you will emit duplicate structured data.
An illustrative Article snippet, with bound fields shown as placeholders:
{
“@context”: “https://schema.org”,
“@type”: “Article”,
“headline”: “{{Post Title}}”,
“datePublished”: “{{Published Date}}”,
“dateModified”: “{{Updated Date}}”,
“image”: “{{Featured Image}}”,
“author”: { “@type”: “Organization”, “name”: “Web Upon” },
“publisher”: {
“@type”: “Organization”,
“name”: “Web Upon”,
“logo”: { “@type”: “ImageObject”, “url”: “https://webupon.com/logo.png” }
}
}
Validate every implementation with Google’s Rich Results Test before the site goes live, one page per template, to confirm the structured data is parsed as JSON-LD schema and not just present.
| Schema Type | Where Implemented in Webflow | Validation Tool |
| Article / BlogPosting | Schema markup field on the blog Collection template, CMS fields bound | Rich Results Test |
| BreadcrumbList | Schema markup field, site-wide or per template | Rich Results Test |
| Organization / LocalBusiness | Schema markup field on the homepage | Rich Results Test |
| FAQPage | Schema markup field on the specific page, answers verbatim | Schema Markup Validator (no rich result since May 2026) |
Post-Migration SEO Recovery: Monitoring, Validating, and Protecting Your Rankings
Launch is the midpoint, not the finish line. The redirects are live and the sitemap is out; the next 90 days determine whether equity actually transferred. There are five monitoring tracks, and they run on this clock:
| Day 0 | Day 1 | Week 1–2 | Day 30 | Day 90 |
| DNS cutover; publish; staging indexing off; sitemap submitted. | List-mode crawl of old URLs; URL Inspection on Tier 1; Change of Address if the domain changed. | Daily Pages report; daily backlink 404 filter; first ranking comparison. | Decision point: run the four root-cause audits if loss persists. | CWV before-and-after; final report; redirects stay live. |
Submitting Your New Webflow Sitemap to Google Search Console
Webflow generates the sitemap for you at /sitemap.xml, provided it is enabled under Site settings > SEO. Submit it to Search Console the moment DNS propagation is confirmed. Then remove the old WordPress sitemap entry so Search Console reflects the new URL inventory. One nuance: leave the old sitemap file itself reachable for a few weeks if you can, so old URLs and their redirects stay discoverable.
Answer the property question before launch day. If the domain and protocol are unchanged, which is the common case, your existing Search Console property simply continues; nothing to re-verify. If the domain changes, verify the new property, keep the old one active, and run Settings > Change of Address from the old property. Search Console checks for 301s on a few pages before accepting the request. Change of Address is domain-level only; it does nothing for URL restructures on the same domain. As of June 2026, Google asks you to run it for every verified variant of the old domain, www and non-www alike. That covers the property side of a Search Console site migration.
Monitor the Pages report, under Indexing, daily for the first two weeks. It was called Coverage; it does the same job. Watch for indexing errors, soft 404s, and excluded pages that should be indexed. Submit the sitemap to Bing Webmaster Tools in the same sitting.
The sitemap sequence:
- Confirm DNS resolves and Staging indexing is off.
- Confirm /sitemap.xml renders on the production domain.
- Submit it in Search Console under Sitemaps.
- Remove the old sitemap entry.
- Check Indexing > Pages daily for 14 days.
Auditing Crawlability and Indexing After DNS Cutover
This is the single most important validation in the migration, and on a typical site it takes about twenty minutes.
Take the Old URL column from the mapping spreadsheet. Within 24 hours of launch, run your crawler in list mode against that list. Not a site crawl; a list crawl. For every row, confirm three things: the old URL returns a 301, the redirect target equals the New URL column, and the target returns a 200. Then filter for anything that fails. A 404 on the old URL is a missing redirect, unless the row is retired. A 302 is the wrong type. A 200 on the old URL means the page still exists and the redirect never fired. More than one hop is a chain. A 404 on the target means you mapped to a page that was never built. Paste the results into the Status Code Verified column, and the mapping sheet becomes your proof.
Then run a normal site crawl of the new domain to catch pages returning unexpected status codes, missing metadata, or broken redirect chains, and confirm every page carries a self-referencing canonical on the production domain.
Verify robots.txt. Fetch it on the production domain and confirm that the staging disallow is gone and that no critical page template is blocked from crawling.
On day one, open URL Inspection in Search Console for each Tier 1 URL and click Request Indexing. Google caps individual requests with a quota and points larger batches to the sitemap, so use it for Tier 1 only. Over the first 30 days, cross-reference your URL inventory against the Pages report to confirm high-priority pages are being discovered and indexed.
| Check | Tool | Pass Criterion | Fix If Failed |
| Old URLs redirect | Crawler, list mode | 100% return 301 | Add missing rows to redirect manager. |
| Targets resolve | Crawler, list mode | 100% return 200 | Build or re-map the missing page. |
| No chains | Crawler, list mode | Exactly one hop | Point the old URL at the final destination. |
| Production robots.txt | Browser | No staging disallow, templates allowed | Edit rules in Site settings > SEO > Indexing. |
| Canonicals | Site crawl | Self-referencing, production domain | Fix global canonical in Site settings. |
| Tier 1 indexed | Search Console, URL Inspection | Indexed within 14 days | Request indexing; check noindex toggle. |
Tracking Ranking Fluctuations and Diagnosing Traffic Loss
You cannot measure a drop without a floor. Establish the rank tracking baseline at least two weeks before migration by exporting position data from Search Console and your rank tracking tool. Export the full Performance report (queries and pages, longest date range available). Top keywords alone will not tell you which section moved.
Expect two to four weeks of fluctuation as Google recrawls and reprocesses the site; Google’s estimate is a few weeks for a small or medium site, longer for large ones. The developer’s job is to separate normal volatility from structural error, and the rule is simple enough. Normal volatility is broad, shallow, and recovering week over week. A structural error is loss concentrated in one section or one template, loss on Tier 1 pages specifically, or loss that widens after week two.
If significant loss persists beyond 30 days, audit the four most common root causes in this order, fastest check first (times are typical for a mid-size site):
- Redirect accuracy. Re-run the list-mode crawl. Twenty minutes.
- Metadata completeness. Crawl for missing or duplicated titles and descriptions. Twenty minutes.
- Internal link integrity. Crawl for internal links to 3xx and 4xx targets. An hour.
- Page speed. Run PageSpeed Insights on the affected template and compare to baseline.
| Symptom | Likely Cause | First Check |
| Whole-site shallow dip, improving weekly | Normal reprocessing | Wait, compare week over week |
| One section down | Missing pattern redirect or Collection prefix mismatch | List crawl filtered to that path |
| Tier 1 pages down | Wrong one-to-one mapping or noindex toggled | URL Inspection |
| Loss widening after week 2 | Chains, or internal links pointing at redirects | Internal link crawl |
| Template-wide drop | Missing metadata binding or canonical | Site crawl grouped by template |
If the four audits do not explain the loss, that is the point to bring in Web Upon’s professional SEO team.
Protecting Backlink Equity and Monitoring External Link Health
Link equity is the ranking value a page receives from the sites linking to it, and after a migration it only arrives if the link resolves. Use a backlink tool such as Ahrefs or SEMrush to monitor the profile post-migration. Most such tools have a broken-backlinks style report: external links pointing at URLs on your domain that now return a 404. Filter for the new domain, run it on day one and weekly through day 90, and treat every hit as a missed redirect. Add it to the mapping sheet and the redirect manager the same day.
Reach out to your top 10 to 20 referring domains by authority and ask them to update the link from the old URL to the canonical Webflow URL. That removes the redirect dependency for the links that matter most. Do not attempt mass outreach; it rarely works and it annoys the sites you need.
Make Search Console’s Links report a permanent fixture. It shows your top linked pages by external links. An old URL appearing there at day 90 with a redirect in place is working as designed. An old URL appearing there without one is a gap you just found.
The monitoring cadence:
- Day 1 and weekly: broken-backlinks report, filtered to the new domain.
- Same day: add every 404 hit to the redirect manager.
- Week 1: outreach to top 10–20 referring domains.
- Monthly: review the Search Console Links report.
Validating Page Speed and Core Web Vitals on Webflow
Before launch, open Google PageSpeed Insights and run your ten highest-traffic pages. Record the field data and the lab scores. That baseline is what makes the change measurable. A sense that the new site feels faster is not a number a marketing director can put in a deck. The same ten pages at day 30 and day 90 are.
Core Web Vitals are three metrics measured on real visitors. Largest Contentful Paint is how long the biggest visible element takes to render; Interaction to Next Paint is how quickly the page responds to a tap or click; Cumulative Layout Shift is how much the layout jumps while loading. Monitor them in Search Console’s Core Web Vitals report over the 90 days after launch, and know what you are reading. Field data from real visitors is what Google’s ranking systems use; lab scores are diagnostic. The report reflects the last 28 days of field data, so a day-one field reading is still describing WordPress. Webflow Core Web Vitals problems, when they appear, are usually self-inflicted:
- Uncompressed hero images, which are the LCP element on most pages.
- Excessive interactions and animations firing on load.
- Third-party scripts pasted into custom code that block the main thread and inflate INP.
| Metric | Good Threshold | Where to Check |
| Largest Contentful Paint (LCP) | 2.5 s or less | PageSpeed Insights, Search Console > Core Web Vitals |
| Interaction to Next Paint (INP) | 200 ms or less | Search Console > Core Web Vitals (field data only) |
| Cumulative Layout Shift (CLS) | 0.1 or less | PageSpeed Insights, Search Console > Core Web Vitals |
Migrate to Webflow Without Trading Away Your Rankings
The whole of WordPress to Webflow SEO comes down to preserving your URLs, your metadata, and your links, and the platform change is safe. You can migrate WordPress to Webflow without losing SEO because nothing that earned the rankings was ever WordPress’s to begin with.
The audit phase documents everything Google currently values, and its non-negotiable is to inventory everything. The build phase turns that inventory into a live site, and its non-negotiables are one-hop 301s and verbatim metadata. The recovery phase proves the transfer worked, and its non-negotiable is to validate on day one and monitor for 90 days.
The payoff on the other side: fewer plugins, fewer patches, speed you can prove, and rankings positioned to hold or grow. Do the work in that order, and the Monday after launch is just another Monday.
Three things to do this week:
- Run the pre-migration audit and tier your URLs.
- Build the master mapping spreadsheet.
- Schedule the launch with the 90-day monitoring timeline beside it.
If you want the migration done with search equity protected at every step, contact Web Upon.