The request arrives on a Thursday. Marketing needs a landing page live by Monday, and getting it there requires a developer, a pull request, and a deploy. You built the React and Node stack because it was the right call at the time, and it has quietly become the reason nobody can publish anything without you.
The obvious fix is to migrate React/Node to WordPress.
Should you go headless or monolithic?
Monolithic if your site is primarily content — marketing pages, blog, resources, landing pages. It ships fully rendered HTML by default, which removes an entire category of crawlability risk, and it is the faster, cheaper, lower-risk migration.
Headless if your React or Next.js frontend delivers genuine application functionality — dashboards, configurators, logged-in experiences — that cannot be affordably rebuilt, and your team has the capacity to maintain a decoupled stack. Headless is SEO-safe only with Static Site Generation, Server-Side Rendering, or Incremental Static Regeneration.
Go monolithic unless application functionality makes it impossible.
| Your situation | Recommended architecture | Why |
| Content-only marketing site | Monolithic | Nothing in your stack needs a decoupled frontend. You are paying maintenance cost for zero return. |
| Content site with a few interactive tools | Monolithic | Rebuild the tools as embedded components or keep them on a subdomain. Do not decouple an entire site for three calculators. |
| Genuine web application with a marketing layer | Headless, or split | The application stays where it is. The question is only whether marketing pages live in the same frontend or a separate monolithic install. |
| High-volume publisher | Monolithic | Editorial velocity and template consistency matter more than frontend flexibility, and the caching story is simpler at scale. |
| Small team, no dedicated frontend engineer | Monolithic | Headless requires two deployment pipelines and someone who can debug both. If that person leaves, the site freezes. |
Will the migration destroy your rankings?
Not if URLs, redirects, metadata, and rendering are handled deliberately. This guide walks through the React/Node to WordPress migration steps and SEO tips to protect your rankings by preserving URLs, metadata, and site speed.
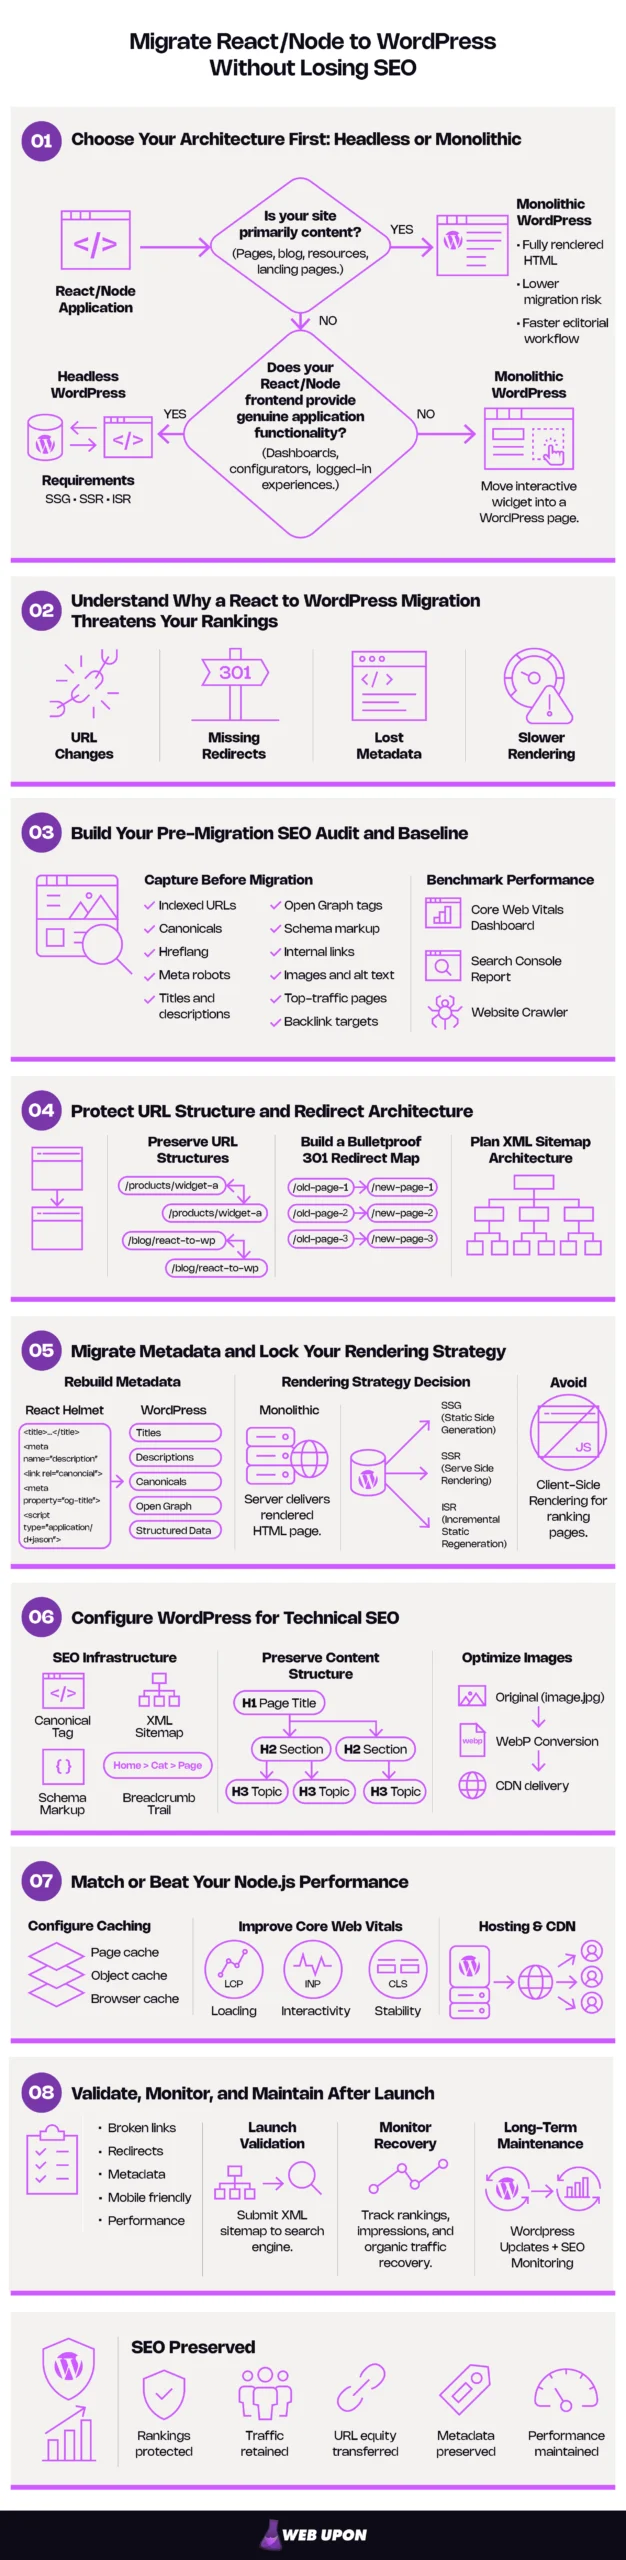
1. Choose Your Architecture First: Headless or Monolithic WordPress
Every tactic in this guide depends on a decision you make before any of them apply. Headless and monolithic produce different rendering behavior, different metadata plumbing, different redirect logic, and a different ongoing maintenance bill.
Make this choice on the shape of your site, not on the appeal of the architecture. The most common expensive mistake in this category is a team choosing headless because it preserves the frontend they already know, then discovering they have kept every operational burden they were trying to escape and added a second system underneath it.
Monolithic WordPress
Monolithic WordPress serves fully rendered HTML by default. Your React application, in its current form, almost certainly does not, and that difference is the whole crawlability argument in one line.
That argument carries more weight than it did two years ago. Googlebot renders JavaScript competently, if on a delay, so for a long time client-side rendering was a manageable inefficiency rather than a hard barrier. The retrieval crawlers behind AI answer surfaces mostly do not execute JavaScript at all: a Vercel and MERJ server-log analysis found none of the major AI crawlers rendering it, with ChatGPT’s and Claude’s crawlers fetching JavaScript files in 11.50% and 23.84% of requests respectively and never running them. Mostly is load-bearing — Gemini is the exception, inheriting Googlebot’s rendering infrastructure. Content that only exists after hydration is invisible to the rest, which means shipping HTML has stopped being a Googlebot accommodation and become the baseline for every automated reader of your site.
Against that, weigh the honest trade: monolithic WordPress gives you operational simplicity, and a well-built headless setup with static generation has a higher performance ceiling. Most content sites never reach that ceiling. Teams already exhausted by technical debt should be suspicious of any architecture whose main advantage is available only to teams with spare engineering capacity.
Here is a test you can run on your own site in under five minutes.
- What share of your indexed URLs are content pages rather than application screens? Above roughly 80%, monolithic.
- Does anything behind a login need to rank? If not, your application layer does not need WordPress at all — it can stay exactly where it is, on a subdomain.
- How many engineers can deploy your frontend unaided today? Fewer than two is an argument against headless regardless of technical merit.
- How often does marketing need a page shape that does not already exist? High frequency favors monolithic, because the block editor absorbs that demand without a deploy.
If you are weighing this against a longer-term program, our WordPress SEO strategy work starts from the same decision.
Headless WordPress
Headless WordPress means running WordPress as a backend content system with a decoupled React or Next.js frontend. You keep your JavaScript frontend and gain WordPress’s editorial infrastructure — and you reintroduce every rendering question you were hoping to leave behind.
The honest cost, stated plainly:
- Two systems to maintain, each with its own update cycle, dependencies, and failure modes.
- Two deployment pipelines, and someone who can debug both at 2am.
- SEO plugin output that must be surfaced manually, because metadata generated in WordPress does not reach your frontend unless you fetch it and inject it.
- Redirect logic in two places, since your frontend routes requests before WordPress ever sees them.
That is a real bill, and it is why the default recommendation runs the other way. But headless is genuinely the right answer for an identifiable set of sites, and for those sites it is not a compromise. Where the frontend really is an application, decoupling lets your content team publish without waiting for a release cycle, often for the first time in the product’s life. That is a significant win, and it is worth more than it sounds.
How Your Architecture Choice Changes the SEO Workload
The architectural choice determines your rendering strategy, your Core Web Vitals trajectory, and how you control metadata. It does not, in most rows below, add work outright. It relocates the work — the same responsibilities still exist, they simply move to a different system and a different owner.
| Responsibility | Monolithic WordPress | Headless WordPress |
| Rendering method | Server-rendered HTML by default | Your choice, and your risk: static, server-side, incremental, or client-side |
| Metadata management | SEO plugin writes directly to the page | Plugin stores it, frontend must query and inject it |
| Sitemap generation | Generated by plugin at the live domain | Must be generated at the frontend layer, where the real URLs live |
| Redirect handling | One place: server config or plugin | Two places: WordPress and the frontend router |
| Schema output | Emitted by plugin or theme automatically | Fetched as data, then rendered into the page by your frontend |
| Caching layer | Page cache plus object cache on the origin | Edge caching of pre-rendered pages, plus origin cache for the API |
| Ongoing maintenance | One stack, one update cycle | Two stacks that evolve independently and must be kept aligned |
You have chosen an architecture. The next question is what the migration itself puts at risk.
2. Understand Why a React to WordPress Migration Threatens Your Rankings
Start with the part nobody tells you, because it changes how you read every number that follows. Custom React and Node applications relying on client-side rendering are frequently indexed inconsistently already. Migration does not create that problem. It surfaces it — and if you have not measured the problem beforehand, the surfacing looks exactly like damage you caused.
So measure it. Three numbers, captured this week: URLs in your sitemap, URLs reported as indexed in Search Console, URLs returned by a crawl with JavaScript rendering enabled. If indexed sits materially below sitemap, the gap predates your migration and you now have it documented. Without that baseline, every post-launch dip gets attributed to the move by default, including losses that were already there.
Beyond that, three structural risks are real:
- Crawl and render behavior changes, creating a window of ranking volatility that has to be managed rather than waited out.
- URL structures, metadata pipelines, and internal linking logic built into Node.js routing do not transfer. WordPress permalinks are a different system, and nothing carries over on its own.
- Signals accumulated over years can be stranded in an afternoon. This is worth stating precisely, because the usual framing — that a bad migration “erases your domain authority overnight” — is not what happens and your engineers know it. Nothing is erased; Google is explicit that permanent redirects do not cause a loss in PageRank. Links still point where they pointed; those URLs simply stop resolving, and the equity attached to them has nowhere to land. That is worse than erasure, because stranded signal generates no error anywhere until the traffic has already gone.
The Four Failure Points That Actually Cause Traffic Loss
Almost every migration that loses rankings loses them to one of four things. Carry this list into your next stakeholder meeting.
- URLs changed without a complete server-level 301 redirect map. The fix is to preserve URLs where you can and map the rest before launch.
- Metadata and canonical logic that lived in React Helmet or Node templates was never rebuilt. The fix is to export it as data and import it at full fidelity.
- Structured data was silently dropped during the template rebuild. The fix is to inventory schema types before migrating and validate them after.
- The new stack renders slower than the old one. The fix is to benchmark the old stack first and treat those numbers as a floor.
What A Realistic Timeline Looks Like
Your leadership will ask two questions before they ask anything else: how long, and who does it.
| Phase | Typical duration | Owner | Blocking dependency |
| Audit and baseline | 1–2 weeks | SEO lead | Access to Search Console, analytics, and server logs |
| URLs and redirects | 1–2 weeks | SEO lead with backend dev | Content retire/consolidate decisions must be final |
| Metadata and rendering | 2–3 weeks | Backend and frontend dev | Audit and baseline export must be complete and clean |
| WordPress configuration | 1–2 weeks | Backend dev | Theme selected and content model agreed |
| Performance parity | 1–3 weeks | Frontend dev with hosting | Audit and baseline benchmarks recorded before old stack retires |
| Launch and validation | 1 week, then 90 days monitoring | SEO lead | Go/no-go sign-off from a named owner |
The reindexing tail sits on top of all of it. Most pages on a small to medium site move within a few weeks, and a move completes only once Googlebot has visited every URL on both sites at least once — per URL, not per site. Which is why a partial redirect map produces a partial recovery, not a delayed one.
Content decisions are critical. Deciding what retires, what consolidates, and what gets rewritten is a stakeholder negotiation, and until it concludes, nobody can finish the redirect map. Budget for that conversation as real project time, because it will take longer than the work it blocks.
3. Build Your Pre-Migration SEO Audit and Baseline
Everything you are about to change currently carries a signal. Know exactly what those signals are while you can still measure them. A structured pre-migration SEO audit exists to capture the state of a site at the last moment it is still capturable.
Crawling and Mapping Indexation
Export every indexed URL from your current application before migration begins, using a desktop crawler or Search Console. Document every canonical tag, hreflang attribute, and meta robots directive currently implemented in your Node.js layer or React Helmet configuration. Identify the pages carrying the most organic traffic, backlink equity, and ranking positions — these are your non-negotiable preservation targets. Map every dynamic route generated by React Router or Express.js that must be replicated in WordPress permalinks.
One reminder specific to this stack, and it can cost you a day if you miss it: a default crawl of a client-side-rendered React application returns almost nothing useful. JavaScript rendering has to be enabled in the crawler, or you will produce a beautiful inventory of empty pages.
Then reconcile three sources: the crawl, Search Console, and your server logs. They will disagree. The disagreement is the finding:
- In the crawl, absent from Search Console → discovered but not indexed. Usually a rendering, canonical, or quality signal rather than a crawl problem.
- In Search Console, absent from the crawl → orphaned. No internal path reaches it, it is ranking on inbound links alone, and it is the easiest page in your inventory to lose.
- In server logs, absent from both → Googlebot is spending crawl budget on URLs nobody has inventoried. Parameters, pagination, retired routes. Decide what happens to these before migration, not after.
At scale: Above roughly ten thousand URLs, stop thinking page-by-page. Group by template, sample within each group, and treat the template as the unit of migration. A publisher with 40,000 article URLs has perhaps twelve genuine page types, and the twelve are what you need to get right.
Pre-Migration Inventory Checklist
| Asset to capture | Where it lives now | How to capture it | Where it must land in WordPress |
| Indexed URLs | Search Console, sitemap | Export plus rendered crawl | Permalink structure |
| Canonical tags | React Helmet or Node templates | Rendered crawl | SEO plugin canonical field |
| Hreflang | Node middleware or head tags | Rendered crawl | Multilingual plugin or custom output |
| Meta robots | Route config or head tags | Rendered crawl | Per-page SEO plugin settings |
| Titles and descriptions | React Helmet | Rendered crawl export | Bulk import to SEO plugin fields |
| Open Graph tags | React Helmet | Rendered crawl | SEO plugin social fields |
| Schema (JSON-LD) | React components | Rendered crawl plus source review | Plugin schema or theme templates |
| Internal links | Hard-coded in components | Crawl link report | Editorial content and menus |
| Images and alt text | Asset pipeline | Crawl image report | Media library entries |
| Top-traffic pages | Analytics | 12-month export | Preservation priority list |
| Backlink targets | Backlink tool | Referring domains by URL | Redirect map priority column |
Establishing Core Web Vitals and Performance Benchmarks
Record Largest Contentful Paint (LCP), Cumulative Layout Shift (CLS), and Interaction to Next Paint (INP) from your current stack. The current thresholds are LCP at or under 2.5 seconds, INP at or under 200 milliseconds, and CLS at or under 0.1, each assessed at the 75th percentile of page loads and segmented across mobile and desktop. That percentile is measured on real Chrome user data collected over a rolling 28-day window through the Chrome User Experience Report (CrUX).
Two consequences of that methodology matter more than the numbers themselves.
The 75th percentile means a stack that feels instant on your team’s hardware can still fail. The benchmark worth recording is the one the fourth-slowest visitor in five actually experiences, which is field data, not a lab score. The 28-day window is where teams misread the consequence. An archive does exist — the CrUX History API holds forty weeks, roughly ten months, at page and origin granularity. What it cannot return is history for a URL that stops existing, and for roughly a month after launch there is no live field verdict at all, because every collection period still contains your old site.
Alongside that, capture:
- Time to First Byte (TTFB) from your Node.js server, which becomes the floor your WordPress hosting and caching must meet.
- Your existing image optimization pipeline, in detail, because WordPress’s default media handling will need explicit configuration to match it.
- Which LCP wins you already have. A code-split, lazy-loaded React app has usually solved LCP deliberately, and any WordPress theme has to clear that bar rather than a generic one.
A structured set of site speed audits is the cleanest way to capture this if you do not have field monitoring already running.
Structured Data Inventory
Export every JSON-LD schema block implemented in your React components or Node templating layer. Identify the types in use — Article, BreadcrumbList, Product, Review, Video — and map each to its equivalent WordPress plugin or theme implementation. Validate what you have today so you have something to compare against after launch.
Two changes to be aware of before you build this inventory. FAQ rich results stopped appearing in Google Search on 7 May 2026, with the search appearance filter, the rich result report, and Rich Results Test coverage for that type dropped the following month. HowTo rich results went earlier and went further: Google removed the How-to documentation in September 2023 on the grounds that the rich result is no longer shown on desktop or mobile.
FAQPage remains valid markup that Google continues to parse, so this is not a reason to strip it during migration. It is a reason to change why you preserve it. Schema continuity is now justified by machine comprehension — how clearly automated readers understand your page — rather than by SERP decoration. That is a better argument for protecting it through a template rebuild than the one it replaces, and it applies to every type, not just the ones with a visible feature attached.
Mapping Your Content and Data Model to WordPress
Metadata, URLs, and performance are the parts everyone plans for. How the content itself moves is the part that consumes the most hours and appears on the fewest project plans.
Work through it in this order:
- Audit what actually holds your data — which React components, Node collections, or database tables contain the content, and in what shape.
- Map it to WordPress primitives — posts, pages, custom post types, taxonomies, and custom fields.
- Decide what migrates, consolidates, gets rewritten, or retires. A structured content audit process is the fastest route through this when the inventory is large.
- Finish those decisions before you build the redirect map. Every retirement and every consolidation is a redirect, and reopening the question afterwards means rebuilding the map.
One trap here looks like a data decision and is really a URL decision. Registering a custom post type inserts its slug into the URL path by default, and taxonomies generate archive URLs whether or not anyone intended to publish them. A content model designed purely around data shape will quietly produce URLs that do not match your old site, which becomes redirect work in the next phase. Decide your content model and your URLs in the same session.
If your team does not have the internal capacity to capture this baseline properly, that is the single hardest gap to recover from, because unlike almost everything else in a migration, the baseline cannot be reconstructed after the fact. It is worth bringing in help for this phase specifically, even if you run the rest yourself — contact Web Upon if that is where you are.
Your inventory is complete. Now protect the asset that migrations break most often.
4. Protect URL Structure and Redirect Architecture
This is the highest-stakes section in the guide, and the principle underneath it is simple enough. Preserve URLs one-to-one wherever it is possible, and redirect only where the old structure genuinely cannot be reproduced. Every redirect is a small tax — an extra hop, a rule to maintain, a thing that can be misconfigured. A migration that changes nothing about your URLs is not a compromise; it is the target.
Preserving URL Structures Across Routing Systems
Map your React Router and Express.js route definitions to your WordPress permalink structure before any content is published on the new platform. That sequence matters — permalinks are painful to change once content exists and links have been generated against them. So set your permalink structure deliberately on day one.
Four WordPress-specific structural traps to avoid:
- The /category/ slug, inserted into taxonomy URLs by default. The Category base field changes that prefix but cannot remove it — leaving it blank restores the default segment rather than deleting it, and removal takes a plugin or a code-level rewrite filter. The trap is that the setting looks like it should work.
- Date-based permalinks, which look tidy and permanently date your content in the URL.
- Custom post type slug prefixes, which behave the same way and are easy to miss until content exists.
- Attachment pages, which depend on how your install came into being. New installations have had them disabled since WordPress 6.4; sites migrated into an existing install keep them on upgrade and will happily index them as thin content. A database option governs this, with no settings-screen interface, so the dashboard tells you nothing.
If you are going headless, one addition: your frontend routing layer must replicate the URL patterns served to search engines, not just the ones users see. Enforce clean rules at the server level — through .htaccess or Nginx configuration — rather than relying on application-layer tidiness.
Building A Bulletproof 301 Redirect Map
Every URL that changes needs a 301 redirect. There are no acceptable exceptions for pages with organic traffic or inbound backlinks.
Build the map from your audit and baseline crawl data, in a spreadsheet, before go-live rather than after. Implement the redirects at the server level — Nginx or Apache — rather than relying solely on a WordPress redirect plugin, which adds application latency to every redirected request and puts your link equity transfer behind PHP execution. Test the full chain with a redirect-testing tool that follows every hop, checking for loops, doubles, and 302s standing in where 301s were intended.
Two numbers turn that test into a pass/fail rule. Googlebot follows up to ten hops, but Google advises redirecting straight to the final destination and, failing that, keeping chains to no more than three. Ten is what the crawler tolerates; three is what your map should be designed against.
If you are going headless, redirect logic has to exist in both the WordPress backend and your frontend router. Getting this wrong produces split-brain failures where a URL resolves differently depending on which system saw the request first.
Redirect Map Template Example:
| Old URL | New URL | Redirect type | Organic sessions (12mo) | Referring domains | Tested? |
| /products/widget-a | /products/widget-a | None — preserved | 4,210 | 18 | ✓ |
| /blog/2021/post-name | /insights/post-name | 301 | 1,890 | 6 | ✓ |
| /old-landing-page | /solutions/overview | 301 — consolidated | 640 | 11 | ✓ |
Sort by referring domains descending, then by sessions. That ordering tells you which rows to test by hand and which can be verified in bulk.
Be mindful of these two things:
- Order and specificity. Server rules evaluate top to bottom, and a broad pattern placed above a specific one silently swallows it. The failure mode is not an error message — it is a handful of your highest-value URLs landing on a category page while the map insists they were handled. Test against the old crawl, URL by URL, not against a sample.
- Persistence. The folklore says redirects can be retired after six months or a year. But keep them at least a year — the period it takes for signals to transfer including the reassignment of external links — or indefinitely. One year is the floor, not the finish line. A redirect is the only thing connecting an inbound link to a live page, and inbound links do not expire on a schedule. Treat these rules as permanent infrastructure.
At scale: Above a few thousand URLs, pattern-based rules using regular expressions at the server level are the only workable approach. The risk is over-broad patterns catching paths you did not intend. Write the rule, then run your full old-URL list through it and inspect every match before deploying — the ones you did not expect are the point of the exercise.
One clarification for teams staying on the same domain: Search Console’s Change of Address tool covers domain changes only. Restructuring URLs within a domain has no equivalent notification, which means your redirects and your sitemap are the entire mechanism by which Google learns what happened.
Planning Your New XML Sitemap Architecture
Generate a new XML sitemap immediately after migration, through your SEO plugin or a custom solution matched to your content architecture. Prioritize high-value pages in the ordering and make sure lastmod timestamps are accurate enough to mean something.
“Accurate enough to mean something” is a documented condition, not a nicety. Google ignores priority and changefreq outright and uses lastmod only where the value is consistently and verifiably accurate, comparing your claim against the page’s actual last modification. Now put that beside WordPress: several sitemap implementations stamp lastmod on any database write — a plugin update, a bulk re-save, a settings change. A migration triggers all three at once. It is precisely the event that makes your timestamps inaccurate across every URL simultaneously, at the moment the signal would have been most useful. Verify what drives the timestamp before launch.
If you are going headless, sitemap generation belongs at the frontend layer, not just in WordPress. The URLs served to users and search engines originate from your decoupled frontend, and a backend-generated sitemap will describe a site that nobody visits.
Submission happens once, in the final phase. Do not submit anything yet.
Your URLs are protected. The next question is whether the content sitting at those URLs still carries its signals, and whether search engines can render it at all.
5. Migrate Metadata and Lock Your Rendering Strategy
Rebuilding Meta Tags, Titles, and Open Graph Data from React Helmet
React Helmet and Next.js Head components manage metadata inside JavaScript. None of that logic survives the move. It has to be explicitly rebuilt in WordPress through an SEO plugin or custom theme functions, field by field.
Map every unique meta title, meta description, canonical URL, and Open Graph tag from your application to its corresponding WordPress post, page, or custom post type field. Then audit your theme’s header files immediately after installation, because WordPress themes frequently inject their own title tags independently of your SEO plugin, producing duplicates that neither system reports.
The practical question is how metadata gets into WordPress at volume. Three routes work: bulk CSV import through your SEO plugin, WP-CLI, or scripted population through the API. Below a few hundred URLs, manual entry is defensible and often faster than building the import.
Above that, the risk is not effort — it is silent corruption. Em dashes, curly quotes, and non-Latin characters arrive mangled in a few hundred title tags that nobody will ever read again. Whichever route you choose, run the same check afterwards: crawl staging, export the metadata, and diff it against your audit and baseline export. Same file, same columns. Anything that does not match is a finding.
If you are going headless, metadata must be fetched from the WordPress REST API or GraphQL endpoint and injected into your frontend’s head management at build time or request time. It exists in WordPress either way — the question is only whether it ever reaches the page.
Selecting Your Rendering Strategy
If you are going monolithic, you can skip this subsection entirely — WordPress renders on the server by default and the decision is already made for you.
For headless builds this is the choice that determines whether the migration succeeds. Four options, and only three of them are viable.
| Rendering Strategy | Crawlability | Best for | Trade-off | Editorial lag |
| Static Site Generation (SSG) | Complete — HTML at build time | Content that changes on a schedule | Full rebuild per change | Minutes to hours |
| Server-Side Rendering (SSR) | Complete — HTML per request | Frequently changing content | Origin cost on every request | None |
| Incremental Static Regeneration (ISR) | Complete — HTML, refreshed per page | Large sites with steady editing | Added complexity | Seconds to minutes |
| Client-Side Rendering (CSR) | Poor — depends on the crawler executing JavaScript | Logged-in application screens only | Reintroduces your original problem | None |
Static generation is the strongest SEO choice, and it stays the strongest right up to the point where a full rebuild takes longer than your editors will tolerate for fixing a typo. That threshold arrives earlier than teams expect — it is a function of page count, and a site in the low thousands can already cross it. Incremental regeneration exists precisely to fill that gap, refreshing individual pages without rebuilding everything.
Client-side rendering in a headless WordPress context reintroduces exactly the crawlability risk you are migrating away from. Avoid it for anything that needs to rank.
Headless WordPress SEO: Ensuring Full Crawlability
Googlebot needs access to the frontend URL layer of your setup, not the WordPress admin backend. Verify that robots.txt on your frontend domain permits crawling — a file carried over from staging is a common and expensive oversight. Internal links must resolve to frontend URLs rather than backend admin URLs, or your crawl paths break at the first hop.
One instruction in most headless guides deserves correcting. Dynamic rendering — detecting crawlers and serving them a separately rendered version — is documented by Google as a deprecated workaround rather than a recommended solution, on the grounds that it adds complexity and resource cost. Maintaining two delivery paths means they drift, and once they diverge materially the arrangement stops being dynamic rendering and starts being cloaking. Treat it as a temporary bridge for a legacy application you have not finished migrating, never as a target state.
That leaves an apparent contradiction. You are told to keep the API accessible to search engines, and also to stop your WordPress backend domain from being crawled and indexed as a duplicate of your entire site. Both are correct, and the distinction is where the fetch happens:
- Build-time or server-side fetching (SSG, SSR, ISR) — the request comes from your build server or frontend server, never from a visitor’s browser or Googlebot. Lock the backend down with authentication or IP allowlisting, then disallow it in robots.txt. Nothing a crawler needs sits behind it.
- Client-side fetching — the request comes from the browser, so blocking the endpoint breaks the page for users and crawlers alike. Which is one more reason client-side rendering is the wrong choice here.
Resist the instinct to add noindex on top of the disallow as belt-and-braces. It does not work that way: noindex is only effective if the page is not blocked by robots.txt, because a crawler that never fetches the page never sees the rule, and the URL can still surface on the strength of links from elsewhere. The two directives answer different goals. Where the backend is genuinely inaccessible, disallow is sufficient and noindex is redundant. Where backend URLs are already indexed, do the reverse: serve noindex and allow crawling until they drop out, then disallow. Never both at once on the same URLs.
If your frontend renders on the server, your backend does not need to be public. Most teams who accidentally index their WordPress backend did so because they assumed otherwise.
Rendering is resolved. Now to the WordPress configuration itself, where defaults quietly undo good planning.
6. Configure WordPress for Technical SEO
WordPress’s defaults are built for a new site being set up by someone who has never done it before. They are not built for a site arriving with a decade of accumulated authority. Every default in this phase has to become a deliberate decision.
Selecting and Configuring SEO Plugins for Continuity
Your SEO plugin will own metadata, sitemaps, schema, breadcrumbs, and canonical tags. Configure it to disable auto-generated descriptions and enforce manual metadata control across every high-value page you migrated — auto-generation is convenient for a new site and destructive for one whose descriptions were written deliberately over years.
Check that breadcrumb schema aligns with your URL structure and internal linking hierarchy, since a mismatch between the two is one of the more common sources of post-migration structured data errors.
The discipline that matters most is plugin ownership. Overlapping plugins that each emit schema or canonicals produce conflicting signals, and nothing in WordPress will warn you. After the stack is configured, view source on one page of each template type and count three things:
- How many canonical tags appear. The answer should be one.
- How many og:title tags appear. The answer should be one.
- How many schema blocks describe the same entity. The answer should be one.
Two canonicals on a page are not a warning in any dashboard. They hand the decision to Google, silently, on a page you spent three years ranking. Plugin count also has a direct performance cost.
If you are going headless, these plugins still manage your backend SEO data but need custom API queries to surface it to the frontend. Verify REST API or GraphQL compatibility before you commit to a plugin, not after.
Preserving Header Tags, Content Structure, and Internal Links
WordPress themes and page builders frequently inject additional H1 tags or restructure heading hierarchies without asking. Audit every migrated template’s heading structure after applying your theme. Content moved from React components or Node templates must keep its original H1, H2, and H3 hierarchy — the hierarchy is a signal, and reshuffling it during a rebuild discards information you cannot recover from the rendered page.
Standardize your content entry method before bulk-migrating, since the block editor and classic editor emit heading tags differently and a mixed inventory is difficult to audit later. Configure custom post types and taxonomies with appropriate slugs and metadata templates before content population begins.
Internal linking continuity is the item most often skipped in this phase, and it is entirely mechanical to check. Links hard-coded in React components have to become real WordPress links; automated imports routinely leave them pointing at the old domain or at relative paths that no longer resolve. After import, crawl staging and filter for two things: links to the old production domain, and internal links returning anything other than a 200 status. Both are routine after an automated import, and both are invisible to anyone reading the page in a browser — the link still looks like a link.
Configuring Image Optimization and the Media Pipeline
WordPress generates multiple image sizes automatically. Configure that behavior to match your existing optimization strategy rather than accepting the defaults, which will produce sizes you do not use and skip ones you do.
Across all migrated images, implement WebP conversion, explicit width and height attributes, and lazy loading. Configure CDN delivery before go-live, because WordPress without a CDN will underperform your Node.js-served static assets on almost any geographic distribution. Migrate alt text, file naming conventions, and image schema explicitly — none of it transfers automatically to media library entries.
As for lazy loading, WordPress core stopped applying it indiscriminately some time ago: it omits the attribute for the first three images on a page, adds fetchpriority=”high” to the likely LCP image — worth a 5–10% LCP improvement on its own — and never emits high fetch priority and lazy loading on the same element. The regression is real; the cause is not core.
It sits above core, in two places. Optimization and caching plugins that lazy-load indiscriminately override the heuristic and reintroduce the antipattern it was written to prevent. Page builders that render images outside core’s image functions never reach the heuristic at all, so nothing is applied and nothing is excluded. Check the rendered source of your hero template for both attributes once the full stack is assembled, not once the theme is installed. This is among the most common causes of a post-migration LCP regression on a previously fast site, and nobody fixes it because nothing reports it.
Configuration protects your signals. The next phase protects the experience those signals are attached to.
7. Match or Beat Your Node.js Performance
Your strongest objection to this entire project is probably that WordPress will be slower than what you built. It is worth meeting directly.
WordPress is not inherently slower than a Node.js application. It is inherently less pre-optimized — a Node stack that performs well does so because someone made it perform well, and WordPress arrives with the same work still to do. The performance has to be configured rather than assumed, which is a project cost, not a ceiling. Most of the web fails this on templates nobody deliberately configured. Ongoing site speed optimization is what keeps it there afterwards.
Configuring Caching to Match Node.js Response Times
Node applications typically handle caching in application code, with fine-grained control in one place. WordPress splits it into layers you must configure independently:
- Page caching, through an explicitly configured caching layer, to bring Time to First Byte near your Node benchmark.
- Object caching, via Redis or Memcached, to keep repeated database queries off the critical path.
- Browser caching, through appropriate headers on static assets.
- Cache invalidation, matched to your editorial workflow so publishing purges what it should without leaving stale content in search indexes.
If you are going headless, this is where the argument turns. Edge caching of statically generated pages can deliver performance that surpasses your original Node.js stack outright, and it is worth understanding the mechanism rather than taking the claim on faith. A statically generated page served from an edge node answers from the location nearest your visitor with no application server in the request path at all. A Node origin, however well tuned, is still a round trip to wherever it runs.
You have spent years optimizing that round trip. The honest framing is not that WordPress is faster — it is that this architecture removes the round trip entirely. That is a different and considerably stronger claim.
Optimizing Core Web Vitals Within WordPress
Theme selection is the highest-impact decision you will make here. A heavy multipurpose theme shipping excessive CSS and JavaScript will degrade LCP and CLS below your React baseline before you have added a single plugin.
But the metric lost is usually not the one you are watching. A team arriving from a code-split React application typically has LCP under control and knows it. The regression that catches them is INP — responsiveness measured across every interaction in a session, not just the first one. It replaced First Input Delay as a Core Web Vital in March 2024, which is why teams who last benchmarked against FID are working from a metric that no longer exists.
WordPress rarely degrades INP through the theme alone. It degrades through accumulation: a consent banner, an analytics wrapper, a form handler, a slider, a chat widget, each adding main-thread work that no single decision ever authorized. An application tuned to a 200-millisecond interaction budget can cross it within a month of launch without one line of theme code changing.
Which gives you concrete theme criteria, rather than the adjective “bloated.” Before committing, check:
- How much JavaScript ships on a page using none of the theme’s features. This is the floor you can never get below.
- Whether stylesheets can be loaded per-template rather than globally on every page.
- Whether third-party scripts can be deferred without breaking the theme’s own behavior. A theme that cannot answer this is not a lightweight theme, whatever the demo site suggests.
Beyond the theme: eliminate render-blocking resources by deferring non-critical JavaScript and CSS, implement critical CSS so above-the-fold content renders without waiting for full stylesheets, and configure font loading explicitly. System fonts or preloaded web fonts prevent the layout shift and render delay that commonly degrade scores after migration from a tuned React application.
Selecting Hosting and CDN Infrastructure
Evaluate hosting against your Node server’s response time benchmarks. Managed WordPress hosting with server-level caching and object caching available will outperform generic shared hosting substantially, and the gap is largest exactly where it matters — under crawl load.
Confirm global CDN distribution for static assets, cached pages, and media, particularly if your Node deployment achieved geographic consistency through distributed hosting. Verify HTTP/2 and HTTP/3 support, server-side compression, and TLS configuration explicitly rather than assuming parity.
For headless builds, your frontend deployment platform determines edge caching behavior and therefore directly shapes the field data Google measures. That choice is a performance decision, not just a deployment convenience.
One number to insist on during evaluation: TTFB on a cache miss, not on a warm cache. Every host demonstrates beautifully when the page is already cached. Your migrated site will serve cache misses constantly in its first weeks, while Googlebot crawls the full inventory for the first time, which is precisely the window in which your performance baseline is being re-established.
Everything to this point happens before launch. The final phase begins the moment the site goes live.
8. Validate, Monitor, and Maintain After Launch
Staging, QA, and the Go/No-Go Checklist
Crawl your staging environment as if it were production, with the same settings and the same rendering configuration you used in the first phase. Test your redirect map against the real map before cutover, not a representative sample of it.
Confirm staging is blocked from indexing — and confirm the block is removed at launch. Forgetting the second half is a routine and catastrophic error, and it deserves a specific warning. Since WordPress 5.3 the built-in “discourage search engines” setting does not touch robots.txt at all — it emits a site-wide noindex, nofollow meta tag instead, because disallowing crawling can itself let a site be listed from links alone. A team inspecting robots.txt therefore sees a clean file while the noindex is live in the page head. Verify it in the rendered source of a live page after cutover, not in a settings screen. One gap that setting cannot close: it does not emit an X-Robots-Tag header, so images, PDFs, and video on staging need a server-level header instead.
Your go/no-go checklist:
- Full staging crawl complete, with no unexpected 404s, redirect chains, or missing metadata
- Redirect map tested URL by URL for every page above your traffic and backlink threshold
- noindex and staging robots.txt rules confirmed removed, verified in rendered source
- Canonical tags present and singular on one page of every template type
- Schema validated on every high-traffic template
- Sitemap generated at the correct domain, with accurate lastmod values
- Core Web Vitals lab scores at or above the first phase baseline
- Analytics and Search Console verified on the new environment
- Named owner has signed off, before an agreed cut-off time
A checklist with no named decision-maker and no deadline gets waived at 6pm on a Friday by whoever happens to still be online.
Running Your Post-launch Validation Protocol
Work on a time axis.
First hour. Before you submit anything, request a live URL as a crawler would and read the returned HTML rather than the browser view. Fetch the homepage and two deep template pages. A noindex shipped at cutover, a robots.txt disallow carried over from staging, or an origin still serving the old application from cache are all visible in ten seconds and completely invisible in a browser. Then submit your updated sitemap to Search Console.
First 24 hours. Run a full post-migration crawl to catch broken internal links, missing metadata, incorrect canonicals, and redirect chain failures before search engines encounter them. Validate structured data across your highest-traffic templates — noting that FAQ support was dropped from the Rich Results Test in June 2026, so use the Schema Markup Validator for that type.
First 72 hours. Monitor the Search Console coverage report for crawl errors, redirect issues, and indexation drops. This is the window in which a redirect fault is cheapest to fix, because Google has not yet re-evaluated most of the site.
Watch Core Web Vitals in Search Console from here on, with one caveat carried forward from the first phase: lab data updates immediately, field data does not. CrUX reflects a 28-day rolling window, so your post-launch field verdict simply does not exist for roughly a month.
Tracking Ranking Recovery and Diagnosing Volatility
Visibility may fluctuate temporarily during a move and rankings settle over time. Configure a rank tracker for daily collection on your top-traffic pages through the first month, and correlate any movement with Search Console crawl data rather than reading positions in isolation.
Then read the shape of a drop rather than its size. The shape tells you what broke:
- Sudden, page-specific, concentrated on URLs that changed → redirect fault. Check status codes on the affected URLs first; a 404 or a chain terminating somewhere unintended is usually visible within minutes.
- Gradual, broad, spread across an entire template type → rendering or indexation fault. That template is not delivering what it delivered before. Compare rendered HTML against your first phase crawl for the template, not for one page.
- Shallow, broad, recovering unevenly across all templates → ordinary re-evaluation. This is the two-to-six-week window. It resolves without intervention, and intervening mostly generates more change for Google to process.
- Impressions holding while clicks fall → not a ranking problem at all. This is metadata. Titles or descriptions were regenerated during import and your listings no longer read the way they used to.
The escalation rule: anything still declining after six weeks is a fault, not a window — diagnose it rather than waiting it out.
The pattern to expect: a dip beginning within days as re-crawling starts, the deepest point typically in weeks one to three, visible recovery from weeks three to six, and a return to baseline by weeks eight to twelve. Anything still falling at week six sits outside the curve.
Set a 90-day review to assess whether the plugin ecosystem, editorial workflow, and performance infrastructure are delivering the scalability that justified the migration in the first place.
Maintaining Technical SEO in the WordPress Ecosystem
The plugin and theme update cycle introduces ongoing regression risk. Run updates through a staging workflow where metadata, schema, and performance impact are checked before production deployment — the same discipline you used for the migration itself, applied at lower intensity, permanently.
Monitor for the WordPress-specific pitfalls that appear months after launch:
- Tag and category archive duplication, which multiplies thin pages quietly.
- Pagination canonicalization errors, which consolidate signals onto the wrong page.
- Unintended noindex directives applied by SEO plugins during unrelated configuration changes.
If you are going headless, keep your backend content structure and frontend rendering logic aligned as both evolve. Schema, metadata, and URL structures must stay synchronised across two systems that will otherwise drift apart on independent release cycles.
Then there is the return that does not appear in any ranking report. Adding a new structured data type to your old stack meant a ticket, a sprint, a developer, a deploy, and a regression risk. Local SEO markup, news sitemaps, video schema, e-commerce structured data — every one of those was custom engineering. In WordPress it is a settings screen and a validation check.
That is what this migration actually buys: the collapse of the distance between wanting a change and having it. You already know what that ticket queue looks like.
Your Migration Decision & First Three Things To Do
Default to monolithic WordPress, and choose headless only when genuine application functionality demands it and static, server-side, or incremental rendering is in place from day one.
Two to six weeks of volatility is the pattern to plan around. Beyond six weeks is a fault to diagnose, not a window to wait out.
Three things worth doing regardless of when you migrate, and the front end of any WordPress migration SEO checklist:
- This week: run a pre-migration crawl and export your current URL inventory.
- Before anything changes: record Core Web Vitals field data, because page-level history dies with any URL that does not survive the move.
- Before scoping any development work: make the architecture decision using the table at the top of this guide.
Do those three and the rest of this guide becomes sequencing. Everything here is executable by a competent internal team, and plenty of teams do execute it. The reason to bring in help is that three phases carry consequences that are expensive to reverse: the baseline you cannot recapture, the redirect map you cannot partially get right, and the performance floor you cannot see until it is already below you. If those are the parts you would rather not carry alone, reach out to Web Upon.