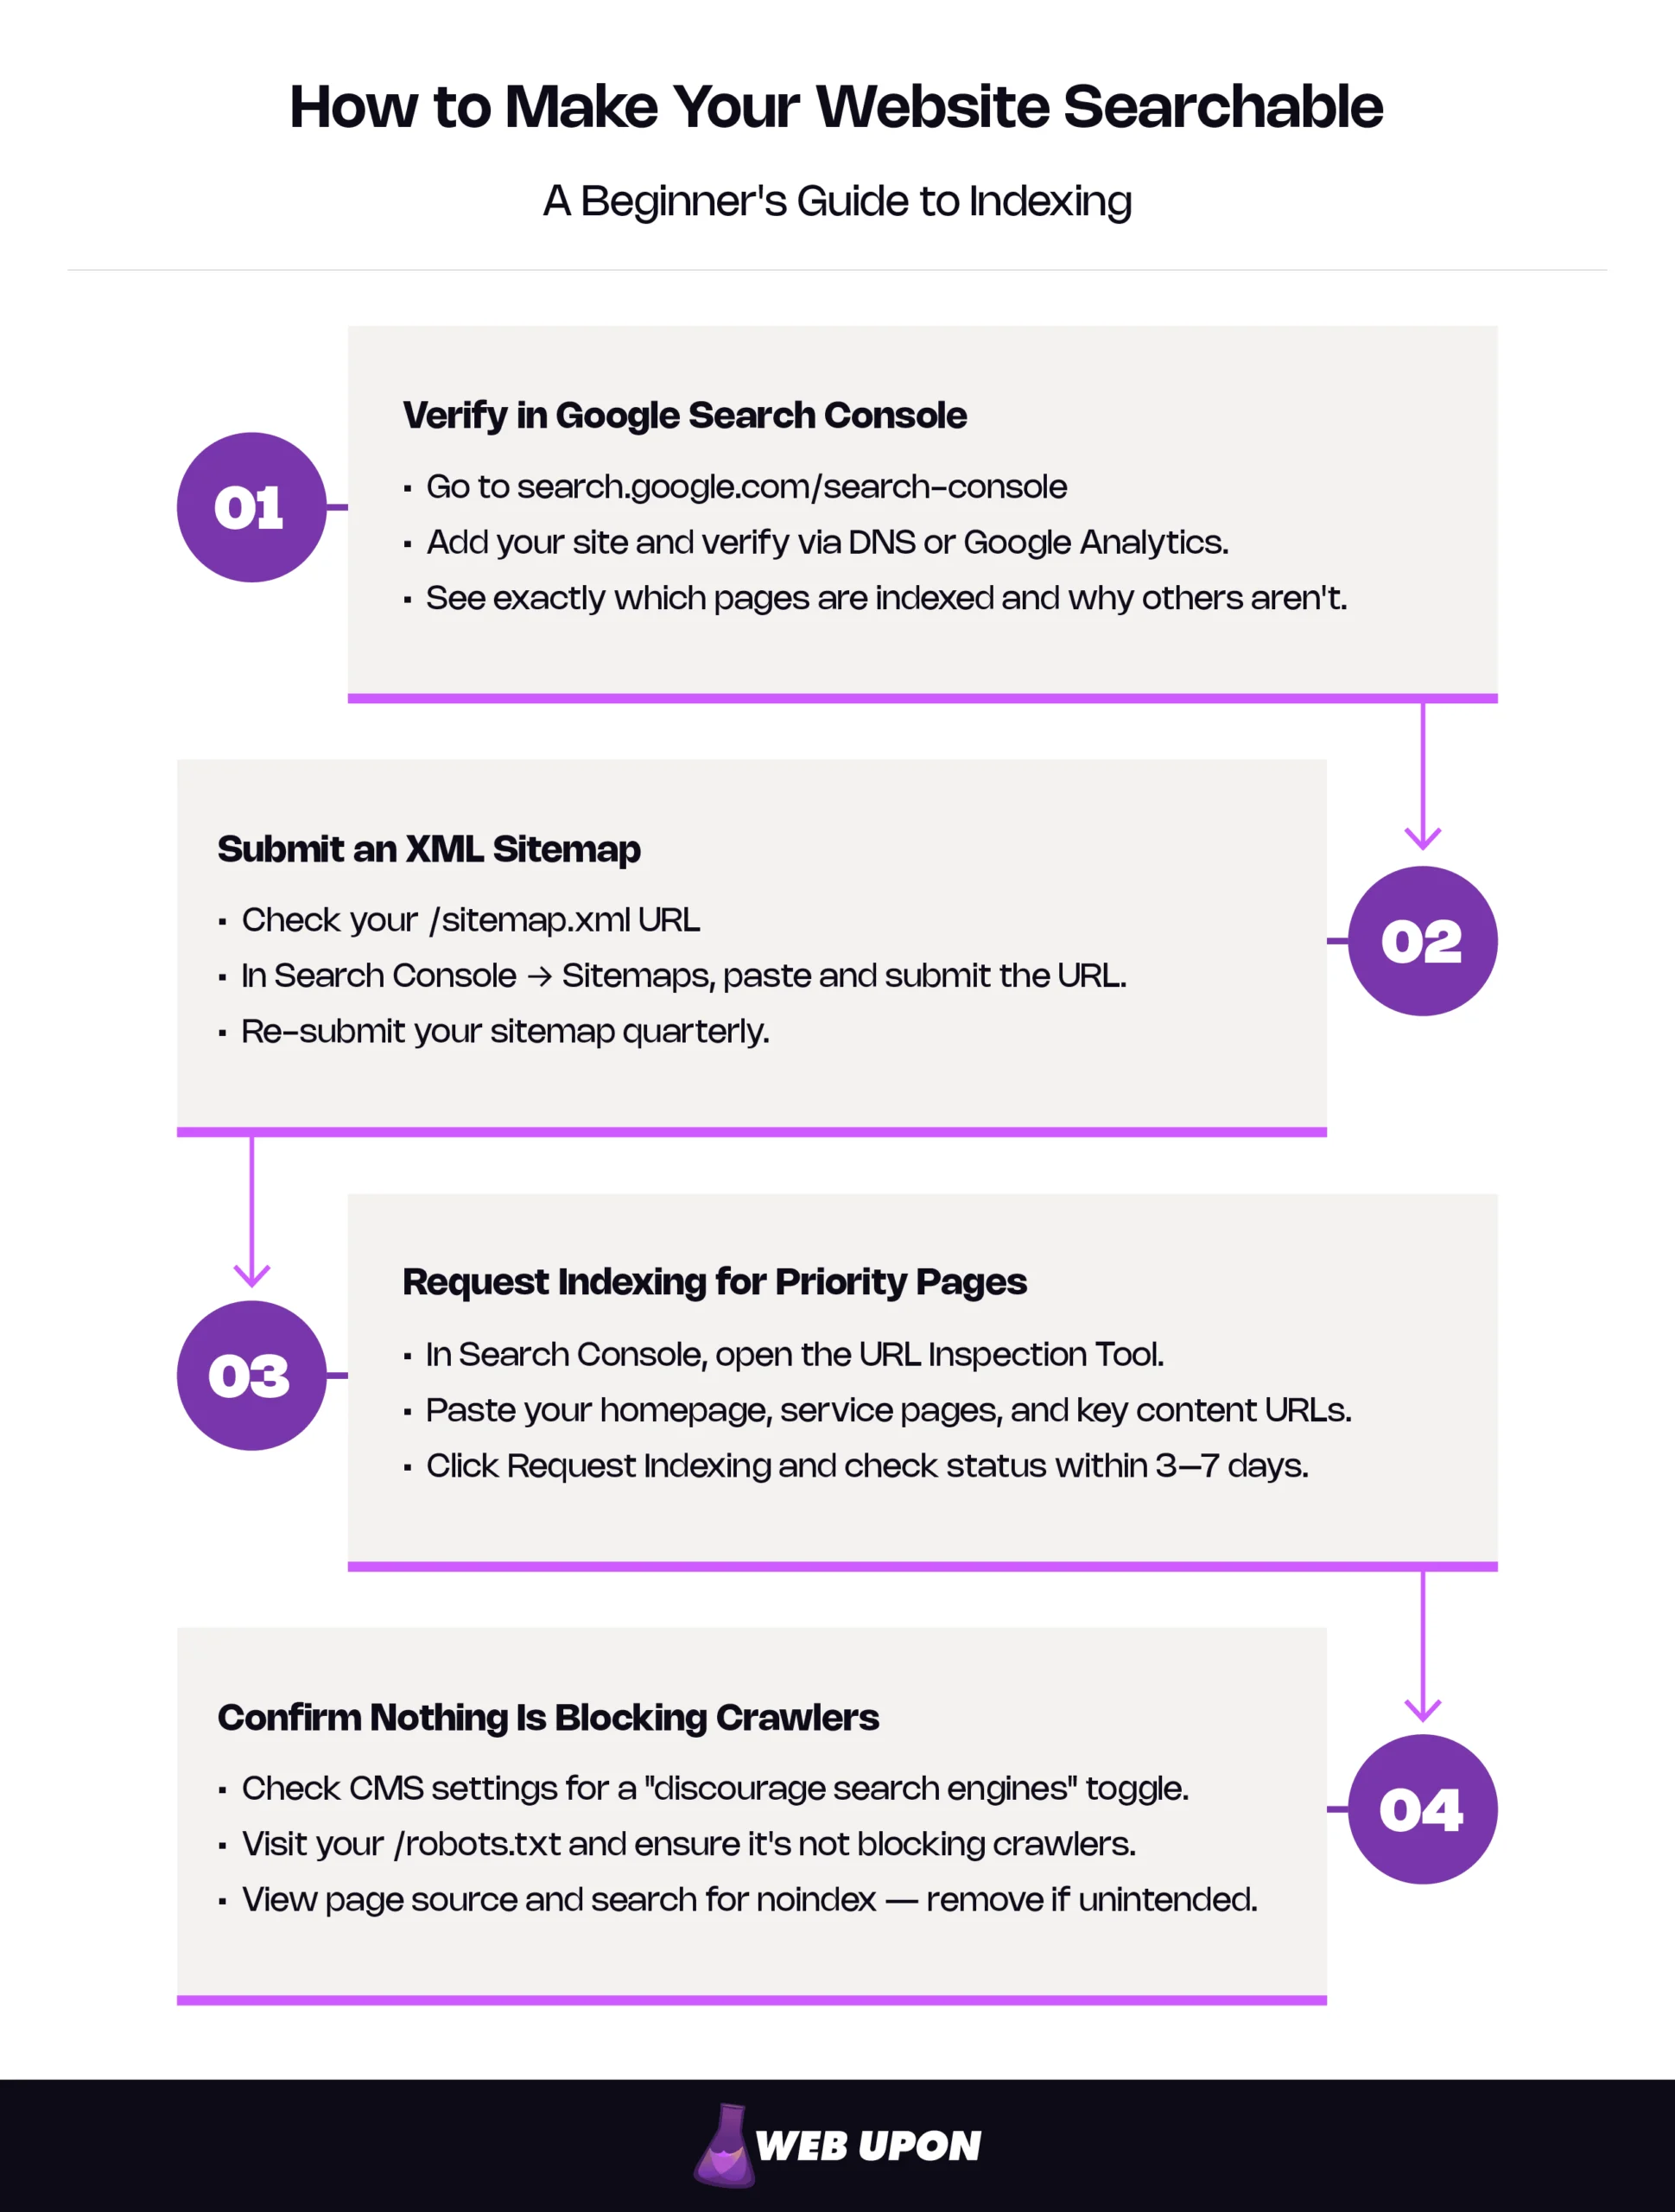
Learning how to make your website searchable comes down to four basic steps: verify your site in Google Search Console, submit an XML sitemap, request indexing for your priority pages, and confirm no technical settings are quietly blocking search engines. This guide explains why each step matters, how to do it without a developer, and how to keep it working in roughly thirty minutes a month.
Key Takeaways
- Indexing is the floor, not the ceiling. Google runs a three-stage process — crawling, indexing, and serving search results — and a page can be crawled without ever being indexed.
- A sitemap helps with discovery, not ranking. Submitting one tells Google your pages exist; it does not push them up the results.
- Most missing-page problems trace to one of four causes: an accidental noindex tag, a robots.txt block, an orphaned page, or thin content. Most are fixable in under an hour without a developer.
- Robots.txt controls crawling, not indexing. A noindex meta tag is the right tool to keep a page out of Google’s results.
- Match one page to one job. Pages aligned with a specific search intent stay indexed and climb; pages trying to be two things at once rank for neither.
Why Your Website Is Invisible (And What Indexing Actually Means)
The Difference Between a Live Website and a Searchable Website
Launching a website does not automatically put it on Google. Launching makes it live — anyone with the URL can reach it. To be indexed means Google has visited a page, decided it’s worth keeping, and stored a copy in its searchable database. Until that happens, the page can’t appear in results, no matter how good the content is or what the design cost. A live site that hasn’t been indexed is an unlisted phone number: it works perfectly for anyone who already has it, and it doesn’t exist for anyone who doesn’t.
How Search Engines Find, Store, and Surface Your Content
Indexing is the floor. Ranking — the part where you compete for the top spots — is the ceiling. Search engines run a three-stage process: crawl, index, rank. Always in that order, and Google’s own developer documentation describes the same flow, noting that not all pages make it through each stage.
Picture a librarian working a giant building. Crawling is the librarian walking the aisles, noticing what books exist. Indexing is the librarian deciding which of those books are worth keeping on the shelves and writing a card for each one. Ranking is the librarian recommending which book to hand a visitor when they ask a question. A book the librarian never walks past doesn’t get indexed. A book the librarian sees but decides is a duplicate or low-quality doesn’t get indexed either. Only indexed books are eligible to be recommended.
The single most-missed distinction in this whole topic is here: a page can be crawled but not indexed. Google’s bots can fetch your URL, read it, and then decide not to add it to the index, usually because the content is thin, duplicative, or low-value. Status messages like “Crawled – currently not indexed” describe exactly that, and Google notes the page may or may not be indexed in the future. The page exists. Google saw it. Google didn’t keep it. The fix is almost always content-side, not technical.
When an indexed page does eventually appear in search results, it shows up on a SERP — short for search engine results page, the list of links Google returns for any given query. The term gets used constantly once you start reading on this topic. It just means the results page itself.
The Most Common Reasons Your Pages Are Missing From Search Results
When pages don’t show up, the cause is almost always one of four things, and most are fixable in under an hour without a developer.
| Reason | How to Spot It | Difficulty to Fix |
| Accidental noindex tag — often left over from a staging or development version of the site, or toggled on in a “discourage search engines” platform setting. | Search Console flags the page as “Excluded by ‘noindex’ tag” in the Page Indexing report. | Easy — toggle off the setting or remove the tag. |
| Blocked in robots.txt — a sitewide file telling crawlers not to enter certain folders or the whole site. | Search Console flags pages as “Blocked by robots.txt.” You can also visit your /robots.txt directly and read it. | Easy with CMS access; minor developer help if not. |
| Orphaned pages — the page exists, but no other page on your site links to it. Crawlers have no path to find it. | The page isn’t in your sitemap and doesn’t appear in any navigation, footer, or related-content section. | Easy — add an internal link from a relevant page. |
| Thin or duplicate content — the page exists but doesn’t offer enough unique substance to earn a spot in the index. | Status reads “Crawled – currently not indexed” or “Duplicate without user-selected canonical.” | Medium — requires expanding or differentiating the content. |
Most owners discover their problem in row one: a checkbox somewhere — usually labeled something like “Discourage search engines from indexing this site” — that got switched on during development and never switched back. It happens constantly. It’s not a sign you did anything wrong. It’s a sign the launch checklist was missing one line.
The Beginner’s Indexing Toolkit: What You Need to Get Started
You understand why pages go missing. Here are the three free tools that get them found. Google itself provides every one of them.
Setting Up Google Search Console as Your Indexing Command Center
If you do nothing else after reading this article, set up Google Search Console. It’s free. It’s made by Google. And it’s the only direct line of communication you have with the world’s largest search engine about your specific website.
Search Console does four things that matter for website indexing: it confirms your site exists, it tells you which pages are indexed and which aren’t, it lets you submit new pages and sitemaps, and it tells you exactly why a page was excluded if one was. That last function alone is worth the twenty minutes of setup.
How to verify your site in Google Search Console:
- Go to search.google.com/search-console and sign in with the Google account you want associated with your site. Use a business account if you have one — long-term access to this data matters.
- Click Add property. You’ll see two options: Domain (covers every version of your URL — with or without www, http or https, all subdomains) and URL prefix (covers only the exact URL you enter). Choose Domain unless you have a specific reason not to.
- Choose a verification method. If you picked a Domain property, Google requires DNS verification — copying a record into your domain registrar (the company you bought your domain from). If you picked a URL-prefix property, you have several options including Google Analytics, HTML file upload, an HTML meta tag, and Google Tag Manager. DNS or Google Analytics tend to be fastest for non-developers.
- Confirm verification. Google checks for the record or tag and confirms ownership. If it doesn’t verify on the first try, give it ten minutes. DNS records sometimes take a moment to propagate, which is the technical term for “the internet hasn’t caught up yet.”
The URL Inspection Tool — the headline feature. Once you’re verified, the most useful function inside Search Console is the URL Inspection Tool. Paste any URL from your site into the search bar at the top of the dashboard, and Search Console will tell you whether that exact page is indexed, when it was last crawled, what the indexed version looks like, and what kind of problem it has if there’s any.
You’ll encounter status messages here. The three most common:
- “URL is on Google” — the page is indexed and can appear in search results. This is the one you want.
- “Crawled – currently not indexed” — Google saw the page but chose not to keep it. Almost always a content quality or duplication issue. Re-evaluate the page itself.
- “Discovered – currently not indexed” — Google knows the page exists, probably from your sitemap, but hasn’t crawled it yet. Usually a patience issue; sometimes a crawl-budget issue on larger sites.
A quick reality check on timing: Indexing isn’t instant. A new page can be indexed within hours, or it can take days or weeks depending on how often Google crawls your site, how much authority your domain has, and how many other pages compete for crawler attention. Don’t panic at day three. Start checking at day seven.
Creating and Submitting an XML Sitemap to Guide Search Engine Crawlers
An XML sitemap is a file — usually located at your /sitemap.xml — that lists every page on your site you want Google to know about. Google describes it as a file where you provide information about the pages on your site so search engines can crawl it more efficiently. Think of it as the table of contents you hand the librarian so they know what to look for.
One misconception worth clearing up immediately: a sitemap helps with discovery, not ranking. Google’s own documentation states that a sitemap helps search engines discover URLs but doesn’t guarantee that all the items in your sitemap will be crawled and indexed. Submitting a sitemap doesn’t make your pages rank higher. It just makes sure Google knows they exist.
Include in your sitemap:
- Your canonical pages — the official, primary version of each piece of content
- Your core service or product pages
- Your published blog posts
- Your homepage and main category pages
Leave out:
- Thank-you and confirmation pages
- Internal search results pages
- Admin or login pages
- Tag and archive pages that duplicate content found elsewhere
- Any page with a noindex tag (Google will flag the contradiction)
Most popular CMS platforms and most popular e-commerce platforms generate a sitemap automatically — you usually don’t need to build one by hand. The file is typically already sitting at your /sitemap.xml or /sitemap_index.xml. Visit one of those URLs in your browser to check. (Google caps a single sitemap at 50MB or 50,000 URLs; most small sites are nowhere near either limit.)
Submitting the sitemap inside Search Console:
- From the Search Console left-hand menu, click Sitemaps.
- In the “Add a new sitemap” field, enter the path — usually just sitemap.xml (Search Console fills in the domain).
- Click Submit. A “Success” status means Google fetched it. Errors usually trace to a typo in the URL or a sitemap that’s temporarily inaccessible.
Once submitted, Google uses your sitemap as one of several inputs for crawling. For full technical details, refer to Google’s sitemap guidelines.
Using the URL Inspection Tool to Manually Request Indexing
After verification and sitemap submission, the URL Inspection Tool gives you one more lever: manual indexing requests. This is where you tell Google, “Please look at this specific page now.”
Use it when:
- You just published a new cornerstone page and want it found quickly.
- You significantly updated an existing page and want the new version reflected in search results.
- A page is stuck in “Discovered – currently not indexed” status and you want to nudge it forward.
Priority order for manual requests:
- Homepage — only after major changes; under normal circumstances, Google re-crawls this often anyway.
- Core service or product pages — these drive your business, so search engine visibility here is the highest priority.
- Cornerstone content — long-form, high-effort pieces designed to rank for important queries.
- Blog posts — useful but less time-sensitive.
A note on restraint: don’t request indexing on every page on day one. Aggressively over-requesting on a new domain can look like spam behavior, which is the opposite of what you want. A handful of strategic requests beats fifty panicked ones.
Controlling What Gets Indexed: Signals, Tags, and Site Structure
Tools tell Google your pages exist. The next layer of work tells Google which pages matter and which to ignore.
Understanding Noindex Tags, Meta Robots, and Robots.txt Directives
Three terms come up constantly in indexing conversations, and they get mixed up almost as often. Here they are, separated.
A noindex tag is a small piece of code that lives in the head of a single page. It tells Google: “Don’t include this specific page in your index.” Google’s syntax is <meta name=”robots” content=”noindex”>, placed in the <head> section of the page. It is the most common reason a page that should be indexed isn’t.
The meta robots directive is the umbrella term for that whole category of page-level instructions. Noindex is one option. Others include nofollow (don’t pass authority through this page’s links) and noarchive (don’t keep a cached version), both defined in Google’s robots meta tag specifications. Most owners only need to know about noindex.
Robots.txt is a different beast. It’s a single text file that lives at your site’s /robots.txt and gives sitewide instructions to crawlers, usually telling them which folders to skip entirely. It controls crawling, not indexing directly. Google’s introduction to robots.txt is unambiguous: the file is used mainly to avoid overloading your site with requests, and is not a mechanism for keeping a web page out of Google. To do that, you need a noindex tag or password protection. A page disallowed in robots.txt can still appear in Google’s results if other sites link to it.
The most common indexing-killer in the wild is a leftover noindex from a staging site — a developer noindexed the test version while building, the site went live, and no one removed the tag. It can sit there for months while the owner wonders why nothing shows up.
Quick Audit: Check for Accidental Noindex Tags
- Open your homepage in a browser.
- Right-click anywhere on the page and select View Page Source.
- Press Ctrl+F (or Cmd+F on a Mac) to open the search bar.
- Type noindex and press Enter.
If “noindex” appears anywhere on the page, that’s a problem worth investigating. Repeat for your top three service pages, your contact page, and your primary blog landing page. Most matches can be cleared in CMS or platform settings without touching code.
For Google’s full reference on these directives, see Google’s robots meta tag specifications.
Building a Logical Site Structure That Supports Crawlability
Google maintains a soft concept called crawl budget — the rough amount of attention its crawlers will give your site in a given window. If your site doesn’t have a large number of pages that change rapidly, you don’t need to think about crawl budget — keeping your sitemap current and checking your index coverage is enough.
For a small business site under a few hundred pages, crawl budget is almost never the bottleneck. Site architecture is. Good structure is what lets crawlers and human visitors find every important page without getting lost.
The four crawlability killers, in order of how often they cause real problems:
- Orphaned pages — pages with no internal links pointing to them. Crawlers find pages by following links. No links in means no crawler arrives.
- Redirect chains — page A redirects to page B redirects to page C. Each hop costs a small amount of crawl efficiency, and long chains sometimes get abandoned mid-route.
- Broken internal links — links that point to URLs that no longer exist. They erode trust in your structure and waste crawl attention.
- Duplicate content traps — multiple URLs serving identical content (often from URL parameters, session IDs, or printer-friendly versions) that split signals and confuse the indexing decision.
A practical test: Can a visitor — or a crawler — reach every important page on your site in three clicks or fewer from the homepage? If the answer is no, your structure has work to do. Internal navigation, footer links, and contextual links inside body content are all valid paths. The point is that no important page should require a search engine to guess.
Indexability Criteria: How Search Engines Decide What to Keep
Crawlability is whether Google can see your page. Indexability is whether Google chooses to keep it once it has. Different problems, different fixes.
A crawled-but-excluded page failed one of Google’s quality bars. The signals aren’t published as a checklist, but the patterns are well understood:
- Uniqueness — does this page offer content that doesn’t already exist on the web in essentially the same form?
- Depth — does it answer the question completely enough to be worth the searcher’s click?
- Relevance — does the content match what the page claims to be about (title, headers, intent)?
- User value — is there a reason a human would want this page?
Pages that get crawled and then excluded usually fall into one of three patterns: thin content (under 300 words on a topic that warrants more), duplicate content (the same product description across fifty variant URLs), or low-value automatic pages (tag archives, search result pages, parameter-based filters). Fixing them is content work, not technical work.
Aligning Content With Search Intent for Lasting Index Position
Getting indexed is the entry ticket. Staying indexed — and eventually ranking — depends on whether your pages give searchers what they came for.
Matching Page Content to What Searchers Actually Want
Every search query carries an intent or the underlying reason someone typed it. Understanding intent is the difference between a page that gets indexed and forgotten and a page that gets indexed and starts climbing.
SEO practitioners commonly group queries into three intent types. Most queries fall cleanly into one.
| Intent Type | What the Searcher Wants | Best Page Type to Match It |
| Informational | To learn or understand something. Example: “how to file quarterly taxes” | Blog post, guide, or educational article |
| Navigational | To find a specific website or business. Example: “Smith CPA services” | Homepage or branded landing page |
| Transactional | To take an action — buy, sign up, contact. Example: “CPA near me” | Service page, product page, or contact page |
Picture a small accounting practice. If the owner builds a single page targeting both “how to file quarterly taxes” and “CPA near me,” the page loses on both. The first query wants a 1,500-word explanatory article. The second wants a service page with location, hours, and a button to book a consultation. One page can’t be both — Google reads it as confused and ranks it for neither.
Pages that match intent stay indexed and climb. Pages that miss intent get crawled, excluded or buried, and quietly disappear. The discipline is one page, one job. Before publishing, ask: “If someone searches the query I’m targeting, will they get what they wanted from this page?” If you can’t answer yes confidently, the page isn’t ready.
On-Page SEO Fundamentals That Signal Indexability
On-page SEO is the set of elements on each page that help search engines understand what the page is about. For indexing purposes, you don’t need a comprehensive ranking optimization — just the foundational signals that tell Google this page is well-formed and worth keeping.
The 7 On-Page Elements to Set on Every New Page:
- A unique title tag — concise enough that it isn’t truncated when shown in search results, accurately describing what the page is about
- A meta description — short enough to display fully in a typical search result snippet, written to be read by humans rather than stuffed with keywords
- A clear H1 — the main headline that names what the page is about. A single, clear H1 remains a long-standing readability and accessibility convention worth keeping.
- Logical H2 and H3 hierarchy — subheadings that organize content the way a table of contents would.
- Body content of substance — generally 300+ words for most page types, more for in-depth topics.
- Image alt text — descriptive text that explains what each image shows. Google notes that alt text both improves accessibility for screen readers and helps Google understand the subject matter of the image — a genuinely dual-purpose payoff.
- Internal anchor text that describes the destination — “learn more about our ___ services” beats “click here”.
These are one-time setup tasks that compound. An indexed, well-optimized page is a permanent digital asset — it works without ad spend, week after week, year after year. Compare that to paid clicks, which stop the moment the budget does. Indexing flips the math in your favor for the long term.
How Fresh and Updated Content Influences Crawl Frequency
Sites that update regularly get crawled more often. Sites that go silent get crawled less. Google can learn which directories on a site change frequently and crawl them at different rates accordingly.
The “publish and forget” mistake is the single most common content failure for small business sites. Owners write five strong service pages, launch them, and never touch them again. Three years later, the information is dated, the internal links are broken, and the pages have quietly stopped ranking for the queries they used to win.
Practical update strategies that don’t require writing new content from scratch:
- Update publish dates accurately when meaningful changes are made (don’t fake a date refresh on unchanged content — Google can tell).
- Add a new section to an existing page when there’s something to say that complements the original.
- Refresh outdated stats, examples, or screenshots as they age.
- Add internal links from new content back to older cornerstone pages.
Ongoing updates are the long-term move that compounds — every refreshed page is one more reason for Google to keep visiting. For owners who want a system rather than a one-off campaign, that’s where strategic content marketing earns its keep.
Monitoring, Troubleshooting, and Sustaining Visibility Over Time
Indexing isn’t a project you finish — it’s a system you maintain. Here’s how to keep it running.
Auditing Your Indexing Status and Identifying Coverage Issues
The Page Indexing report in Search Console is your primary diagnostic. It shows every URL Google knows about on your site and tells you whether each one is indexed or not. Once a month, this report gives you a complete read on the health of your site’s indexing.
Google’s current Page Indexing report uses two top-level statuses:
| Status | Plain English Translation | What to Do About It |
| Indexed | The page was successfully indexed and is eligible to appear in search results. | Nothing — these are working as intended. |
| Not indexed | The page is not in Google’s index, either because of an indexing error or a legitimate reason (such as a robots.txt block, a noindex tag, or being a duplicate). | Open the report and read the “Why pages aren’t indexed” reasons. Triage anything that wasn’t intentional. |
The “Not indexed” group is where the diagnostic work happens. The most common reasons you’ll see:
- “Crawled – currently not indexed” — Google saw the page, but didn’t keep it. Almost always a content quality or duplication signal. Strengthen the content.
- “Discovered – currently not indexed” — Google knows the page exists but hasn’t crawled it yet. Usually patience; sometimes a sign internal linking to the page is weak.
- “Duplicate, submitted URL not selected as canonical” — Google decided a different URL is the “real” version of the page. Check for duplicate pages or canonical tag conflicts.
- “Excluded by ‘noindex’ tag” — exactly what it sounds like. If unintended, remove the tag.
- “Blocked by robots.txt” — your robots.txt file is keeping crawlers out. If unintended, edit the file.
A monthly audit is enough for most small sites. Open the Page Indexing report, scan the totals, click into “Not indexed” reasons, and triage anything that looks wrong. Under thirty minutes, no developer required.
Fixing the Most Common Indexing Problems Without a Developer
Most indexing issues for small business sites are fixable from the platform dashboard plus Search Console. The 80/20 rule holds: roughly four out of five problems are solvable without code changes.
The post-fix workflow is the same regardless of the underlying problem:
- Problem — identify the specific exclusion or error in the Page Indexing report.
- Fix — make the change in your CMS, platform settings, or robots.txt
- Verify — return to Search Console, paste the URL into the URL Inspection Tool, and click Test Live URL to confirm Google can now reach and process the page correctly.
- Re-request indexing — once the live test passes, click Request Indexing to nudge Google to re-crawl.
- Done — check back in 3–7 days to confirm the status has updated to “URL is on Google”.
The most common DIY fixes:
- Removing accidental noindex tags — usually a CMS setting or a leftover from a staging site, fixable in seconds.
- Submitting missing pages — add them to your sitemap, request indexing through the URL Inspection Tool.
- Repairing broken internal links — find them with any free crawler check (or by manually clicking through your nav) and update the URLs.
- Resolving redirect errors — most often a redirect chain; collapse multiple hops into a single redirect to the final destination.
Most owners are surprised by how quickly the panic dissolves once the workflow becomes familiar. This is a learnable, repeatable skill. Site indexing stops feeling like a black box for beginners once you’ve worked through a few real cases. When an audit reveals issues that exceed comfortable DIY scope like site-wide canonical conflicts, persistent crawl errors, or structural problems beyond a few pages, that’s the moment a comprehensive SEO audit really pays off.
Building a Long-Term Indexing Strategy That Compounds
Foundational indexing sets the floor. Long-term strategy raises the ceiling.
Every page you successfully index and maintain becomes a permanent digital asset. Unlike paid ads, which stop the moment the budget does, an indexed and well-structured page works for you continuously — for months, often years. The math compounds: ten well-indexed pages this year, plus ten more next year, plus quarterly updates to the original ten, equals an organic traffic base that doesn’t depend on ad spend to survive.
Your Monthly Indexing Routine:
- Open the Page Indexing report in Search Console.
- Scan totals for sudden drops in Indexed pages.
- Triage any new “Not indexed” reasons.
- Run URL Inspection on your top 5 pages.
- Submit any new pages published since last check.
- Quarterly: re-submit your sitemap and audit internal links.
- Semi-annually: refresh dated content on cornerstone pages.
When goals stretch beyond foundations — competing for harder keywords, building topical authority across a content hub, or scaling organic traffic into a primary acquisition channel — a long-term SEO strategy becomes the force multiplier.
From Invisible to Indexed
Indexing is one of the few corners of marketing where the foundational work is genuinely finishable. Verify your site, submit a sitemap, request indexing for the pages that matter, confirm nothing is blocking the crawlers, and maintain the system in roughly thirty minutes a month. That is how to make your website searchable in practice, and the work compounds.
When you’re ready to move past foundational indexing into a strategy designed to compound over years, start a conversation with the Web Upon team.

