
In the world of digital graphics, mastering the art of pixel manipulation is crucial for designers and enthusiasts alike. An 8×8 pixel image converter is a tool that allows us to transform visual data into images with a resolution of 8 pixels by 8 pixels. This specific resolution means working with a tiny canvas where each pixel is critical to the overall image representation. At this scale, the ratio is typically 1:1, signifying that the width and height are equal, leading to a perfectly square grid. Understanding the pixel density, which in this case is the number of pixels within a demarcated area, becomes less significant due to the straightforward count of 64 pixels.
Creating an 8×8 pixel image might seem like a straightforward task, yet it requires precision and an understanding of how minimal pixel changes can drastically alter the visual outcome. To make such an image, one must use a graphics editor capable of defining and editing images at the pixel level. Precision tools within these editors enable us to set color values for each pixel, ensuring that the final artwork meets our exact specifications. Whether used for icons, textures, or other graphical elements, 8×8 images are optimized for various uses, including user interface design or digital art, where resource efficiency is paramount.
Key Takeaways
- An 8×8 pixel image converter translates visual data into a 64 pixel, square format image.
- The process of creating an 8×8 pixel image demands meticulous color selection for each individual pixel.
- These small-scale images serve multiple purposes, such as icon creation or texturing in digital design, where their compact size is advantageous.
Understanding 8×8 Pixel Images
When we explore 8×8 pixel images, we are delving into the basics of digital image specifications, focusing on resolution, pixel density, and aspect ratio. These fundamental attributes define the image’s detail, dimensions, and display quality.
Resolution and Pixel Density
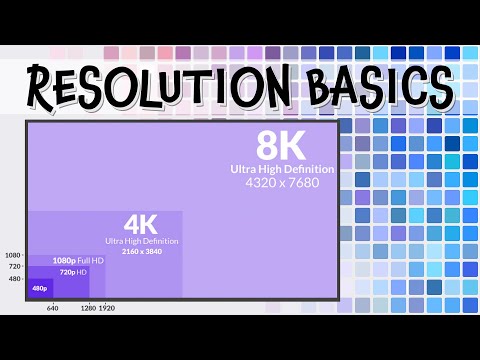
The resolution of an 8×8 pixel image is exactly as the name indicates: it contains 8 pixels in width and 8 pixels in height, making up a total of 64 pixels. In terms of pixel density, which is measured in pixels per inch (PPI), an 8×8 pixel image will have the same density regardless of the display size unless the image is scaled. Pixel density is crucial as it determines how sharp an image appears; higher pixel densities generally mean crisper images. However, for an 8×8 pixel image, due to its extremely low resolution, the image will inherently lack detail, often appearing blocky or pixelated, especially if viewed on larger screens.
Aspect Ratio and Its Importance
The aspect ratio of an image refers to the proportional relationship between its width and height. For an 8×8 pixel image, the aspect ratio is 1:1, meaning that the width and height are equal and the image is perfectly square. The importance of maintaining the correct aspect ratio lies in preserving the original appearance of the image without distortion. The aspect ratio is particularly crucial for images that are to be integrated into systems requiring specific dimensions, such as icon designs for software, where distorting the aspect ratio would result in a loss of quality and clarity.
Steps to Create an 8×8 Pixel Image

Before we dive into the software choice and conversion steps, it’s essential to understand that an 8×8 pixel image is very low-resolution, which means we must use precise editing tools to handle such small images effectively.
Choosing the Right Software
To create an 8×8 pixel image, we need software that supports meticulous pixel-level editing and a variety of file formats such as gif, jpg, bmp, png, tiff, ico, webp, eps, and svg. We recommend using a platform that is both free and easy to use to ensure a smooth process. An online editor can be a great choice as it often requires no installation and can be accessed from anywhere. Platforms like GIMP and Pixel Art are excellent options, as they offer the necessary precision for small-scale images.
Converting Images to 8×8 Pixels
To convert an existing image to an 8×8 pixel dimensions, follow these steps:
- Open the selected software and import your image file.
- Locate the resize or scale tool within the editor. This tool is often found in the image or canvas settings.
- Enter ‘8’ in both the width and height fields to set the resolution to 8×8 pixels.
- Confirm the changes. The software will transform the picture into an 8×8 grid, where each square represents one pixel.
- If needed, manually adjust individual pixels to refine your image, given the limited space available in an 8×8 format.
- Save the edited image in your desired file format – whether gif, png, or any other format mentioned earlier, ensuring your work is preserved.
By following these steps, we can convert any image into an 8×8 pixel version, suitable for icons or very small visual elements in digital projects.
Optimizing 8×8 Pixel Images for Different Uses

When we discuss optimization of 8×8 pixel images, we’re focusing on maintaining image quality while adjusting for file size and appropriate medium. This entails understanding the differences in pixel density, resolution, and how to best resize images for different platforms.
For Web and Digital Platforms
The internet demands that images load quickly and display clearly on a variety of devices. For 8×8 pixel images used on digital platforms:
- Quality: Keep the image in a format (like PNG or GIF) that supports a high-quality output for clear and crisp visuals, even with limited color palettes.
- File Size: Compress the image to reduce file size without losing quality; this ensures faster loading times online.
- Display: Design images with digital display in mind, knowing that screen resolutions vary widely.
- Pixels to Print Size Calculator: Not typically needed for web, but useful to understand how an 8×8 image would scale if printed.
- Resize Image: Use software to precisely resize the image, ensuring that the quality is preserved after scaling up or down.
For Printing and Physical Media
Printing 8×8 pixel images presents unique challenges that require careful consideration of physical media properties:
- DPI (Dots Per Inch): Optimize the image’s DPI based on the print size; for example, printing small stickers might require a higher DPI to retain clarity.
- Print Size: Determine the desired print size and use a pixels to print size calculator to verify that our 8×8 image can be scaled suitably.
- Image File Size Calculator: Helps us understand the file size prior to printing, as high-resolution images for print can be larger in file size than web images.
- Medium: Choose the right medium (e.g., glossy paper, canvas) that complements the image’s resolution and enhances its quality upon print.
- Resize Image: Carefully enlarge the image if needed using a reliable image editor that can increase the pixel count for printing without causing pixelation.
By adhering to these specific practices for web and physical media, we ensure that our 8×8 images are displayed at their best in their respective environments.
Advanced Considerations
In this section, we’ll cover the technical details that are crucial when working with 8 x 8 pixel images. Our focus will be to ensure accuracy in terms of aspect ratio while maintaining the highest image quality in the smallest file size.
Aspect Ratio Calculators and Formulas
For an 8 x 8 pixel image, the aspect ratio is 1:1, which means the width and height are equal, forming a perfect square. In instances where the aspect ratio needs to be modified, we can use an aspect ratio calculator or refer to a chart for common ratios. However, for custom changes, here’s the simple formula for calculating aspect ratios:
- Aspect Ratio = Width / Height
When the aim is to scale up or down while maintaining the same aspect ratio (known as locking the aspect ratio), we multiply both original width and height by the same percentage.
Maintaining Image Quality and File Size
Maintaining the image quality when resizing an image to 8 x 8 pixels can be challenging due to the loss of detail at such a small resolution. To preserve the highest quality, we use image formats like JPEG, which allow us to balance quality and file size. When adjusting the resize settings, ensure the conversion process does not introduce unnecessary artifacts.
It’s essential to consider privacy in this process as well. Minimize the metadata embedded within the image file to protect user privacy and reduce the file size. This step often goes unnoticed but is a key factor in our overall image handling strategy.

