Originally posted on March 16, 2024 @ 6:59 am

Instructions on Using the Tool

Diving into the world of digital photos, grabbing the nitty-gritty on how clear and big they are matters tons. Imagine a picture exactly as wide as it is tall, like a perfect square, with 840 tiny dots (or pixels) lining each side. That’s a 1:1 ratio – sides match up exactly. Now, think about clarity, or how much detail you can see. With 840 x 840 pixels, you’re getting a pretty decent look at your picture, because that’s how many dots fit into the space on a screen.
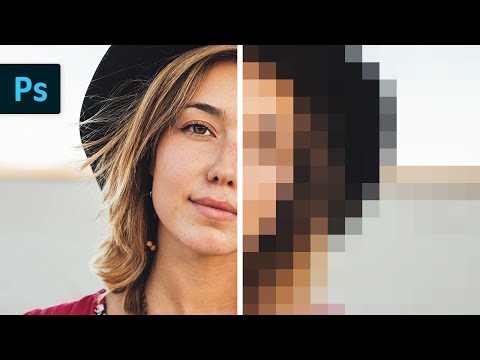
Pixel density, on the other hand, is how many pixels are displayed per inch (PPI). The pixel density influences how sharp an image appears and is dependent on both the image’s resolution and the size at which it’s displayed. When you resize an image to 840px x 840px, maintaining the image quality becomes a concern. It involves using the right tools and methods to prevent the photo from becoming pixelated or blurry, ensuring the end result retains clarity and detail.
Key Takeaways
- 840 x 840 pixels indicates a square image with an aspect ratio of 1:1.
- Pixel density affects image sharpness and depends on the resolution and display size.
- Proper resizing techniques are essential to maintain image quality during conversion.
Understanding Image Basics
Before diving into specifics, it’s crucial to grasp the foundational elements that define digital images: aspect ratio, resolution, and common image formats. These concepts are paramount when working with images, especially when creating an 840px x 840px photo.
What Is Aspect Ratio
Aspect ratio refers to the proportional relationship between the width and height of an image. It is commonly expressed as two numbers separated by a colon, such as 16:9, 4:3, or 1:1. The aspect ratio of an 840px x 840px image is exactly 1:1, meaning it is perfectly square.
- 16:9: Common for videos and modern computer monitors
- 4:3: Traditional TV and computer screen format
- 1:1: Common for social media profile pictures
Using an aspect ratio calculator can help ensure that images are resized without distorting their content.
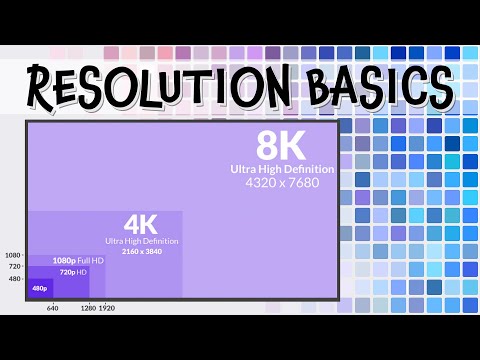
Image Resolution and Quality
The resolution of an image is usually measured in pixels and is indicative of the image’s detail and clarity. It is denoted by figures representing the height and width of the picture, such as 840 pixels wide by 840 pixels high. The pixel density, often measured in dots per inch (DPI), also affects the resolution. High resolution and pixel density typically mean higher image quality, essential for print or when detailed visuals are of utmost importance.
Additionally, we can assess image quality through:
- Resolution: Higher resolution means more pixels and better detail
- DPI: Greater pixel density for increased clarity, particularly in print
Common Image Formats
When dealing with image files, format is a term that refers to the way image information is stored. Different formats serve various purposes:
- JPG or JPEG: Best for photos due to its compression capabilities.
- PNG: Good quality with transparency support, ideal for logos.
- GIF: Supports animation with lower color depth.
- BMP: Uncompressed bitmap, resulting in larger file sizes.
- TIFF: Often used for high-quality images in professional printing.
- WEBP: A modern format aiming to provide high quality with smaller file sizes.
- EPS: Encapsulated PostScript, typically used for vector graphics.
Each image file format has its trade-offs between quality, file size, and compatibility. Choose the format that best serves the intended use of the image.
The Process of Resizing Images
When we need an image that is exactly 840×840 pixels, it is essential to understand the process of adjusting image dimensions. We achieve the perfect size while maintaining resolution quality, and we will show you the specific tools and steps to make resizing seamless.
Using Online Image Resizers
Our first step involves utilizing an online image resizer. These tools are often free and straightforward to use. We simply upload our image, usually with a drag and drop interface, and enter the desired image dimensions, in this case, 840×840 pixels. After the resize, we can typically hit a download button on the download page to save our resized photo with the new dimensions.
Steps to Resize:
- Upload your image to the resizer.
- Input ‘840’ for both width and height to resize image to 840×840.
- Click resize and then download your resized image.
How to Convert Image File Formats
Occasionally, we need to convert our image file format for compatibility with various software or websites. Most online converters offer an option to change the format (JPG, PNG, BMP, etc.) in addition to resizing. During conversion, we keep an eye on the file size which may change depending on the selected format.
File Format Conversion:
- Select the new image file format.
- Ensure the dimension remains 840×840 after conversion.
- Download the image in its new format.
Optimizing for Social Media Platforms
Lastly, we often resize photos specifically for social media. Each platform, like Facebook or Instagram, has preferred image sizes and dimensions for optimal display. We ensure our photo’s dimensions and format meet the platform’s requirements before uploading, thus preserving image quality on our social media profiles.
Social Media Optimization:
- Verify the platform’s required image size (e.g., 840×840 for a profile picture).
- Resize and convert the image accordingly.
- Use the platform’s upload link to add your photo seamlessly.
By understanding these specific aspects, we ensure that every image we resize meets our exact needs and is visually appealing on all platforms.
Technical Considerations and Tips

In the process of converting images to a specific 840px by 840px dimension, several key factors must be addressed to ensure the highest quality outcome. We’ll discuss how to maintain image integrity, compatibility across different platforms, and the safe handling of your images.
Maintaining Image Quality
When resizing images to fit a width and height of 840px by 840px, it’s crucial to avoid compromising quality. Here are two main points:
- Resolution and Pixel Density: Always start with the highest quality source image. When using a software to resize images, select the ‘Preserve Details’ option or its equivalent to maintain the image quality. A higher resolution photo will yield a better result upon resize, as it has more detail to work with.
- Resize Method: Use bicubic or Lanczos resampling over simpler methods like nearest neighbor, which can result in a pixelated photo. Additionally, avoid scaling up significantly from a much smaller image, as this can degrade image quality.
Ensuring Website and Mobile Compatibility
Ensuring that your resized 840px images are displayed correctly on all platforms is vital for a good user experience.
- Web: Ensure that the image’s dimensions are optimized for both speed and visual quality. Most modern browsers can handle images with a resolution of 840px squared without issue, but the file size should be kept in check to accelerate page loading times.
- Mobile: Given the variety of mobile devices, the resized image should be mobile-friendly. Test the image on different screen sizes and densities to confirm that it scales well and maintains quality across devices.
Privacy and Security Concerns
When working with images, especially when using online tools or cloud storage, remember:
- Privacy: Avoid using online converters that ask for unnecessary permissions or store your images without explicit consent.
- Security: Prefer reputable image editing software or services that are transparent about their use of data. Be wary of third-party sites and services that can potentially misuse your images.

