
Instructions on Using the Tool

Creating a precise 800 x 420 pixel image can be crucial for many digital projects, whether it’s for social media posts, website banners, or graphic design elements. The 800 x 420 pixel dimension translates to an aspect ratio of approximately 1.9:1, which is essential for ensuring the image displays correctly across different platforms. Understanding this aspect ratio helps us maintain the image’s integrity and appearance when scaled.
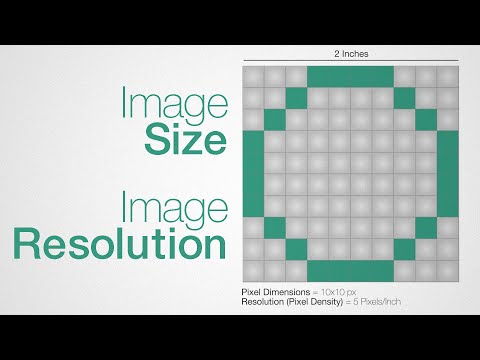
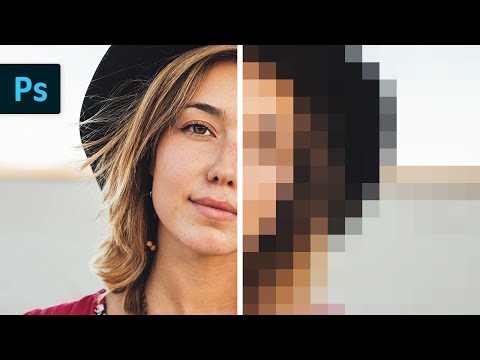
Pixel density, or pixels per inch (PPI), also plays a significant role in how sharp the image appears, especially on higher resolution screens. We need to consider this when converting and resizing images to 800 x 420 pixels. Tools like image converters can assist in this, allowing us to maintain the image quality while adjusting its size. Ensuring the right resolution and pixel density guarantees that our image remains clear and visually appealing.
When making an 800 x 420 photo, we must choose the appropriate format, such as JPEG or PNG. These formats balance quality and file size, making them ideal for web use. Optimizing the image for its intended platform ensures quick loading times and high visual quality, enhancing the overall user experience.
Key Takeaways
- The aspect ratio of 800 x 420 pixels is approximately 1.9:1.
- Resizing images should maintain quality through careful consideration of pixel density.
- Select the right image format for the best balance of quality and file size.
Understanding Image Dimensions and Aspect Ratios
When working with image dimensions and aspect ratios, it’s important to consider how they impact the visual quality and compatibility of your images across different devices. Let’s examine the specifics of dealing with a resolution of 800px x 420px and compare common aspect ratios.
The Significance of 800px x 420px Resolution
The 800px x 420px resolution is often used in web design and digital media. This specific resolution helps maintain image clarity on various screen sizes without overwhelming the layout. We achieve a balance between detail and performance by selecting this size.
High-resolution images provide more detail, crucial for visual-heavy content. However, larger files can slow down loading times. Using an 800 x 420 Pixel Image Converter ensures the images are optimized for both clarity and speed, making them suitable for online use where fast loading is necessary.
Exploring Common Aspect Ratios: 16:9 vs. 4:3 vs. 1:1
16:9 Aspect Ratio: We frequently use the 16:9 aspect ratio for widescreen displays, including televisions and monitors. This ratio perfectly fits most modern devices, making it ideal for video content and large format photography.
4:3 Aspect Ratio: The 4:3 ratio is commonly associated with traditional television screens and older monitors. While not as prevalent today, this ratio is still useful for certain types of presentations or images that need to fit within specific constraints.
1:1 Aspect Ratio: The 1:1 ratio provides a square image. This is perfect for social media platforms like Instagram, where uniformity in the feed is crucial. Square images ensure consistent appearance regardless of how they are displayed.
We use aspect ratio calculators to precisely convert images while maintaining the intended proportions. This helps in achieving the desired output without distorting the image.
By considering these standards, we can better tailor our visuals to suit various platforms and devices.
How to Resize Images While Maintaining Quality
To ensure high-quality images after resizing, it is essential to use effective tools and make basic adjustments like cropping and rotating.
Using Photo Resizer Tools Effectively
We need to choose the right photo resizer tools to resize images while maintaining quality. Modern tools like Adobe Photoshop, GIMP, and online platforms like Pixlr offer excellent resizing features. When resizing, it’s vital to manage the output dimensions and file formats.
Choosing bicubic or bilinear resampling methods can help maintain image quality. These methods are especially useful when downsizing. For images that need enlarging, selecting a tool with intelligent upscaling can minimize pixelation.
Maintaining the correct aspect ratio, which in our case is 800 x 420, ensures the resized images don’t look stretched. This ratio must be upheld throughout the resizing process to keep the photo aesthetically pleasing and true to its original context.
Crop, Rotate, and Edit: Basic Image Adjustments
Basic image adjustments like cropping and rotating are fundamental. Cropping allows us to focus on the important parts of the image and discard unwanted areas. This is particularly useful if we need our images to fit specific dimensions without distorting them.
Rotation adjustment ensures the subject of the photo aligns correctly. Combined with cropping, rotating can enhance the visual appeal and composition of the image.
After cropping and rotating, we should also look at adjusting brightness, contrast, and color balance. These edits can substantially improve the visual quality and make the images more engaging.
By carefully combining these adjustments, we can resize images and still maintain the highest quality, resulting in photos that look professional and polished.
Choosing the Right Image Format for Your Needs

Selecting the appropriate image format can significantly affect the quality and usability of your images. Key considerations include the intended use, quality, and compatibility of the format.
Understanding the Differences: JPG, PNG, WEBP, and More
When deciding between JPG, PNG, and WEBP, it’s crucial to understand their strengths and weaknesses. JPG is ideal for photographic images thanks to its high compression and small file size but may lose quality with each edit. It’s widely supported across different platforms and devices.
PNG offers lossless compression, making it perfect for images requiring transparency or high detail, such as logos or graphics. Unlike JPG, PNGs maintain quality through multiple edits and are best used where image clarity is paramount.
WEBP combines the best of both worlds, providing high-quality images with smaller file sizes compared to JPG and PNG. It supports both lossy and lossless compression and is particularly beneficial for web use as it reduces load times without sacrificing quality.
Converting to PDF: When and Why to Use It
PDF is a versatile format for documents that need to be printed or shared consistently across different devices and operating systems. Converting images to PDF is beneficial for presentations, reports, or portfolios where maintaining layout and formatting is critical.
We use PDF when we need to compile multiple images into a single document or ensure the images appear the same on all screens and printouts. This format is also preferred for content that combines text and images, offering robust support for both elements in a single file.
Optimizing Images for Web and Print

To optimize images for web and print, we must consider factors like pixel density and file formats, ensuring that the images look great and load quickly.
Pixel Density and Printing: Pixels to Print Size Calculator
When printing images, the rule of thumb is higher pixel density for better quality. We use a pixels to print size calculator to determine the right dimensions for a given image. Typically, the industry standard for print is 300 pixels per inch (PPI).
This means a 300 PPI resolution ensures our 800 x 420 pixel image prints at approximately 2.67 x 1.4 inches. When converted to centimeters, it is about 6.78 x 3.56 cm. This pixel density offers crisp and clear prints.
Using online calculators can help automate these conversions and ensure we get the best print results.
Ensuring Fast Loading Speeds: Image File Size and Formats
For the web, small file sizes are crucial. Large images can slow down page load times significantly. The first step is using an image file size calculator to gauge the size. We can adjust formats and compression levels to optimize loading speeds.
JPEG is a preferred format for photographs due to its balance of quality and size. PNG is ideal for images with transparency. WebP is another excellent option due to its efficient compression, maintaining quality while minimizing size.
Compressing images and using the right format ensures our web pages remain lightning fast, providing a better user experience.

