
Instructions on Using the Tool

Pictures play a huge role online, and getting the size just right matters a ton for different spots on the web. Ever heard of a tool that tweaks your photos to a neat 750 x 750 pixels? It’s like a magic wand for your selfies, products on shopping websites, or anywhere else you need a square snap. It’s all about that equal sides game, with the height and width matching up to make a flawless square. This 1:1 ratio is famous for fitting in just right, keeping your pics from getting chopped or looking wonky. So, if you’re aiming to polish up your images without a hitch, stick around to see why this little trick is a game-changer.
Resolution and pixel density play a crucial role in determining the quality of your image. The resolution is the total number of pixels within the image, and in this case, it would be 562,500 pixels. Pixel density, measured in pixels per inch (PPI), dictates how those pixels are distributed across the image. The higher the PPI, the sharper the image will appear, especially when printed. To create or convert an image to 750px by 750px, image editing software or an online converter is necessary to adjust the dimensions without sacrificing the integrity of the original photo.
Key Takeaways
- Converting images to 750px x 750px is beneficial for ensuring compatibility on various digital platforms.
- The square ratio (1:1) of a 750px image avoids cropping and maintains image integrity.
- Quality conversion preserves resolution and pixel density for visual clarity.
Basics of Image Conversion

Before we delve into image conversion specifics, it’s crucial to understand that the process involves changing a photo’s dimensions and resolution to meet certain criteria, often without losing clarity or detail.
Understanding Pixels and Resolution
Pixels are the tiny dots that make up an image on a digital display, where each pixel represents a color. Resolution refers to the number of pixels along the width and height of a photo, expressed typically as width x height. Higher resolution means more pixels and finer detail, assuming that display size remains the same. Our goal in conversion is to either maintain or improve the resolution and quality during the conversion process.
For example, when converting an image to 750px by 750px, we are specifying that the image should be 750 pixels in width and 750 pixels in height. If we’re adjusting from a higher resolution, we must ensure that the decrease in total pixels doesn’t significantly diminish the photo’s quality.
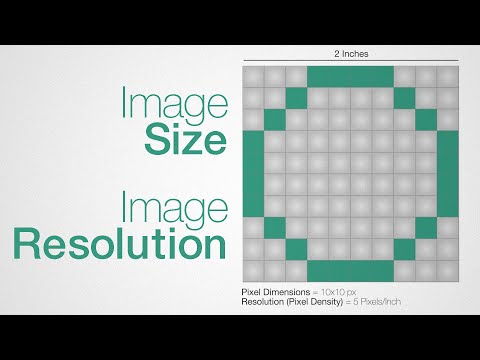
To understand pixel density, we often use the term pixels per inch (PPI) or dots per inch (DPI). A standard photograph that is meant for digital screens usually has around 72 PPI, while for quality printing, the image should have 300 PPI. A simple formula to remember when converting pixel dimensions to print size is:
Print Size = Pixel Dimension / PPI
Common Aspect Ratios
An aspect ratio is the ratio of the width to the height of an image. It is independent of the actual pixels or inches—only the relationship between width and height matters. Common aspect ratios include 1:1, 4:3, 3:2, and 16:9. The ratio of 1:1 is a perfect square, and it is what we aim for when converting an image to 750px x 750px.
To figure out an image’s aspect ratio or to calculate one for conversion, you can use an aspect ratio calculator. These tools allow you to input one dimension and receive the other, ensuring that the aspect ratio remains consistent. Maintaining the correct aspect ratio is crucial—if the aspect ratio is changed improperly, images may appear stretched or squished.
For consistency across multiple platforms, it is important for us to maintain the aspect ratio during the image conversion process, especially when dealing with standardized content like profile pictures or thumbnails.
Step-by-Step Conversion Process
To obtain the perfect 750px by 750px image, we’ll navigate through resizing images and selecting the right format and quality level. Following these procedures guarantees not only the correct dimensions but also the preservation of image clarity and optimization for use across different applications.
Resizing Images
Resizing an image to a precise pixel dimension, such as 750 x 750, requires an image editing tool or software. Here’s how we do it:
- Open the image: We’ll initiate by opening our photo in the image editing software of our choice.
- Access resizing tool: Next, we’ll locate the image resizing function, typically found under the ‘Image’ or ‘Edit’ menus.
- Set dimensions: In the resizing interface, we’ll ensure the aspect ratio is unlocked to manually enter the width and height values—750 pixels by 750 pixels.
- Apply changes: After confirming the new dimensions, we’ll apply the changes to resize our image accordingly.
- Save the resized image: It’s crucial to save the adjusted photo, ideally creating a copy to preserve the original size.
Format Selection and Quality Enhancement
Selecting an appropriate format and enhancing the quality are essential steps to maintain the visual integrity of the resized photo.
- Choose the right file format: We’ll select a file format that suits our needs. For websites, JPEG or WEBP are optimal due to their smaller sizes, while a PNG is great for preserving transparency. Formats like BMP, EPS, and ICO are chosen based on specific requirements.
- Quality adjustment: To ensure the image maintains high quality, we’ll adjust the compression settings—if the format allows. This determines how much quality is sacrificed for file size.
By adhering to these steps, we ensure that our 750 x 750 pixel image maintains its size, quality, and format optimization for our intended use.
Practical Uses and Considerations
When working with 750 x 750 pixel images, it’s crucial to consider the platform’s requirements, in terms of resolution, aspect ratio, and file size, to optimize the image appropriately.
Optimizing for Social Media
Aspect Ratios and Resolutions:
For social media platforms like Instagram, the 1:1 ratio is perfect for posts, while Facebook may require different sizes depending on the kind of post. It’s important to remember that although a 750px square image works well for Instagram, Facebook cover photos work best at a 16:9 ratio. In these cases, understanding how to resize and crop images without losing quality becomes essential.
- Instagram: 750px x 750px (1:1 ratio)
- Facebook: 1920px x 1080px (16:9 ratio for cover photos)
File Size and Formats:
Maintaining a balance between file size and image quality is key. A large file size can slow down page loading times, which could be detrimental to viewer engagement. On the other hand, a file that’s too small may appear pixelated. Formats like JPEG are ideal for balancing quality and file size, whereas GIFs may be used for smaller, simple graphics.
Preparing Images for Printing
Resolution and DPI:
When preparing a 750 x 750 pixel image for printing, DPI (dots per inch) plays a crucial role in determining print quality. A higher DPI often indicates better image quality, but it increases the file size. For most prints, a DPI of 300 is standard, as it ensures good quality without unnecessary file size.
Pixels to Print Size Calculator:
To calculate the print size, a pixels to print size calculator can be very helpful. A 750px square image at 300 DPI will yield a print size of 2.5 inches by 2.5 inches. However, different print sizes and DPIs will affect the final output.
- Print Size at 300 DPI: 2.5″ x 2.5″
By considering these specific factors for each application, we can ensure that our 750 x 750 pixel images are optimized for both online and print purposes.

