
Instructions on Using the Tool

In talking about the details of an image converter with a resolution of 720 x 1280 pixels, grasping the basic principles that determine the quality and features of a digital image is crucial. The aspect ratio, which is the proportional relationship between its width and height, of such a resolution is 9:16. This indicates that for every 9 parts of width, it stretches to 16 parts of height. This ratio is especially compatible with mobile devices, mirroring the portrait mode often utilized.
Pixel density, measured in pixels per inch (PPI), is another crucial factor to consider; it describes how closely packed the pixels are on a display, with higher values resulting in sharper and crisper images. Resolution refers to the total number of pixels that compose the image, with 720 x 1280 resolution amounting to 921,600 total pixels. When it comes to creating or converting images to this resolution, there are various online tools and software available that can resize and adjust images accurately without compromising their quality.
Key Takeaways
- A 720 x 1280 resolution corresponds to an aspect ratio of 9:16, typically used for mobile screens.
- Pixel density is key to image clarity, with higher values indicating sharper images.
- Image converters can resize photos to 720 x 1280 pixels while maintaining image quality.
Understanding Image Basics
When we talk about digital images, understanding formats, resolution, and pixel density is crucial for achieving the desired clarity and compatibility.
Image Formats and Quality
Digital images come in various formats, each with its own characteristics. Common image formats include JPEG, PNG, GIF, WebP, BMP, TIFF, EPS, and ICO. JPEG is widely used for its balance of quality and file size, making it suitable for web use. PNG offers lossless compression, meaning it maintains image quality despite file resizing. GIF is best for simple animations. WebP is a modern format designed for excellent compression and quality. BMP, TIFF, EPS, and ICO are often used in professional or specific contexts due to their particular attributes in handling color depth, transparency, and scalability.
- JPEG: Good for photos, balance of quality and size.
- PNG: Lossless, supports transparency, suitable for web graphics.
- GIF: Allows simple animations.
- WebP: High-quality, good compression.
- BMP, TIFF, EPS, ICO: Specialized uses, various advanced features.
Resolution and Aspect Ratio
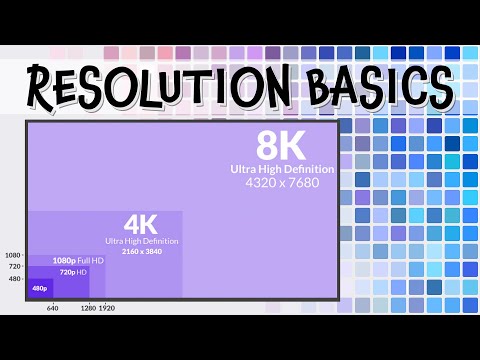
Resolution refers to the number of pixels contained in an image and is generally described in terms of width and height (e.g., 720×1280 pixels). Aspect ratio describes the proportional relationship between the image’s width and height. For a 720×1280 pixel image, the aspect ratio is 9:16, which is common for smartphones. A higher resolution often means more detail, but it also results in a larger file size. Understanding aspect ratios helps ensure that images are displayed correctly without unintended stretching or compression.
- Resolution: 720×1280 pixels, indicates detail and clarity.
- Aspect Ratio: 9:16, ensures proper image display without distortion.
Dimension and Pixel Density
The dimensions of an image are directly related to the total number of pixels it contains, which in turn affects the image’s pixel density. Pixel density, typically measured in pixels per inch (PPI), determines how sharp an image will appear on a screen. When we resize or convert images while maintaining the same aspect ratio, the pixel density can change, affecting the overall sharpness and quality.
- Dimensions: The total pixel count—height by width (e.g., 720px x 1280px).
- Pixel Density: Sharpness of the image on the display, varies with screen size and resolution.
By understanding these basics, we can make informed choices about converting and resizing images to fit our needs while preserving the desired quality and compatibility.
Practical Guide to Image Conversion

When converting images, we must consider the platform requirements, appropriate resizing techniques, and how to maintain or improve image quality.
Converting Images for Different Platforms
Each social media platform has preferred image dimensions and aspect ratios. For example, Facebook typically uses images with an aspect ratio of 1:1 for profile pictures or 16:9 for cover photos. When dealing with Instagram, images are best viewed at ratios of 4:5 for portrait posts and 1:1 for square posts. To meet these requirements, we utilize an aspect ratio calculator to keep our images proportional while resizing.
- Facebook profile photo: 1:1 (minimum 180px by 180px)
- Facebook cover photo: 16:9 (minimum 820px by 312px)
- Instagram portrait post: 4:5 (recommended 1080px by 1350px)
- Instagram square post: 1:1 (recommended 1080px by 1080px)
Image Resizing Techniques
The process of resizing an image, known as downsizing or scaling down, typically involves using an image resizer tool. There is a need to preserve the original aspect ratio to prevent distortion. For example, to convert an image to 720px by 1280px, we ensure the initial image is close to the 16:9 aspect ratio or crop it accordingly before resizing.
Steps to resize:
- Open the image in an editing tool
- Select the crop tool to adjust the aspect ratio (if needed)
- Enter the desired dimensions (e.g., 720px by 1280px)
- Apply resizing to complete the transformation
Adjusting Image Quality
After the image is resized, quality adjustments may be necessary to enhance the visual appeal. Converting a colored image to black and white can add a dramatic effect, whereas increasing the sharpness can improve the clarity of the image. Tools within image editing software allow us to refine color balance, contrast, and brightness to optimize the image quality.
- Convert to black and white: Enhance for a classic look
- Adjust sharpness: Improve clarity and detail
- Modify color balance, contrast, brightness: Achieve desired ambiance and mood
Remember that each modification can affect the file size and loading time, which are crucial for website performance and user experience.
Technical Considerations

When we convert a 720 x 1280 pixel image, we need to consider various factors such as accurate pixel to print size calculations, maintaining aspect ratios for consistency, and optimizing file size and format for use across different platforms.
Pixel to Print Size Calculations
To calculate the print size from pixels, we use the formula: print size = pixels/dpi (dots per inch). For a 720px by 1280px image, using a standard print quality of 300 dpi, the print dimensions are 2.4″ wide by 4.27″ high. A pixels to print size calculator can simplify this process by automating the conversions. It’s crucial to ensure that the print dimensions remain within a square or vertical layout, depending on the 3:2 aspect ratio or other desired print ratios.
Maintaining Aspect Ratios
The aspect ratio of an image, in this case, 720px wide to 1280px high, is 9:16. It’s vital to maintain this when resizing to prevent distortion. If we need to change the dimensions while keeping the original width to height ratio, we multiply both the width and the height by the same factor. So, a doubled version of our image would be 1440px by 2560px, still maintaining the aspect ratio.
File Size and Format Optimizations
Finally, consider the file size and format. Larger images generally mean larger file sizes, which can affect loading times and storage. An image file size calculator can help us estimate this. To maintain the highest quality with an optimized file size, we often save the image in a .png or .jpeg format, depending on the need for transparency (choose .png for that). For images that will be displayed digitally, resolutions may vary based on the display device, but retaining the aspect ratio is key to visual consistency.
Additional Information and Resources
In our quest to ensure the highest quality image conversion, we keep both the functionality and security forefront. Here’s how we can effectively manage our 720px x 1280px photo needs while safeguarding our privacy.
Choosing the Right Tool for Image Conversion
When converting images to a resolution of 720 x 1280 pixels, selecting the appropriate tool is critical. For those of us using iOS or Mac, preference might be given to software that integrates seamlessly with our operating system. A good converter should provide a high-quality image without a significant wait; we’re looking for processing in a matter of seconds. Additionally, if we’re dealing with animations, we want to ensure that the software supports conversion to or from GIFs effectively.
- Free options can be attractive, but we must ensure they don’t compromise on quality.
- Paid tools may offer advanced features, like batch processing or additional file format support.
Protecting Your Privacy During Conversion
During the image conversion process, privacy is a non-negotiable aspect. Here’s what we focus on:
- Opt for services that don’t keep a copy of our images or personal information.
- Check the provider’s privacy policy for clarity on data handling.
With these proactive steps, we ensure that our image conversion is a secure process.

