
Instructions on Using the Tool

Diving into the world of digital snapshots and videos? Let’s crack the code on something super important: resolution and how wide or tall your picture is (yeah, that’s the aspect ratio!). Picture this: you’re scrolling through your favorite videos online, and you hit a super smooth one that doesn’t take forever to load – that’s probably playing in 360p, the go-to standard for keeping things quick and clear, kind of like the fast food of image sizes. This magic number keeps things looking neat on different screens, aiming for a cool widescreen vibe with a 16:9 ratio, just like the big movies and YouTube hits. But here’s the twist: depending on how big your screen is, the same picture can go from kinda blurry to super sharp! It’s all about the pixels – those tiny dots that paint the picture. The more you have in a square inch, the clearer your image. So, whether you’re watching cat videos on your phone or binging series on a giant TV, that 360p resolution has got your back, making sure everything looks just right. Stick around, and I’ll show you how to make your photos and videos pop off the screen, no matter where you’re viewing them. Trust me, you don’t want to miss these tricks!
Converting images to a resolution of 640px by 360px can be necessary for compatibility with certain devices or to meet file size requirements for web uploads. The process involves resizing the image using software that preserves the quality while adjusting the width and height. Image converters are available both offline and online, offering different features to match user needs. Some converters also provide additional options for adjusting the final image quality or for converting between different image formats while maintaining security during the process.
Key Takeaways
- A resolution of 640 x 360 pixels is standard definition with a 16:9 aspect ratio, suitable for various digital platforms.
- Converting to 640px x 360px requires using an image converter that ensures quality retention during resizing.
- Image conversion tools should also address proper formatting and secure handling of images.
Understanding 640px by 360px Image Resolution

When we talk about 640px by 360px images, we’re discussing a specific resolution with attributes closely tied to display quality. Let’s look closer at its characteristics.
Aspect Ratio and Resolution
The aspect ratio of an image describes the proportional relationship between its width and height. In the case of a 640px by 360px image, the aspect ratio is 16:9, which is a widely used standard, especially in the context of video formats because it balances width and height well without distorting the image. The resolution of 640 pixels in width by 360 pixels in height means the image contains a total of 230,400 pixels.
Pixel Density and Image Quality
Pixel density, often measured in pixels per inch (PPI), is crucial in determining the image quality. For a 640px by 360px image, the pixel density would vary depending on the screen size it’s displayed on. If you spread those pixels over a larger screen, the density decreases, and individual pixels may become noticeable, reducing image quality. Conversely, on a smaller screen, the pixel density is higher, leading to a sharper and clearer image. To maintain a high-quality image, the pixel density should be high enough that the human eye can’t discern individual pixels at a typical viewing distance.
How to Convert Images to 640px x 360px
To meet specific requirements for web or print use, converting images to a standardized 640px by 360px dimension is often necessary. We’ll guide you through this process using different methods and tools.
Using Online Image Resizer Tools
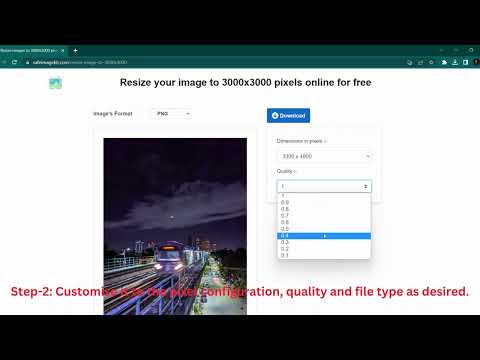
We can resize images quickly and easily with online image resizer tools, many of which are free. First, choose the image file (jpg, png, webp, bmp, or gif) for conversion. On the image resizer’s website, we often find a “Choose File” button or a drag-and-drop interface to upload our image. After uploading, enter ‘640’ for width and ‘360’ for height to set the desired dimensions. Confirming these changes will often give us a preview and an option to download the resized image.
- Step 1: Click “Choose File” or drag image to upload area.
- Step 2: Set dimensions to 640px width and 360px height.
- Step 3: Preview and confirm changes.
- Step 4: Download the converted image.
Adjusting Image Dimensions in Photo Editing Software
For more control during the conversion process, photo editing software like Adobe Photoshop (PS) allows us to adjust dimensions and pixel density with precision. After opening our image file in the software, we navigate to the “Image Size” option. Here, input ‘640’ for width and ‘360’ for the height while maintaining the aspect ratio to prevent distortion. Once we finalize the settings, we can save our file in the format we need.
- Step 1: Open the image in photo editing software.
- Step 2: Navigate to “Image Size” and enter ‘640’ x ‘360’ px.
- Step 3: Ensure the aspect ratio is maintained.
- Step 4: Save the resized image in the preferred file format.
Choosing the Right Format for Conversion
Choosing the right image file format is crucial for maintaining quality and efficiency. JPG is suitable for photographs, while PNG is best for images that require transparency. WebP offers high quality with a smaller file size, making it ideal for web use. BMP retains quality but results in larger files, and GIF is used for images with limited colors or animations. Therefore, we must select the format that aligns with our needs once the image is resized.
- JPG: Best for photographs without transparency.
- PNG: Supports transparency; best for graphics.
- WebP: Great for web usage; combines quality with small file size.
- BMP: High quality but larger file size; not recommended for web.
- GIF: Limited colors, supports animation.
Image Formats and Conversion

When dealing with image conversion, it is imperative to understand the variety of image file formats available and the distinctions between vector and raster graphics. These factors influence the quality and use of an image, whether it’s for web use on platforms like Facebook and Instagram or for professional graphic design applications.
Common Image File Formats
The world of digital images is populated with several file formats, each with its specific use-cases and characteristics. Here’s a brief rundown of the most common ones:
- JPG (JPEG): Widely used for digital photography and online images due to its balance between quality and file size.
- PNG: Popular for web graphics, as it supports transparency and tends to have better quality than JPG.
- BMP: An older format that’s not commonly used online due to large file sizes with no compression.
- TGA (TARGA): Mainly used in video and animation industries, appreciated for its ability to store image data without compression.
- TIFF: Favored in the printing and publishing industry for its lossless quality.
- SVG: A vector format ideal for web use as it’s scalable without losing quality.
- ICO: Specifically used for creating small icons for websites or software.
- EPS: A vector file format used for high-resolution images in graphic design.
Vector vs. Raster Graphics
Understanding the difference between these two types of graphics is crucial for effective image conversion and use.
-
Vector Graphics: Made up of paths defined by mathematical formulas, these can be scaled infinitely without losing quality. They’re typically saved as SVG, EPS, or AI (Adobe Illustrator) formats. Vector graphics are ideal for logos, icons, and other design elements that require scalability.
-
Raster Graphics: These are composed of pixels and have a fixed resolution. Popular raster formats include JPG, PNG, BMP, TGA, and TIFF. Raster images are best for complex imagery like photographs. When converting or scaling these images, quality can be compromised, so it’s essential to consider the intended use and required resolution.
By selecting the appropriate image format and understanding the graphic type, we can ensure the best representation of the image across various platforms and for different uses.
Maintaining Image Quality and Security

When it comes to adjusting the size of your images to 640px x 360px, we must not only focus on achieving the desired dimensions but also ensure that the integrity and security of the image remain intact.
Ensuring High-Quality Images After Resizing
While resizing images to a 640px x 360px resolution, maintaining the highest quality is essential. Tools and techniques matter:
- Image Editing Tool: Utilize a reputable image editing tool that supports high-quality resizing. These tools offer algorithms that maintain image quality and sharpness rather than simply stretching pixels.
- File Size and Format: After resizing, check the file size. A smaller file could indicate a loss of quality. Save the resized image in a format that supports quality, like PNG or JPEG at a high compression rate.
The resizing process should preserve image quality and pixel density to prevent the image from looking pixelated or blurry.
Protecting Images and Data Online
Ensuring the security of images online is just as crucial as the quality.
- Encryption: When uploading or sharing images, use encrypted platforms or servers. This guards against unauthorized access.
- Watermarks: Apply a watermark to protect against unauthorized use. This can deter theft and help maintain ownership.
- Cloud Storage: Use secure cloud storage services that offer encrypted file transfer and storage.
- Third-Party Access: Be cautious of third-party websites and platforms when resizing images. Ensure they have strong security measures in place to protect your data.
Deleting images after use does not ensure they are gone forever. Data can still be retrieved unless secure deletion methods are used.
Remember, every time we share or edit our images, we must consider both their quality and security. Using the right platforms and techniques will help us maintain the integrity of our work safely.

