Originally posted on March 20, 2024 @ 5:47 am

Instructions on Using the Tool

In the realm of digital imagery, grasping the nuances of resolution and dimensions is vital for creators and consumers alike. A common resolution used across various platforms, such as online video services, is 480 x 360 pixels. This dimension offers an optimal compromise between image sharpness and file size, facilitating faster loading times without significantly compromising on image quality. The aspect ratio of 4:3 for this resolution is a classic format accommodating different kinds of content, including photographs and standard-definition video.
Using an image converter to resize photos to 480px x 360px is a common task for individuals aiming to optimize their images for specific platforms or to meet upload requirements. Online tools for image conversion are readily available, allowing users to adjust their images to this resolution while preserving as much quality as possible. These tools often support multiple formats, offering flexibility in how one manages and transforms their digital assets. Understanding how to properly rescale images to maintain quality is vital, especially when preparing content for responsive web design where images might be viewed across different devices.
Key Takeaways
- 480 x 360 pixels is a common resolution that balances image quality with file size.
- Online tools facilitate efficient resizing and format conversion for images.
- Proper image optimization ensures visuals are tailored for diverse web applications and devices.
Understanding 480 x 360 Pixel Resolution
When we discuss 480 x 360 pixel resolution, we’re focusing on a specific image clarity that corresponds to the exact number of pixels along the image’s width and height. This clarity impacts the detail, sharpness, and versatility of an image, especially when viewed on different platforms or devices.
Aspect Ratio and Dimension
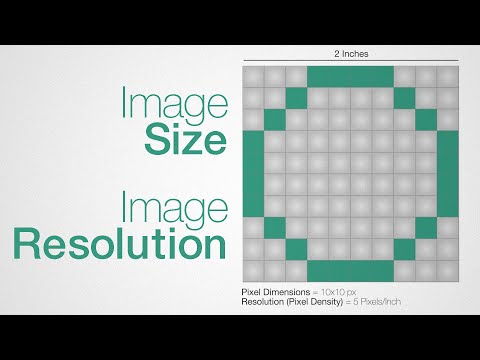
The aspect ratio of a 480 x 360 image is 4:3, meaning for every 4 units of width, there are 3 units of height. This aspect ratio is common for standard definition video and is well-suited for display on a wide range of devices without significant letterboxing or pillarboxing. To visualize the specific dimensions:
- Width: 480 pixels
- Height: 360 pixels
Pixel Density and Display Quality
Pixel density, often measured in pixels per inch (PPI), is crucial for determining the display quality of an image. A 480 x 360 resolution image may appear sharp on a small screen but can lose clarity on larger displays due to a reduction in pixel density. When producing or converting images to this resolution, it is important to consider the display size to maintain image quality. For example:
- On a 4-inch display, the pixel density would be higher.
- On a tablet-sized screen, pixel density decreases, which can affect the sharpness of the image.
How to Resize Images to 480px x 360px
Resizing an image to specific dimensions, like 480px by 360px, often involves using online tools or image editing software. We’ll look at methods for both, ensuring your images meet the required size.
Using Online Image Resizers
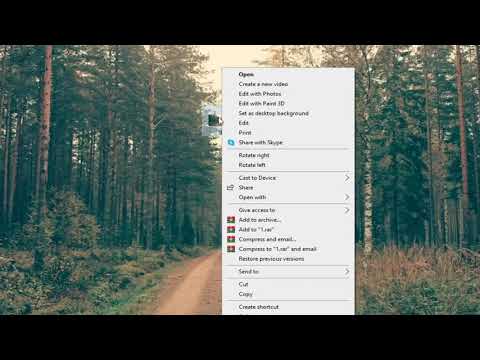
Online image resizers offer a quick and easy way to adjust the dimensions of your pictures. We simply upload the image to the resizer tool’s website, select the image we want to resize, and enter the desired width and height – in this case, 480px width and 360px height. Here’s how the process generally works:
- Visit an online image resizer website.
- Upload the photo you wish to resize.
- Enter ‘480’ for width and ‘360’ for height in the provided fields.
- Apply any additional adjustments, such as crop or modify the scale, if necessary.
- Download the resized image to your computer.
Many of these services guarantee privacy; the photos we upload are deleted automatically after we’re done. This aspect is particularly important when working with sensitive or personal images.
Image Editing Software Options
When resizing images with software, we gain more control over the final output. Software like Adobe Photoshop or GIMP allows us to resize images, crop, and adjust the pixel density with precision. These are the usual steps:
- Open your image in the image editing software.
- Find the resize or image properties option.
- Input ‘480’ in the width field and ‘360’ in the height field, ensuring to maintain the aspect ratio if that’s important to you.
- Make additional edits, such as adjusting sharpness or quality as needed.
- Save the image in your preferred file format.
With image editing software, we retain full control over our files and aren’t required to upload anything to an external system, which might be a preferable method for those of us concerned about privacy.
By following these methods, we can efficiently resize our images to 480px by 360px, whether we choose the convenience of an online tool or the advanced features of image editing software.
Image Conversion and Supported Formats
When we discuss image conversion, we focus on transforming an image from one file format to another while preserving image quality as best as possible. We not only aim to convert but also to understand the intricacies of various formats.
Converting to Common Formats
To convert a 480px x 360px photo, we must choose a format that best suits our needs. Common image file formats include JPEG (or JPG), PNG, GIF, WEBP, BMP, TIFF, and ICO. Each of these formats serve different purposes:
- JPEG/JPG: Ideal for photographs and images with gradients; however, it uses lossy compression, which might reduce quality.
- PNG: Offers transparency and lossless compression, making it perfect for web graphics.
- GIF: Best for simple animations and images with a limited color palette.
- WEBP: Designed for modern web usage, it provides both lossy and lossless compression.
- BMP: A raw, uncompressed format that results in large file sizes, suitable for Windows applications.
- TIFF: Often used in scanning, it supports layers and, like PNG, is lossless.
- ICO: Specifically used for icons on the Windows platform.
For conversion, we typically utilize tools or software that allow us to convert and resize photos to suit various platforms and requirements. The process typically involves choosing the desired output format and quality settings before initiating the conversion.
Understanding Vector and Raster Formats
When dealing with image files, it’s crucial to distinguish between vector and raster formats. Raster image formats like JPG, PNG, and GIF are made up of pixels and are resolution-dependent, which means their quality can degrade when scaled up or down.
In contrast, vector image formats such as SVG, EPS, and TGA are resolution-independent. These formats use geometric shapes like points, lines, and curves to create images that can be scaled indefinitely without losing quality:
- SVG: Used for web graphics, it supports interactivity and animation.
- EPS: Ideal for high-resolution printing, it’s often used for logos and graphic designs.
- TGA: Favored for its simple compression and use in video games and animations.
We can convert image files between raster formats or from vector to raster, but turning raster images into vectors requires specialized software that can trace the image and create the necessary geometric shapes.
Optimization and Best Practices for Web Use

When preparing images for web use, it’s essential to strike the right balance between maintaining image quality and managing file size. Let’s dive into how we can optimize 480px x 360px images specifically for web purposes, maintaining both visual integrity and performance.
Ensuring Image Quality
To ensure image quality, we must consider several factors. The resolution of an image, 480 x 360 pixels in this instance, should be sufficient for clear viewing on a standard web page without stretching or pixelation. Using an online photo resizer can help us achieve the highest quality outcome by allowing us to adjust our image to the custom size necessary for our web content. By doing so, display clarity is preserved, especially when images are viewed across various devices.
File size has a direct impact on website loading times. We compress images to reduce file size without significantly affecting visual quality. A common method is to use a tool that executes lossless compression, effectively stripping unnecessary metadata while keeping the image visually intact.
Privacy and Security Considerations
As we handle images, protecting the privacy and security of the content we upload is paramount. When utilizing cloud storage or photo editing tools, it’s our responsibility to ensure that they are secure and have clear policies to prevent access by third parties.
Sensitive images should be edited using trusted platforms, and we should verify whether these platforms encrypt our photos during transfer and storage. Moreover, always check the privacy policy to understand how our images might be used and to confirm that they are not shared with third parties without consent.

