
Instructions on Using the Tool

In the realm of digital media, the size of an image plays a crucial role in how it looks and operates, particularly in the contexts of advertising and website design. The traditional 468 x 60 pixel format, also referred to as the standard banner size for online advertisements, is particularly noteworthy. This image has a 7.8:1 aspect ratio, indicating that its width is 7.8 times greater than its height. Recognized early on by the Interactive Advertising Bureau (IAB) as one of the initial standard sizes for banner advertisements, this dimension continues to be utilized across a variety of online platforms, even with the introduction of more versatile advertising dimensions.
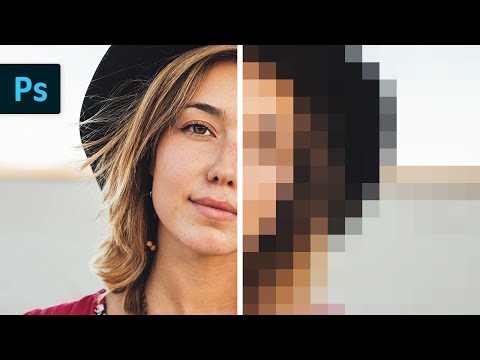
Understanding the resolution and pixel density is critical when working with 468 x 60 pixel images. The resolution refers to the number of pixels distributed across a digital image and directly affects the image clarity and detail. Pixel density, measured in pixels per inch (PPI), determines how sharp the image will appear on various screens. To maintain clarity across devices, the image must be created or converted accurately to this size. Resizing an image to these dimensions requires a tool or software that can correctly adjust the image without losing its inherent quality.
Key Takeaways
- The 468 x 60 pixel size was recognized by the IAB for web ads and has a ratio of 7.8:1.
- Clarity of an image at this size depends on maintaining proper resolution and pixel density.
- Converting to this dimension necessitates tools that preserve image quality.
Understanding Image Resolution and Pixel Dimensions

Before we dive into specifics, it’s essential to understand that image resolution and pixel dimensions are fundamental aspects that determine the quality and use of digital images.
What Is the 468×60 Pixel Image
A 468×60 pixel image refers to the size of a digital image where the width is 468 pixels and the height is 60 pixels. This is a specific dimension often used for banner ads, known informally as a “banner” size. In pixels, the image’s total area would consist of 28,080 pixels (468 multiplied by 60). Pixel density, typically measured in dots per inch (dpi), is not inherent in the pixel dimensions and will depend on the device displaying the image or the settings used when it’s created.
Exploring Aspect Ratios and Resolution
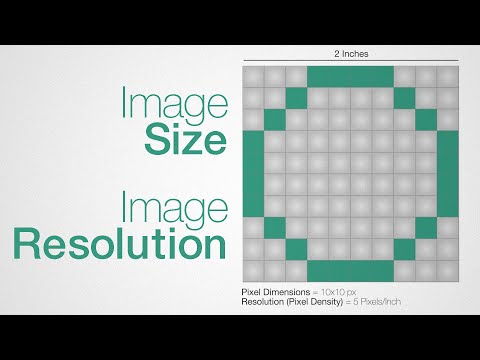
Aspect ratio is the proportional relationship between the width and height of an image. For a 468×60 image, the aspect ratio is 7.8:1, which is quite wide. This ratio is important when designing content, ensuring the image fits properly in the space intended without stretching or compression.
The resolution of an image defines the amount of detail it holds, which is relevant when printing or displaying on high-resolution devices. It’s usually defined in terms of pixels per inch (ppi) or sometimes in millimeters (mm). However, for digital display purposes, the resolution is tied to the pixel dimensions – in this case, 468 by 60 – because the image will be displayed pixel-for-pixel on screens.
To adjust an image to these specific dimensions without altering the aspect ratio, we need an image editing tool or converter software that can resize images. The software should maintain the quality while ensuring the pixel count precisely matches the intended dimensions. The quality, represented by the resolution in dpi if printing, will be adjusted accordingly to fit the physical medium, such as paper, where an inch might equate to a different number of pixels than on a digital screen, altering the image’s pixel density.
How to Convert and Resize Images
When it comes to adjusting an image to a specific pixel dimension, like 468×60, knowing how to properly convert and resize the image is crucial for maintaining its quality. We’ll cover the essentials of image conversion and provide a straightforward guide to resizing images.
Image Conversion Basics
Understanding image file formats is key when you’re looking to convert your images. We can use JPEG for photos and other images with gradients, PNG for graphics with transparent backgrounds, and GIF for simple animations. Converting between these formats affects the file size and quality, so we must choose wisely based on our needs.
- JPEG (Joint Photographic Experts Group): Best for photographs and realistic images.
- PNG (Portable Network Graphics): Ideal for images with transparency.
- GIF (Graphics Interchange Format): Used mainly for animated images.
Sometimes, we might also need to compress the image to reduce its file size, which is essential for web use to ensure fast loading times. However, compression can lead to a loss in quality, so we must balance size and clarity.
Step-by-Step Guide to Resizing
To resize an image to a desired width and height like 468px by 60px, we’d follow these steps:
-
Choose an Online Image Resizer: Find a reliable online image resizer. There are multiple tools available that let us resize images directly in our web browser.
-
Upload the Image: Upload our image to the chosen platform. Ensure that the file format is supported.
-
Specify the Dimensions: Enter the width (468px) and height (60px) in the resizer’s options. If we want to maintain the aspect ratio, which keeps the image proportions intact, some resizers will automatically adjust the opposite dimension when one is entered.
-
Adjust the Quality: If the tool allows, select the quality of the output image. A higher quality results in a larger file size.
-
Compress if Necessary: If we need to reduce the file size further, use a compression feature if available. This is useful for website optimization.
-
Crop or Rotate if Required: Before finalizing the size, we can use the resizer’s options to crop or rotate the image to fit our needs better.
-
Convert the Image: If needed, convert the image to a different file format based on how we’re planning to use it.
-
Download the Resized Image: Once we’re satisfied with the adjustments, we download the newly resized image.
Following these steps, we can successfully resize and convert images without compromising their integrity for our specific requirements.
Image Formats and Optimization

When creating or converting images to a 468px x 60px format, understanding the image file formats and the different methods of optimization is crucial to achieve the best balance between quality and load time.
Popular Image File Formats
In our digital world, several image formats have become standard for various uses. Raster image formats include JPEG (or JPG), widely used for photographs due to its compression capabilities. However, JPEG images can lose quality when overly compressed. PNG is preferred for web graphics with transparency and does not lose quality with data compression. GIF is another format known for its small file size and is commonly used for simple animations.
For images that require high-quality detail or for printing purposes, formats like TIFF and BMP are typically used, though they often result in larger file sizes. Additionally, WebP is becoming popular for its efficient compression, which provides high-quality images at smaller file sizes than JPEG or PNG.
Vector image formats like SVG, EPS, and PDF are used for illustrations that need scalability without losing image quality. They are composed of paths, defined by a start and end point, along with other points, curves, and angles.
Other formats, such as ICO for icons, TGA for texture files, and EXR for high dynamic range images, are specific to certain applications. HEIC has recently emerged as a format for Apple devices, noted for its high-efficiency compression.
Optimizing Images for Web and Print
To ensure images serve their intended purpose effectively, their optimization for web and print is essential. For web, reducing the file size without compromising quality is paramount. This can often be achieved by selecting the right format (e.g., JPEG for photos or WebP for a mix of graphics and photos) and adjusting the level of compression.
For images intended for print, resolution and pixel density become important. High-resolution images, like 1920×1080, ensure a clear and crisp print. Formats favorable for printing include PDF, TIFF, and vector formats like SVG and EPS.
We select the resolution depending on the medium – for web images, 72 pixels per inch (PPI) is a typical standard, but for print, 300 PPI is the baseline for high-quality output. Using SVG or other scalable formats is best for keeping logos and icons clear on prints of various sizes.
In creating a 468px x 60px photo, the ratio translates to approximately 7.8:1, which is wide and narrow, typically suited for web advertising banners. Pixel density is not applicable in raw pixel dimensions, but it will matter when one specifies how large the image will appear on a screen or in print.
For practical optimization, consider using image editing software that allows batch processing and lets us choose the target file format and compression settings. We can also utilize built-in features like “Save for Web” which are tailored to optimize images for web use without the need for extensive technical knowledge.
Uploading and Safety Considerations
When uploading a 468px by 60px photo, it’s imperative to follow specific protocols for maintaining image quality, safeguarding privacy, and ensuring that the image adheres to the intended display requirements.
Best Practices for Image Uploads
To ensure a smooth and secure upload process, we always recommend using trusted platforms. Uploading image files should be a straightforward process, often completed in seconds. Here are key steps to follow:
- Choose a Reliable Platform: Opt for a service known for its robust security measures, especially if the photo is to be stored in cloud storage.
- File Size: Keep the file size in check, ideally under a couple of hundred kilobytes, to facilitate a quick upload and easy download.
- Automatic Deletion: If temporary sharing is the goal, use services where files are deleted automatically after a set period.
Maintaining Image Quality and Privacy
Maintaining the integrity of the photo is just as crucial as the upload process itself. Here are our focuses:
- Resolution Preservation: Ensure the service maintains the original resolution of 468×60 pixels for optimal display quality.
- Privacy Settings: Before uploading, adjust the privacy settings to control who can view or download the photo.
- Compression Without Quality Loss: Use an image converter that compresses the file without significant loss of quality, ensuring the photo remains clear and free from pixelation.
By adhering to these protocols, we maintain the high standards necessary for both image quality and privacy during uploads.

