Originally posted on March 20, 2024 @ 5:40 am

Instructions on Using the Tool

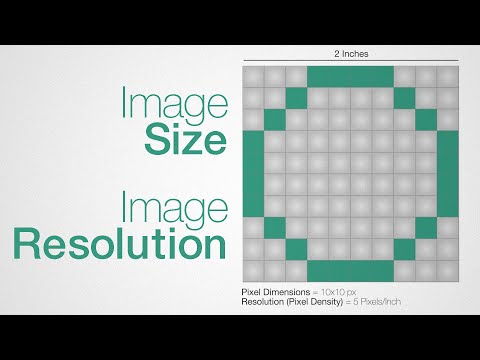
Talking about pictures for online and digital purposes, it’s essential to grasp fundamental ideas such as pixel dimensions, aspect ratio, and pixel density. An image converter that resizes photos to 400 x 400 pixels is useful for adjusting images to these precise measurements. An image with 400 x 400 pixel dimensions has 400 pixels across its width and 400 pixels down its height, resulting in a square configuration. Here, the aspect ratio is 1:1, which means the width and height are equally matched.
The quality of a 400 x 400 pixel image is largely dependent on its original resolution and the method used to convert the image to these dimensions. Pixel density, which refers to the number of pixels per inch (PPI), plays a significant role in how the image will appear, especially on different devices with varying screen densities. Understanding how to adjust and refine images to meet the 400 x 400 specification can ensure that the graphic maintains its clarity and visual impact upon conversion.
Key Takeaways
- We use a 400 x 400 pixel image converter to resize images to square dimensions, ensuring they maintain the correct aspect ratio and image quality.
- The aspect ratio of a 400 x 400 image is 1:1, and the quality is influenced by both the original resolution and the conversion method used.
- To preserve clarity, we must consider pixel density when resizing an image to 400 x 400 pixels, especially for displays with different screen densities.
Understanding Image Basics
Before we dive into the specifics, it’s essential for us to understand that image dimensions and aspect ratios, file formats, and resolution play crucial roles in the quality of digital images.
Pixel Dimensions and Aspect Ratios
The term 400×400 refers to the width x height in pixels, making it a square image where each side is 400 pixels in length. The aspect ratio of an image like this is 1:1, meaning the width and height are equal, which creates a perfect square. It’s important because it determines how the image scales and displays across different devices.
- Dimensions: 400px (Width) x 400px (Height)
- Aspect Ratio: 1:1 (Square)
Image File Formats
When we talk about image file formats, we’re looking at the structure the image is saved in. Common formats include JPEG (jpg), PNG, GIF, TIFF, BMP, WebP, SVG, ICO, and EPS. Each of these has its own use cases. For example, JPEG is great for photographs whereas PNG can handle transparency, which is ideal for logos.
- JPEG: High compression, suitable for photos
- PNG: Supports transparency, uncompressed
- And more…
Image Quality and Resolution
Image quality is often dictated by resolution (DPI) and the file’s compression level. A 400×400 image would have a resolution that refers to the number of pixels per inch, contributing to the sharpness of the image when printed. The image quality can also be affected by the file format chosen due to compression—a JPEG might lose some data, whereas a PNG is lossless but could result in a larger file size.
- Resolution: Measured in DPI (dots per inch)
- Quality: Can vary based on format and compression
How to Resize Images to 400×400 Pixels
When we resize images to a specific size like 400×400 pixels, it’s important to maintain image quality while changing the dimension.
Using Online Image Resizers
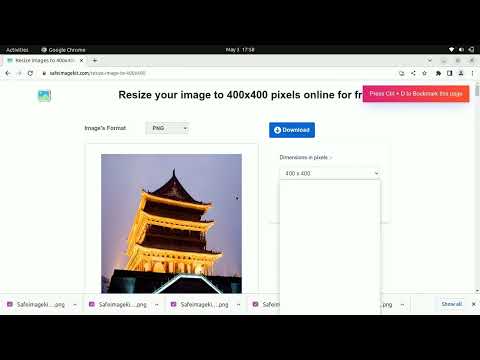
We can utilize online image resizers which are convenient and do not require any software download. Simply upload the photo, select the desired dimension of 400×400, and the website will convert the image for us. Most online platforms are easy to use; they only require us to select the image and input the specific size. Some popular online image resizers ensure the privacy of our photos with encrypted transactions.
- Navigate to a free online image resizer in a web browser.
- Click to upload or drag and drop your original image.
- Input “400” in both width and height fields to set the pixel dimensions.
- If needed, crop the image to maintain the aspect ratio.
- Convert the image, then download the resized photo.
Image Resizing Software
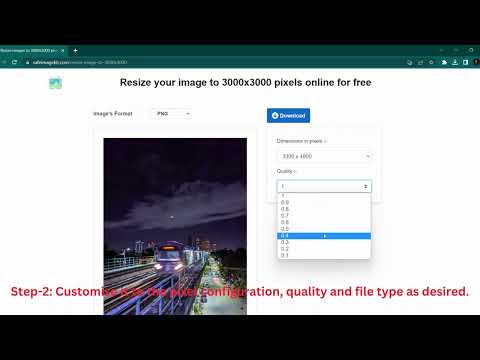
For those of us requiring more control over the resizing process, image resizing software for Windows, Mac, Android, or iOS offers advanced options. We can adjust the DPI (dots per inch) for print, and ensure we’re not losing quality. Look for software that provides a visual preview to easily crop and resize images while keeping the quality optimized.
- Open the resizing software on our device.
- Upload or open the photo we wish to resize.
- Specify the new size as “400×400” pixels.
- Adjust the quality, DPI, and other settings if necessary.
- Save the photo, which may also compress the file size without compromising the image quality.
Ensuring Optimal Quality
When we convert and resize images, we aim to maintain the quality of the original image. To ensure this, we should:
- Preserve the original aspect ratio to avoid distortion when we resize images.
- Choose the correct file format for our needs, like JPEG for web or TIFF for printing.
- Be aware of the pixel density (DPI) which affects the quality when printing.
- Understand that a free online image resizer may have limitations, and adjusting settings in resizing software might be necessary for specific needs.
Advanced Image Conversion Techniques
In advanced image conversion, we focus on maintaining the integrity of the original image while accommodating the technical requirements of the target format or use case. This includes preserving the aspect ratio during resizing and understanding the nuances of format conversion.
Maintaining Aspect Ratio While Cropping
When we resize images to a specific size like 400px x 400px, maintaining the original aspect ratio prevents distortion. To achieve this, we often crop the image. Cropping requires selecting the most important area of the image to display. Here’s how to ensure we preserve the aspect ratio:
- Identify the core subject in the image.
- Use a software tool that shows aspect ratio constraints during the cropping process.
- Adjust the crop box to fit the desired dimensions (e.g., 400px x 400px) without altering the ratio between the image’s width and height.
If the image needs to be shrunk or enlarged to fit the dimensions after cropping, we apply resample techniques that maintain image quality while altering the pixel dimensions.
Converting Between Different Formats
Different image formats serve various purposes, from web graphics (JPG, PNG, GIF, SVG) to print-ready files (TIFF, EPS). When converting an image to a different format, we take the following steps:
-
Determine the purpose of the image conversion (e.g., reducing file size, increasing compatibility).
-
Select the appropriate format based on the image’s use case:
Use Case Appropriate Formats Web graphics JPG, PNG, GIF, WebP, SVG Icons and logos ICO, SVG Print quality TIFF, EPS -
Use conversion software that allows for control over quality settings to avoid loss of detail.
-
For vector images like logos, we might convert between SVG and EPS for better scalability and print quality.
In all cases, we keep an eye on the resulting file size, as this impacts loading times and storage space, especially relevant for website performance. Converting while maintaining high image quality means selecting the right balance between compression and clarity.
By strictly adhering to these techniques, we ensure that the converted images meet our requirements, whether that’s a perfect 400px x 400px representation or an optimized format for web and print use.
Practical Considerations and FAQs

When resizing images to a 400 x 400 pixel dimension, understanding the technicalities and having answers to common questions can facilitate a smooth experience. We’ll explore compatibilities with various platforms and address frequent inquiries regarding the resizing process.
Compatibilities Across Platforms and Devices
We often work with images across multiple platforms such as Facebook and Instagram. It’s crucial to ensure that photos remain clear and correctly formatted when viewed on different devices. Here’s how compatibilities work across various mediums:
- Web Browsers: Most online image resizers can convert and resize photos in formats like JPG and PNG within seconds directly from your browser.
- Mobile Devices: Whether you’re on a smartphone or tablet, resizing tools are optimized to function seamlessly on mobile browsers.
- Cloud Storage: After resizing, you can usually save images directly to your cloud storage, ensuring they’re accessible from any device with internet access.
- Facebook and Instagram: Photos resized to 400 x 400 pixels are typically compatible with profile pictures or posts, maintaining quality on both platforms.
Common Questions About Image Resizing
Q: How do I resize images without losing quality?
A: When downsizing images, ensure the aspect ratio (height and width) remains constant to avoid distortion. Opt for high-quality resizers that maintain image integrity.
Q: Are my photos kept private when I use an online image resizer?
A: Yes, privacy is paramount. Most reputable services state that images are deleted automatically after conversion to ensure your data is not compromised.
Q: What file sizes can I expect when converting to 400 x 400 pixels?
A: The file size largely depends on the original image. However, converting to a 400 x 400 pixel image typically results in smaller file sizes, convenient for saving space and quicker upload times, often measured in a few megabytes or less.
Q: Do I need to register or pay for using these tools?
A: Many online tools allow you to resize images for free without the need to register, offering a quick link to download your resized photo.

