
Instructions on Using the Tool

In the realm of digital photography or imagery, the size and resolution of an image are key factors in deciding its clarity and effectiveness. The 320 x 320 pixel image converter excels in customizing images to fit these exact measurements. Given that both the width and the height of the image are the same, it naturally forms a 1:1 ratio, resulting in a perfectly square shape. This specific ratio is crucial in the design world and on social media platforms, where precise dimensions are frequently a necessity.
Moving on to resolution and pixel density, resolution refers to the number of pixels displayed per inch of an image, while pixel density refers to the concentration of pixels within a digital image. A 320 pixel by 320 pixel image may possess a reasonably high pixel density on a small screen, which can reflect good quality. To achieve or maintain the desired quality when converting to a 320px by 320px photo, it is essential to utilize a reliable image converter that can resize your image without significant loss in quality. The file format, whether png, jpg, or others, also influences the end result, along with the resultant file size.
Key Takeaways
- Converting images to 320 x 320 pixels maintains a 1:1 aspect ratio suitable for various digital uses.
- It’s important to understand resolution and pixel density for image quality when resizing.
- Specific tools are required to convert images effectively while preserving or enhancing quality.
Understanding Image Basics
When we discuss image basics, it’s fundamental to understand that pixels are the building blocks of digital images, and the resolution directly affects image quality. The right image format can make a difference in how an image renders online or in print.
Image Resolution and Quality
Resolution refers to the number of pixels in an image and is usually represented by width x height. For a 320px by 320px image, the total count would be 102,400 pixels. The DPI (dots per inch) measures the pixel density; higher DPI values typically indicate finer image detail and higher quality. However, online images are generally displayed at a standard 72 DPI, whereas print materials often require at least 300 DPI for high-quality output.
- Pixels: Each image consists of tiny dots called pixels. The more pixels an image has, the higher its resolution.
- DPI: Stands for “dots per inch,” indicating pixel density—essential for print quality.
Common Image Formats
Multiple image formats exist, each with its strengths and weaknesses. Some of the most common formats include:
- JPG (or JPEG): Good for photographs and images with gradients. This format uses lossy compression, slightly reducing image quality to achieve smaller file sizes.
- PNG: Supports transparency and utilizes lossless compression, making it ideal for web graphics.
- GIF: Best for simple animations and images with limited colors. GIFs use lossless compression but are restricted to a 256 color palette.
- BMP: A bitmap image format that provides high quality but large file sizes as it’s uncompressed.
- TIFF: Often used in the publishing industry for its lossless compression and high quality.
- ICO: The format for small icons used on websites or as software icons.
- SVG: A vector image format suitable for logos and illustrations; scales without quality loss.
Aspect Ratios and Their Importance
The aspect ratio is the proportional relationship between an image’s width and height, crucial for maintaining consistency across different display devices.
- 1:1 Ratio: Perfect square, often used for profile pictures or app icons.
- 4:3 or 16:9: Common aspect ratios for videos and standard photographs.
Maintaining the correct aspect ratio is important to avoid image distortion. It also ensures that images appear as intended across various platforms and devices.
Here, we’ve covered the fundamental concepts that are pillars to working with digital images. This includes understanding the pixel composition of images, recognizing the importance of resolution and pixel density for image quality, choosing the right format based on usage, and respecting aspect ratios to preserve visual fidelity.
The Conversion Process
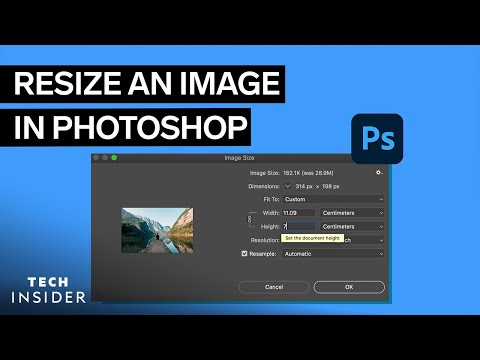
When we need to resize images to a specific dimension, it’s essential to use a reliable process that preserves quality. Let’s explore how to effectively convert images to 320 x 320 pixels.
Steps to Resize an Image
- Select the Image: First, choose the image you want to resize. Ensure that the original image is of high quality to avoid a poor result post-resize.
- Choose an Image Resizer: Use a trusted software or online image resizer platform. There are several tools available, so select one that aligns with your requirements.
- Input Desired Dimensions: Enter the specific dimensions for the resize, in this case, 320px by 320px. Some tools may allow you to drag to resize manually, but inputting the numbers ensures accuracy.
- Apply the Resize: Execute the resizing by clicking on the corresponding button, often labeled as “resize” or “convert”.
Choosing the Right Format
- JPEG: Ideal for photographs due to its compression that reduces file size while retaining reasonable quality.
- PNG: Provides lossless compression, suitable for images with text or transparent backgrounds.
- GIF: Best for simple animations or images with limited colors.
Each format affects the image’s final quality and file size differently. Choose a format that balances quality with your particular use case’s necessity for compression.
Maintaining Aspect Ratio
Maintaining the original image’s aspect ratio is crucial to avoid distortion. When converting an image to a 320 x 320 pixels size:
- If the original aspect ratio is not 1:1, consider cropping the image to the correct ratio before resizing.
- Some resizer tools offer a “maintain aspect ratio” checkbox, which automatically adjusts the dimensions to preserve the image proportionality.
- Alternatively, manually calculate the new dimensions that would keep the original aspect ratio before performing the resize.
By understanding these subsections and following the steps described, you should be able to successfully convert and resize your image while maintaining its integrity.
Tools and Software

As we explore the topic of 320 x 320 pixel image conversion, it’s important to note the variety of tools and software available tailored for this purpose. These options range from online platforms requiring no download, to robust desktop software, and convenient mobile apps for on-the-go editing.
Online Platforms for Image Conversion
There are multiple online platforms that provide image conversion services which allow us to upload images and convert them to a 320 x 320 pixel resolution. Most of these platforms are user-friendly, supporting drag and drop functionality, and do not require registration. A major benefit of these online image resizers is their accessibility; they can be used across different browsers and do not require any download or installation.
- Examples of online services:
These platforms typically work on an array of internet-connected devices, making it easy for anyone with a connection to resize images accordingly. They also generally support a percentage-based scaling option, providing flexibility for our resizing needs.
Desktop Software Options
For those of us looking for more advanced features and controls, desktop software can be a suitable option. This software often includes additional editing features beyond simple resizing, such as adjusting pixel density, cropping, and other image enhancements.
- Popular desktop software includes:
These applications enable us to download our edited images at the desired 320 x 320 pixel resolution and offer a higher level of precision with extensive image editing tools.
Mobile Apps for Quick Editing
When we’re away from our computers, mobile apps can provide a quick and convenient way to edit images to 320 x 320 pixels. Available on both iOS and Android platforms, these apps allow us to directly download our modified images to our mobile devices.
- Handy mobile apps include:
These apps are specifically designed for intuitive use on touchscreens and are optimized for quick editing. Many are free to use, with optional in-app purchases for more advanced features. With mobile apps, we can easily transform our photos on the go, perfect for social media uploads or web requirements.
Storing and Sharing Images

To effectively handle images of 320px by 320px, it’s important to consider both secure storage and the versatility needed for sharing. We’ll explore options for cloud storage that ensure safety and quality, alongside methods for sharing these images on prevalent social media platforms.
Cloud Storage Solutions
Cloud storage services offer a reliable method for storing images securely. When we upload images to these services, they are often encrypted, which keeps our photos safe and protected. Popular file formats such as JPG, PNG, and WEBP are supported, with quality retention being a top priority. Cloud storage also allows us to store multiple images and organize them efficiently, including both color and black and white photos. There are several cloud storage reviews that would help you find the service that works best for you.
Image Sharing on Social Media
Sharing 320px by 320px images on platforms like Facebook and Instagram has become commonplace. For optimal display, it’s crucial to understand the preferred image formats; JPG for most uses, PNG for higher quality when required, and WEBP for a balance between quality and file size. When we share images on these platforms, they sometimes compress our files, so starting with the highest quality possible is important. Additionally, utilizing the built-in tools provided by these social media services can help us tailor images to meet platform-specific requirements to ensure they look great for our audience.

