
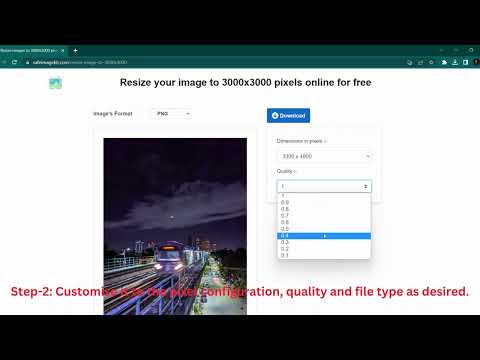
Instructions on Using the Tool

Getting the hang of **image sizes** matters a ton, whether you’re sprucing up a project at work or jazzing up your social media. Take the 3200 x 3200 pixel image – it’s a neat square shape that folks everywhere nod at because everything’s balanced just right. This square buddy is a champ for making your profile pic pop, making your posts look sharp, and getting those app icons to look just right. And here’s a nugget of knowledge: not all screens show your picture the same way. It’s all about the pixel density. More pixels squished into an inch means everything looks crisper. For anyone eager to make their digital content look top-notch, sticking around here will light the way to mastering those pixels and making every image shine.
Before creating or converting an image to a 3200px by 3200px photo, understanding resolution is essential. The resolution signifies the total number of pixels, and in this context, it equals 10,240,000 pixels, a factor that’s crucial for defining the detail and quality of the image. When resizing an image to these dimensions, maintaining the aspect ratio ensures that the scale of the image is preserved without distortion. Using a dedicated image converter or photo editing software allows for precise adjustments and the possibility to work with various file formats and compression methods to optimize the image for the desired use.
Practical tips for managing and working with 3200px images include the use of correct file formats to balance quality and file size according to the platform’s requirements where the image will be displayed. JPG is widely used for its compression capabilities, which can reduce file size while still retaining decent image quality, whereas PNG is preferable for images requiring transparency.
Key Takeaways
- A 3200 x 3200 pixel image has a 1:1 aspect ratio, ideal for square format applications.
- To achieve high-quality images without distortion, maintain the original aspect ratio when resizing.
- Select the appropriate file format based on the intended use of the image, with JPG for lower file sizes and PNG for transparency needs.
Understanding Image Resolution and Aspect Ratios

Before we dive into specifics, it’s essential to grasp that resolution determines an image’s detail quality, while aspect ratio describes the shape of the image.
What Is Resolution?
Resolution is a term that describes the number of pixels spread over a digital image, quantified as width x height. For instance, an image with a resolution of 3200×3200 pixels consists of 10,240,000 total pixels. This number signifies the image’s precision and the amount of detail it can display. High-resolution images are characterized by a higher pixel count, which translates to finer detail.
Common Aspect Ratios for Images
The aspect ratio is the proportional relationship between an image’s width and height, commonly expressed as two numbers separated by a colon. Here are a few standard aspect ratios and their typical uses:
- 16:9: Widely used for monitors, TVs, and online video platforms.
- 4:3: Once standard for television and computer displays; still common for photography.
- 1:1: A square format popular on social media platforms like Instagram.
Each aspect ratio gives a different visual experience and is chosen based on the intended display method or artistic requirements. For example, a 3200×3200 pixel image constitutes a 1:1 aspect ratio, which is perfect for profile pictures or posts where a square format is preferred.
How to Resize an Image to 3200px by 3200px
To ensure high-quality results when resizing an image to 3200px by 3200px, we’ll cover the use of online image resizers and methods to maintain image quality during the process.
Using Online Image Resizers
To resize an image to 3200 pixels by 3200 pixels using online tools, we follow these specific steps:
- Select Image: Choose the image file to resize.
- Upload to Image Resizer: Find a reputable online image resizer and upload your selected image.
- Set Dimensions: Enter the desired dimensions (3200px by 3200px).
- Aspect Ratio: Use an aspect ratio calculator if the original image has a different ratio, to understand how it will affect the final image.
- Resize: Click the option to resize the image.
Remember to always check the percentage increase or decrease to understand how much the image is being scaled.
Maintaining Quality During Resizing
Retaining the quality of an image while resizing it is crucial. Here’s how we do it:
- Image File Size: Be mindful of the original image’s resolution. High-resolution source images are better for resizing.
- Dimension: Avoid drastic changes in dimensions. Small percentage adjustments are preferable.
- Quality Check: Preview the image post-resizing to ensure that there is no quality loss.
By following these steps, we can confidently resize images to 3200px by 3200px without losing quality.
File Formats and Compression Techniques
When considering the use of a 3200 x 3200 pixel image, understanding the file format options and how to effectively compress images without quality loss are critical to both image preservation and usability.
Understanding Different Image Formats
Let’s begin by exploring the most common image formats:
- PNG: Known for its lossless compression, it preserves image detail and transparency, making it ideal for graphics.
- JPG: This format uses lossy compression, which reduces file size by slightly lowering image quality, commonly used for photographs.
- GIF: Supports animations and allows for transparency but is limited to 256 colors.
- BMP: A raw, uncompressed format that results in large file sizes but no loss of quality.
- TIFF: Often used in professional photography and desktop publishing for its lossless compression.
- WebP: A modern format providing both lossy and lossless compression for rich and detailed web images.
- SVG: Stands out for being a vector image format, which allows for scaling without loss of clarity – perfect for logos and illustrations.
- ICO: Generally used for favicons, the small icons you see in browser tabs.
- EXR: Suited for high dynamic range (HDR) imagery and often used in visual effects and 3D rendering.
Each format serves a different need, balancing image size, quality, and the medium in which it’ll be used. For example, vector image formats like SVG are excellent for graphics that need to be resized frequently.
Compressing Images Without Losing Quality
We can compress images effectively while maintaining their integrity through specific techniques:
- Selecting the Right Format: For instance, use JPG for photos and PNG for images requiring transparency.
- Adjusting Compression Levels: Many formats allow us to choose the level of compression; JPEGs can be significantly reduced in size before visible quality loss occurs.
- Optimizing for Web: Tools like Adobe Photoshop offer ‘Save for Web’ options, balancing quality and file size for online use.
- Using Compression Tools: Software and online tools can intelligently compress files, reducing the file size without noticeably affecting the image size or quality.
By carefully selecting the appropriate image format and utilizing these compression techniques, we can maintain the integrity of our 3200 x 3200 images across various platforms and uses.
Practical Tips for Working with 3200px Images

When working with 3200px images, it’s crucial to understand the trade-off between image quality and file size to ensure fast load times and compatibility across various platforms.
Determining the Best File Size for Web
For 3200px by 3200px images, which have a 1:1 ratio, maintaining a balance between clarity and a manageable file size is essential. To optimize for web:
- File Formats: Use JPEG, WEBP, or HEIC formats as they offer high compression with minimal quality loss.
- Compression: Compress images without sacrificing quality. Aim for images around 200-500 kilobytes for a balance of quality and speed.
- Cloud Storage: Utilize cloud storage solutions to host images, ensuring faster download times from any internet connection.
Optimizing Images for Different Platforms
Each platform requires specific considerations for image dimensions and resolutions:
- Social Media: Platforms like Instagram or Facebook have ideal image sizes. For best results, follow their recommended guidelines.
- Print: If printing, ensure the DPI (dots per inch) is set to at least 300 for the highest quality prints at 3200px by 3200px.
- Professional Use: For graphics intended for professional use in applications like Adobe Photoshop (PS), prefer TGA, EPS, or list formats, which are less compressed and preserve more detail for editing.

