
Instructions on Using the Tool

Diving into the world of digital snapshots, figuring out all about those pesky pixel sizes and quality is a must-do. Take a 300 x 300 pixel picture; it’s perfectly squared, like a piece of toast, making its aspect ratio a neat 1:1. This size is just right for things like your next amazing profile picture, a cool logo, or tiny images of products for your online store or to show off on your Instagram. Now, let’s chat about resolution—it’s all about how many tiny dots, or pixels, fit into your picture. For a 300 by 300 picture, you’re looking at a whopping 90,000 pixels crammed in there. “Pixel density” is another fun term. It’s about how tight those pixels hug each other, usually measured in pixels per inch (PPI). When whipping up an image this size, keeping it top-notch quality is key. This means making sure it’s got enough pixel buddies close together, so it looks sharp and snazzy no matter where it ends up, from your phone to your computer screen. Keep reading for the secret sauce on how to master this, and make every pixel count!
Maintaining the clarity and crispness of a 300px by 300px photo hinges on the pixel density and the quality of the original image. The pixel density needed for a sharp display differs based on whether the image is intended for web use or print. Typically, screen resolutions are around 72 PPI to 96 PPI, while printed materials require a higher pixel density, often 300 PPI or more, to prevent pixelation—when the individual pixels become discernible, leading to a blurry image. In crafting a 300 x 300 pixel image, one would typically start with a larger, high-quality picture and then resize it using an image editing software to ensure the final image retains the desired clarity.
Key Takeaways
- A 300 x 300 pixel image is square-shaped with a 1:1 aspect ratio and consists of 90,000 pixels in total.
- Quality and pixel density are essential for clear image presentation, varying between web (72 to 96 PPI) and print (300 PPI and above).
- Creating a sharp 300px by 300px photo often involves resizing a larger image while maintaining high pixel density to avoid blur.
Understanding Image Basics
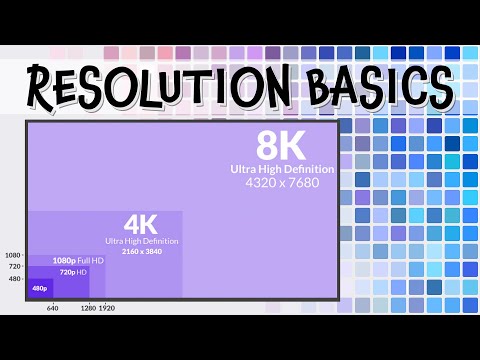
When we talk about creating a 300 x 300 Pixel Image, it is crucial for us to understand the specifics of aspect ratio, resolution, and pixel density. These elements determine the overall image quality and are fundamental to achieving a professional-looking photo.
Aspect Ratio and Resolution
Aspect Ratio refers to the ratio of the width to the height of an image. In a 300 x 300 pixel image, the aspect ratio is 1:1, meaning it’s a perfect square where each side is equal in length. Resolution is the detail an image holds, and it is often represented by the term pixels per inch (PPI) or dots per inch (DPI). For digital formats, a 300 x 300 pixel image on a computer display might appear differently than on a high-resolution printing device due to varying resolutions.
Pixel Density and Image Quality
Pixel Density is measured in DPI, which is the number of pixels per linear inch of the image. A higher DPI value typically indicates higher image quality, as there are more pixels packed into a given area. The standard DPI for web images is 72 DPI, while printed images usually require at least 300 DPI for clear quality. Ensuring that our image has the correct DPI is essential, especially for print, to avoid a pixelated or blurry appearance.
How to Create a 300×300 Pixel Image
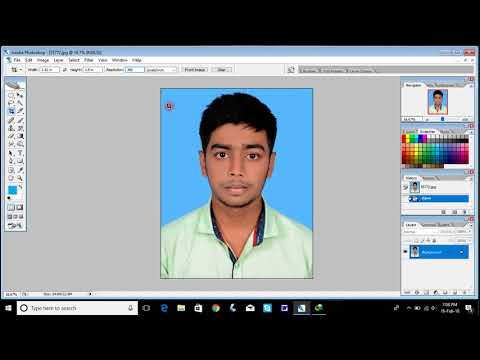
Creating a 300×300 pixel image is a straightforward process when you choose the right tools and follow the proper steps. We’ll ensure you have a resized image that maintains clarity and suits your needs.
Selecting the Right Software
First, we need to select an appropriate image editing software. There are many free online tools available that let us resize images efficiently without the need to download any software. Look for an online tool that supports a variety of image file formats like JPEG, PNG, or BMP. Ensure it offers a simple upload and preview feature to ease the editing process.
Step-by-Step Resize Process
Once we’ve chosen our tool, follow this step-by-step guide:
- Upload the image: Find the upload button to add your image to the tool. Supported formats usually include JPEG, PNG, and more.
- Access the resize feature: Locate the tool’s resize option. This is typically labeled as “Resize,” “Adjust Dimensions,” or something similar.
- Set the dimensions: Enter 300 in both the width and height fields to ensure a square aspect ratio.
- Preview the image: Before finalizing, preview the changes to verify that the image’s clarity is intact and it appears as desired.
- Crop if necessary: If your original image isn’t square, you might need to crop it to avoid distortion.
- Save the image: After resizing, save the new image. Some tools allow you to choose the format, which could be the same as the original or different, depending on your needs.
By following these steps, we can convert any picture into a 300×300 pixel image, perfect for profile pictures, logos, or any other requirement that demands this specific resolution and size.
Optimizing Images for Web and Social Media

When preparing images for the web and social media, it’s essential to focus on proper format selection and compression to ensure images load quickly while maintaining visual quality.
Adjusting for Facebook and Instagram
For platforms like Facebook and Instagram, we must consider both the aspect ratio and file size. Images should be .jpg or .png for optimal compatibility. Specifically, a 1:1 ratio is ideal for Instagram posts, translating to 300px by 300px images. On Facebook, the cover photo is best displayed as 820 pixels wide by 312 pixels tall on computers, and 640 pixels wide by 360 pixels tall on mobile devices. It can be beneficial to use online tools or software to automate the resizing process for multiple platforms.
Ensuring Fast Web Page Load Speed
Fast loading times are crucial for maintaining user engagement. We recommend using WebP format for images as it provides high-quality results with smaller file sizes, thereby reducing load times. However, since not all browsers support WebP, including fallback options like JPG, PNG, or GIF is wise. Aiming for images to load in under two seconds is a standard practice to keep internet users engaged. To facilitate this, we can utilize efficient image compressing tools while balancing visual fidelity and file size. Reducing HTTP requests by merging images into CSS sprites can further increase page speed.
Privacy and User Experience

When discussing 300 x 300 pixel image converters, we must ensure our users’ privacy is protected while providing an easy-to-use interface that enhances the overall user experience. Integrity in handling images is paramount as they often contain sensitive data. Our commitment to privacy includes encrypting user data and ensuring images are deleted automatically after processing.
Image Security on the Internet
We recognize that when images are uploaded to the internet, they can be vulnerable to unauthorized access and misuse. To combat this, we employ cutting-edge encryption techniques to safekeep the images during transmission. Furthermore, to maintain trust and uphold privacy, we make sure that the images are deleted automatically from our servers once the conversion process is completed. This ensures that users’ photos remain strictly private and are not stored longer than necessary.
Improving User Accessibility
Enhancing the user experience involves not just sleek design, but also easy-to-use features that accommodate all users, including those with accessibility needs. By implementing intuitive interfaces and clear instructions, our 300 x 300 pixel image converter is accessible to a wide range of users, ensuring that anyone can convert their images without hassle. This commitment extends to scaling our interface to various screen sizes and pixel densities, providing an enhanced experience across devices.

