Originally posted on March 22, 2024 @ 3:38 am

Instructions on Using the Tool

Diving into the digital image world, knowing the nitty-gritty like how big or sharp they are is super important. Let’s say you’re hunting for a picture that’s exactly 250 pixels wide and 65 pixels tall. You might need this size for stuff on the web, like cool banners or the top part of an email. The shape of this image, with its width and height, has a special mix called a ratio, hitting right around 3.85:1. This is a fancy way of saying it’s more stretched out than tall, kind of like a really long skateboard. If you’re aiming to jazz up your website or emails, this info is golden. Stick around, and you’ll discover even more gems about handling images like a pro.
The resolution of an image, referring to the number of pixels displayed per unit of printed length in the image, does not apply to a pixel-based dimension such as 250px by 65px when viewed on screens; resolution becomes pertinent when printing. Pixel density, however, which is measured in pixels per inch (PPI), is important for ensuring that the image retains clarity and sharpness on various displays. Different devices have different PPI requirements to maintain image quality. To create or convert an image to 250 x 65 pixels, one must use an image converter tool or editing software that allows you to input custom dimensions, ensuring the image fits the desired size without compromising the aspect ratio or image quality.
Creating a crisp and clear 250px by 65px photo entails not only resizing an image to these dimensions but also understanding and maintaining the aspect ratio to prevent distortion. Moreover, one has to consider the context in which the image will be used to optimize its pixel density and overall quality, ensuring it looks professional and visually appealing on all platforms it’s intended for.
Key Takeaways
- A 250 x 65 pixel image has a ratio of about 3.85:1, indicating a wide and narrow shape.
- Maintaining pixel density is key to preserving image clarity across different devices.
- To convert an image to this size, use tools that allow custom dimension inputs without distorting the quality.
Understanding Image Basics

When we discuss images in the digital realm, it’s essential to understand the concepts of aspect ratios, resolution, and pixel density. These fundamentals help us optimize images for various uses, ensuring clarity and compatibility.
Aspect Ratios and Their Importance
An aspect ratio is the proportional relationship between the width and height of an image. It is expressed as two numbers separated by a colon, such as the 250×65 image ratio, which simplifies to approximately 3.85:1. This ratio is critical because it affects how an image is perceived on different displays and whether it will need to be cropped or have its size adjusted for various platforms.
Image Resolution and Pixel Density
Resolution refers to the number of pixels distributed across an image, typically represented as width x height. A 250×65 pixel image has a total of 16,250 pixels. Pixel density, measured in pixels per inch (PPI) or pixels per centimeter (PPCM), indicates how many pixels are packed into a linear inch or centimeter of the image. Higher pixel densities generally mean sharper images. For instance, many computer displays aim for about 72 to 96 PPI, which could be calculated for any image using a PPI calculator.
Let’s consider our 250×65 image. If we want to maintain its clarity on a standard display, we might aim for a pixel density that keeps the image sharp, which often means finding the right balance between pixel count and the eventual physical size of the image.
Image Conversion Explained
When we talk about converting an image to a specific size, like 250px x 65px, we’re focusing on factors such as the aspect ratio, resolution, and pixel density. These are important to maintain the quality of the image throughout the conversion process.
Supported Image Formats
The first step in image conversion is understanding which file formats are supported. Common image formats include:
- Raster Images: JPEG (or JPG), PNG, GIF, BMP, and TIFF are widely used for their ability to display a vast array of colors and accommodate varying degrees of image complexity.
- Vector Images: Formats like EPS, SVG, and WEBP are crucial for scaling images without losing quality.
- Other Formats: ICO for icons, HEIC for high-efficiency images, and JPEG-2000 which is a successor of the original JPEG format are also notable.
Each of these formats serves different purposes, and some may not be ideal when aiming for a small resolution like 250px x 65px due to their inherent characteristics.
Steps to Convert Your Image
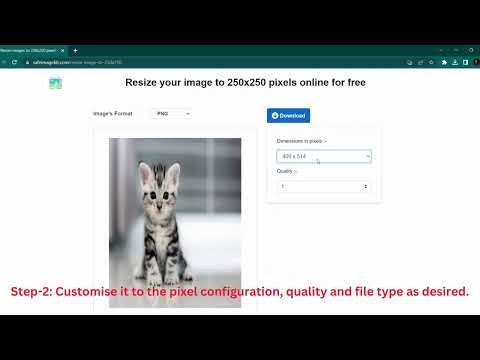
Here are the concise steps to convert your image to a 250px by 65px photo:
- Choose an Online Image Resizer: Find a reliable online image resizer that supports your image’s current format and the intended size.
- Upload Your Image: On the resizer tool, upload the original image file from your device.
- Set Dimensions: Enter the required dimensions, in this case, 250px in width and 65px in height.
- Adjust Compression: If available, select the compression level to manage the file size without affecting the quality drastically.
- Convert and Download: Initiate the image conversion and, once done, download the resized image.
It’s important to retain the image’s aspect ratio to avoid distortion. If the original aspect ratio differs from the desired output, there may be a need to crop the image or add padding to achieve the 250px by 65px size.
Optimizing Image Quality
When converting an image to 250px x 65px, we aim to ensure that the quality remains high, and the image appearance is sharp and clear. Here’s how we can accomplish this while considering file size and other factors.
Maintaining High Resolution
High resolution in an image provides more detail and clarity, which is essential for both print and digital media. To maintain high resolution when we resize an image to 250 pixels in width and 65 pixels in height, we must start with a source image that is of high quality. For instance, if the original image has a high number of pixels, it will retain more quality when downsized. We should also preserve the image aspect ratio to avoid distortion, ensuring the width and height remain proportional to the original.
File Size vs Quality
Weighing file size against quality is crucial, as high-quality images often result in larger file sizes. However, large files can negatively impact website loading times. We’ll use an image file size calculator to estimate the final file size after conversion and adjust the quality level accordingly. Here are the factors we consider in balancing file size and quality:
- Image File Format: JPEGs are often the best choice for maintaining a balance between quality and file size.
- Compression: Applying the right amount of compression can significantly reduce file size while preserving quality.
- Image Width and Height: Keeping to our target resolution of 250px x 65px, we adjust compression to meet size constraints without compromising quality.
By following these steps, we ensure that our final image is optimized for both quality and performance.
Practical Applications and Tips
Before diving into the specifics, it’s vital for us to understand that finding the correct image specifications for different mediums is key to maintaining clarity and intention in our visual presentations.
Choosing the Right Dimensions for Web Use
For web use, the width and height of an image, like our 250px x 65px example, can significantly affect how it looks on different devices. When we are resizing an image for the web, we aim for it to load quickly without sacrificing quality. Here, aspect ratios like 16:9 for wide screens or 4:3 for more square images can guide us. To conveniently modify image dimensions, we can use an online resizer, most of which are free and allow for a simple upload and resize process.
-
Steps to resize:
- Choose an online image resizer.
- Upload your image.
- Enter new dimensions or select a preset aspect ratio.
- Download or save the resized image to cloud storage.
-
Aspect Ratio Calculator: Useful when we need to maintain the image scale.
Tip: Always check the image resolution and pixel density after resizing. They should not fall below the minimum standards of the platforms you’re using.
Image Sizing for Print
When preparing an image for printing, like our 250px x 65px photo, the print size and resolution matter greatly. Images for print typically require a higher pixel density, measured in pixels per inch (PPI), to ensure a sharp appearance. We use a pixels to print size calculator to convert and understand the relationship between digital image size and printed output.
- Print Resolution Standard: Aim for 300 PPI for high-quality prints.
- Conversion to Print Size:
- Input the digital size (250px x 65px).
- Specify desired PPI (300 PPI is standard for print).
- The calculator will provide the print size in inches.
Tip: Remember, enlarging an image too much can lead to pixelation. Always check the percentage increase and stay within a reasonable range to avoid quality loss.
By following these guidelines, we ensure our images are optimized for their respective uses, preserving the integrity and purpose of our visual communication.

