
Instructions on Using the Tool

In the realm of digital image editing, being able to change and tailor the size of an image is essential. For instance, when dealing with an image that’s 250 x 250 pixels, it becomes crucial to grasp its aspect ratio, resolution, and pixel density, especially because different web platforms frequently demand specific dimensions. An image of 250 x 250 pixels has an aspect ratio of 1:1, indicating it’s a perfect square. This square shape is commonly favored for profile pictures, thumbnail images, and supplemental visuals on various digital outlets.
To create or convert an image to a 250px by 250px photo, specialized software or online tools are often necessary. These tools can not only resize images to the desired dimensions but also ensure that the resolution and quality are suitable for its intended use. Pixel density, which is the number of pixels per unit of length in the image, remains fixed for digital viewing, but it is crucial for print where high-density values are required for sharp, clear images.
Key Takeaways
- Understanding the specifications of a 250px by 250px image helps in creating suitable graphics for various digital needs.
- It is necessary to use the right tools or software to resize and convert images without losing quality.
- Adherence to best practices for image conversion ensures high-quality results for both digital and print media.
Understanding Pixel Dimensions and Image Resolution
To effectively work with digital images, it’s essential to grasp how pixel dimensions and image resolution intertwine to affect image quality. These fundamentals dictate an image’s clarity and suitability for various applications, whether it be web design or printing.
What Is a Pixel?
A pixel is the smallest unit of a digital image, visible as a tiny square of color. Think of pixels as building blocks; the composite of these blocks forms the complete picture. Specifically, for a 250×250 image, we have exactly 62,500 pixels in total (each row has 250 pixels, and there are 250 such rows).
Understanding Resolution
Resolution refers to the density of pixels in an image, often measured in dots per inch (DPI) or pixels per inch (PPI). Higher resolution indicates a larger number of pixels packed into the same area, resulting in finer detail and higher image quality. For instance, a 250×250 pixel image might display sharp and clear on a website but could appear pixelated if printed without sufficient resolution.
Aspect Ratios and Image Scaling
The aspect ratio of an image is the proportional relationship between its width and height. A 250×250 image has an aspect ratio of 1:1, meaning it is perfectly square. When scaling an image, preserving the aspect ratio prevents distortion. Image scaling adjusts the dimension, width, and height while maintaining the integrity of the image. If we alter either the width or the height, we must adjust the other dimension proportionally to retain the original aspect ratio.
How to Resize and Convert Images
When we need to adjust an image to a specific pixel dimension, such as 250 x 250 pixels, it’s crucial to use the right tools and follow precise steps. This will ensure we maintain the quality and proper format of the image.
Choosing the Right Software and Platforms
To get started, we need to choose software or an online platform that allows us to resize and convert images efficiently. For most image resizing and conversion tasks, software like Adobe Photoshop is a robust option that supports a wide range of image formats such as JPG, PNG, GIF, WEBP, TIFF, EPS, SVG, BMP, TGA, ICO, DDS, and EXR. Online image resizers offer convenient alternatives that are typically user-friendly and do not require software installation. These platforms support basic functions such as resize image, convert image, and crop image for various formats, including vector image formats.
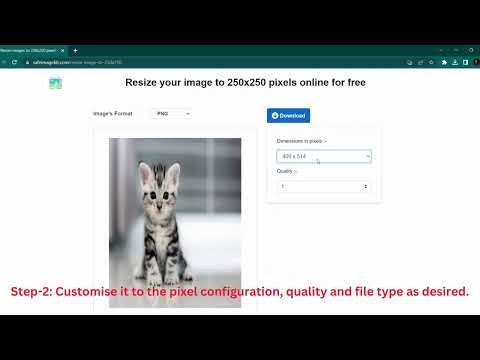
Step-by-Step Guide to Resizing Images
Here’s a simple guide to resizing images:
- Upload the image to the chosen software or online service.
- Select the resize option and enter the desired image size; in this case, 250 x 250 pixels.
- If necessary, crop the image to maintain its aspect ratio. Most tools will allow you to manually select the crop area or enter the specific dimensions.
- Choose whether to compress the image to reduce file size without significantly compromising quality.
- Decide on the format to convert the image if different from the original. Keep in mind that formats like JPG are best for photographs, PNG for images with transparency, GIF for animated images, and vector formats like SVG for images that require scaling without quality loss.
- After processing, review the image to ensure it meets your needs and then download the resized and possibly converted file.
Throughout this process, we must always consider the balance between file size and image quality. An online image resizer can be a quick option for those who need to resize images on-the-go or don’t have access to advanced editing software on their devices. However, for those who require finer control over the conversion options, professional software might be the preferred choice. Always test different settings to understand how your image is affected before finalizing the resizing and conversion.
Best Practices for Image Conversion and Compression
When converting images to a specific dimension, such as 250px by 250px, we need to follow certain best practices to ensure the image maintains its quality while being optimized for file size.
Maintaining Image Quality
It’s crucial to maintain the integrity of the photo during the conversion process. We recommend using image conversion software that allows you to manually adjust the resolution. Resolution determines the clearness of the image, and we should always aim for the highest resolution within the required file size limit. When downsizing an image to 250px by 250px, ensure that the aspect ratio remains consistent to avoid distortion. When working with formats like JPG and PNG, choose PNG for graphics with fewer colors as it provides lossless compression.
- Aspect Ratio: Keep the original aspect ratio to avoid stretching.
- File Format: PNG for graphics, JPG for photographs.
- Resolution: Aim for the highest resolution that respects file size constraints.
Effective Compression Techniques
To reduce file size while preserving image quality, use compression tools that offer a balance between compression intensity and image fidelity. There are online tools that can compress images effectively; some are even 100% free. The key is to select a compression level that reduces the size without visibly affecting image quality. Opt for software that gives a preview of the final image to make decisions based on visual evidence. Remember, cloud storage can also optimize images on-the-fly, offering both storage solutions and maintaining privacy with secure transmission.
- Compression Tools: Use selective online tools for effective compression.
- Compression Level: Opt for a balance between size and quality.
- Preview Options: Always preview the compressed image.
- Cloud Storage: Leverage cloud services with built-in image optimization.
By adopting these best practices, we ensure the final 250px by 250px image retains quality and clarity, with an optimal file size suitable for use across various digital platforms.
Using Images for Web and Social Media
When we discuss images for the web and social media, specific dimensions, file formats, and optimization techniques are crucial for maintaining quality and efficiency. Each platform has unique requirements that dictate how we should manage and present our visual content.
Optimizing for Different Platforms
For effective social media presence, we must tailor our images to the specific requirements of platforms like Facebook, Instagram, and various blogs. For instance, Facebook favors images of 1200 x 628 pixels for link previews and 1080 x 1080 pixels for posts, whereas Instagram prefers images with a minimum width of 1080 pixels. On any social media, an image of 250 x 250 pixels works great for profile pictures or small icons.
We optimize not only for dimension and display but also for download rates and on-the-go access from mobile devices. Photos with larger file sizes take longer to load, causing a potential increase in the rate of people leaving the page. Hence, it’s ideal to reduce file size while keeping the image quality visually pleasing.
Image Formats for the Web
The common image file formats for web use are PNG, JPG, WebP, GIF, and SVG. Each format serves a unique purpose:
- PNG: Offers transparent backgrounds and is ideal for logos and icons.
- JPG: Used for photographs and images with gradients due to its ability to handle a multitude of colors effectively.
- WebP: A modern format that provides superior lossless and lossy compression for images on the web.
- GIF: Perfect for animated images but limited in color depth.
- SVG: A vector format used for diagrams, icons, and other images that need to scale without losing quality.
For branding, consistency in image quality and format across various platforms is key. A converter can be a helpful tool to quickly transform images to the correct dimensions and file format, often with simple drag and drop functionality and a convenient download button. This ensures that our images maintain a professional appearance and conform to platform-specific standards, whether they are displayed vertically or horizontally, with or without accompanying text.

