Originally posted on March 22, 2024 @ 3:26 am

Instructions on Using the Tool

Diving into the world of image processing, it’s a game-changer to get the scoop on what makes a picture pop. Picture this: a tool that can jazz up, tweak, or totally transform your pics into a crisp 2000 x 2000 pixel masterpiece. Why that size, you ask? Well, this magic square is the golden ticket for crystal-clear images that look fab both on your screen and printed out. Now, let’s talk shop about resolution. Simply put, it’s all about the nitty-gritty details in your photo, which boils down to how many pixels are packed into it. With a whopping four million pixels, a 2000 x 2000 pixel image doesn’t mess around – it’s all about giving you that eye-popping clarity. But wait, there’s more – pixel density! This is the secret sauce to how sharp your image looks, no matter the size. Think of it as the pixels’ cozy closeness, usually measured in pixels per inch (PPI). The closer they are, the sharper your image. So, for anyone looking to step up their image game, mastering these tricks will make your photos stand out in a crowd. Stick around, and I’ll show you how to turn your images into pixel-perfect masterpieces that’ll wow everyone.
Ensuring the quality of the converted image involves managing the resolution and pixel density appropriately for the intended use. Whether it’s for web graphics, professional printing, or archiving, the right balance of resolution and pixel density will dictate the image’s clarity and detail. Conversion processes might include scaling, cropping, or changing file formats, and it’s important to use the right tools and techniques to maintain the integrity of the original photo. For example, upscaling a smaller image to a 2000 x 2000 size could result in loss of quality, unless proper interpolation methods are used.
Key Takeaways
- A 2000 x 2000 pixel image converter adjusts images to a specific resolution and aspect ratio.
- We maintain image quality by balancing resolution and pixel density during conversion.
- Conversion methods and tools are critical to optimize images for their intended use.
Understanding Image Basics
Before we dive into the specifics, it’s crucial to understand that resolution and pixel density are the building blocks of digital image quality. These factors dictate the clarity and detail an image can convey.
What Is Resolution?
Resolution refers to the number of pixels that compose an image. It’s often represented by the width and height of the image in pixels. For instance, a resolution of 2000px x 2000px means the image is 2000 pixels wide and 2000 pixels tall, yielding 4,000,000 pixels in total. High-resolution images have more pixels, which usually translates to a higher level of detail assuming the quality is not compromised during resizing or compression.
Resolution is also measured in dpi (dots per inch) or ppi (pixels per inch), which are crucial for printing. The higher the dpi/ppi value, the more detailed the printed image. For example:
- 300 dpi: High-quality print
- 72 dpi: Standard for web images
| Dimension (in pixels) | Quality | Usage |
|---|---|---|
| 2000 x 2000 | High | Professional printing, detailed art |
Exploring Pixel Density
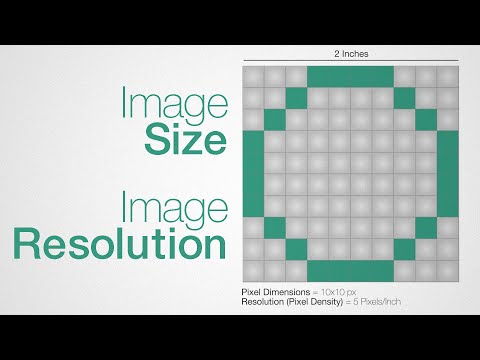
Pixel density, measured in ppi (pixels per inch), is the number of pixels within a set area of a screen or image. This affects how sharp an image appears on different devices with varying screen sizes.
An image that is 2000px x 2000px on a 10-inch screen has a pixel density of 200 ppi:
- To calculate ppi: (2000 pixels / 10 inches = 200 ppi)
The larger the screen size with the same dimension of pixels, the lower the pixel density, and vice versa. Here’s a brief list:
- 200 ppi: Good for mid-sized displays
- 300 ppi: Optimal for high-quality prints
- 72 ppi: Common for web images, typically on monitors
Higher pixel density usually equates to sharper images, as there are more pixels present within each inch, making individual pixels less distinguishable to the naked eye.
Image Conversion Process

In this section, we’ll guide you through the specifics of converting images to a standardized size, with a focus on achieving a resolution of 2000px by 2000px. We’ll cover the steps to resize images, including the tools and techniques available, as well as the range of supported image formats in the conversion process.
How to Resize Images
To resize an image to 2000px by 2000px, we follow a set of straightforward steps:
- Upload: Use a trusted online resizer or image editing software to upload your original photo.
- Select Dimensions: Input ‘2000’ in both the width and height fields to set your desired dimensions. Use an aspect ratio calculator if you need to maintain the original image’s aspect ratio.
- Choose Resolution: While selecting the size, you also have the option to adjust the resolution, which dictates the image clarity.
- Convert: Once you’ve set the correct dimensions and resolution, initiate the conversion. The resizer tool will then process the file.
- Download: After the image is processed, you can download the resized version.
Supported Image Formats
We can handle a wide variety of file formats for resizing:
- Raster Images: Formats like JPG, PNG, GIF, WebP, BMP, ICO
- Vector Images: Formats such as EPS, SVG
For each of the formats, the resizing process remains consistent albeit some formats like PNG and SVG support transparency, and retaining such features is part of our conversion service.
Keep in mind that while resizing, we ensure that the image aspect ratio is accurately adjusted to prevent distortion. It’s our aim to retain the highest possible quality during the conversion process so that your resized images are crisp and clear.
Optimizing for Quality and Efficiency

When we talk about converting images to a 2000×2000 pixel resolution, it’s crucial that we focus on maximizing image quality while ensuring the file size remains manageable. The key lies in choosing the optimal file format and maintaining the aspect ratio.
Choosing the Right File Size and Format
-
File Size: It’s imperative to balance quality with file size. A smaller file size often means faster upload and download times, but it can adversely affect image quality. For the highest quality, PNG is preferable due to its lossless compression; however, JPEG can be used for efficient compressing while still maintaining good quality.
File Format Quality Compression Typical Use PNG High (lossless) None Graphics with text JPEG Good (lossy) Adjustable Photographs -
Compression: If we must use JPEG for its compression benefits, we aim for a balance that reduces the file size without a noticeable drop in quality. The key is to compress the image just enough to make it efficient but not so much that we introduce artifacts.
Maintaining Aspect Ratio Integrity
-
Aspect Ratio: To prevent any distortion, we ensure the aspect ratio remains unchanged during resizing. For a 2000×2000 pixel image, we maintain a 1:1 ratio, perfect for profile pictures or icons.
| Original Measurements | Target Aspect Ratio | Crop Necessary? | |-----------------------|---------------------|-----------------| | 4000x3000 pixels | 1:1 | Yes | | 2000x2000 pixels | 1:1 | No | -
Crop: To maintain the integrity of the aspect ratio, cropping might be necessary if the original image doesn’t match our aspect ratio. We carefully choose which sections to crop to preserve the image’s focal points.
By focusing on these critical components, we ensure that our images are of the highest quality upon conversion, without unnecessary bloat in file size, all the while keeping the original aspect ratio intact for a seamless appearance.
Security and Accessibility

When discussing image converters, particularly those that handle 2000px x 2000px images, it’s essential for us to examine the security and accessibility of these tools. Our primary concerns include safeguarding user privacy and ensuring the converter is straightforward to use across various platforms, such as Windows and Mac.
Privacy Considerations
When selecting an image converter, we should consider one that values user privacy. Ideally, this means opting for a tool that offers privacy guarantees, perhaps stating that images are deleted automatically after conversion. This is crucial when working with potentially sensitive images. We recommend using a converter that doesn’t require lengthy sign-ups or personal information sharing. It would be best if it operates directly from a browser, reducing the need for unnecessary software downloads which could potentially put your device at risk or expose it to unwanted ads.
- Privacy Guaranteed: Opt for services that explicitly state their privacy policy.
- Browser-Based: A tool that works in your browser can reduce the risk of downloading malicious software.
- Automatic Deletion: Ensure that the service deletes your images post-conversion for added security.
Easy Access and Usage
Accessibility is synonymous with ease of use. A user-friendly image converter should be accessible through any standard web browser, without the need for specialized software. This allows us to efficiently access the converter on various devices, be it on Windows or Mac systems. Furthermore, a service should be free of ads to streamline the process without distractions.
- Browser-Based: Access using Chrome, Firefox, Safari, or other popular browsers on Windows or Mac.
- Easy to Use: Look for a converter that lets you select an image and convert it with a few simple clicks.
- Free: Access to a free service means you can convert images without incurring costs.
In conclusion, when choosing an image converter, prioritize one that upholds privacy and accessibility. Look for a platform that’s free, easy to use, browser-based, and makes no compromises on your privacy.

