Originally posted on March 23, 2024 @ 3:15 am

Instructions on Using the Tool

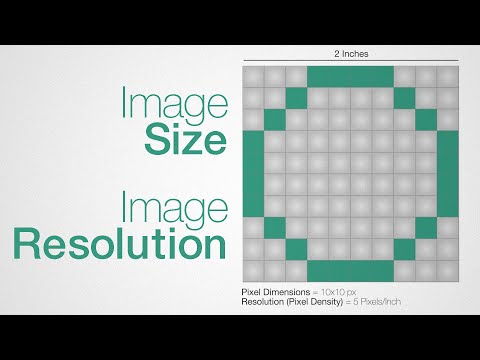
When working with digital images, understanding the specifics of image resolution and conversion is crucial. A 192 x 192 pixel image is a square graphic often used for icons, avatars, and other web elements where uniform dimensions are required. The aspect ratio for a 192px by 192px image is 1:1, which means the width and height are equal, producing a perfectly square shape. The resolution in this context refers to the number of pixels displayed per inch of an image, which determines the level of detail that the image will retain. Pixel density, usually measured in pixels per inch (PPI), will vary depending on the display device, but for a 192 x 192 image, it remains constant within the image itself.
Creating a 192px x 192px photo requires resizing the original image without compromising its quality. This process is known as image conversion and can be done using various online tools or graphic software. The key is to maintain the integrity of the image while resizing or resampling it to fit the desired dimensions. For use on the web, images often need to be optimized to balance visual quality with file size to ensure fast loading times and a good user experience.
Key Takeaways
- A 192 x 192 pixel image maintains a 1:1 aspect ratio, ideal for square graphics.
- Resizing to this dimension requires careful conversion to preserve image quality.
- Optimizing images for web use involves a balance between resolution and file size.
Understanding Image Basics

Before diving into specific tools such as a 192 x 192 Pixel Image Converter, it’s crucial for us to grasp fundamental concepts like image resolution, pixel density, and aspect ratios. These elements determine the visual quality of an image and its suitability for various applications.
Image Resolution and Quality
Image resolution refers to the detail an image holds, which is typically represented as width by height in pixels. For instance, a 192 x 192 pixel image has a width and height of 192 pixels each, resulting in a total of 36,864 pixels. Higher resolution images contain more pixels, which generally leads to improved detail and clarity. However, this does not necessarily guarantee higher visual quality, as other factors like sensor quality and lighting also play significant roles. To convert an image to a specific dimension like 192 x 192 pixels, an image size converter can be used that maintains the necessary detail without compromising the image’s integrity.
Pixel Density and Aspect Ratios
Pixel density, measured in pixels per inch (PPI), indicates the number of pixels within a given area of the screen and heavily influences the sharpness of an image. In terms of aspect ratio, which is the ratio of width to height, a 192 x 192 pixel image is perfectly square with an aspect ratio of 1:1. This uniformity is ideal for profile pictures or icons that require a balanced dimension. When resizing images, maintaining the correct aspect ratio is vital to avoid distortion. A reliable image size converter ensures that the final image preserves the original aspect ratio or modifies it according to the desired specifications.
Image Conversion Process
Before we dive into the specifics, it’s essential to understand that converting an image to a 192×192 pixel format involves choosing the right image type and following conversion steps closely to maintain the image quality.
Choosing the Right Image Format
When it comes to image formats, we have multiple options, each with its unique advantages. Formats like JPEG and PNG are widely used for their compatibility and balance between quality and file size. JPEG is often preferred for photographs due to its efficient compression, while PNG offers lossless compression, making it ideal for images with text or transparent backgrounds.
Other formats such as WEBP provide excellent compression with minimal loss in quality, while TIFF and PS (Photoshop) files are great for professional editing due to their high resolution and detail preservation. BMP has a simple structure and does not compress image data, ensuring that all pixel data is saved without loss. EPS and ICO are generally used for vector graphics, suitable for logos and icons, respectively. Lastly, SVG format is perfect for scalable vector-based graphics on the web that need to be resized without loss in quality.
Steps to Convert to 192×192 Pixels
To convert an image file to a 192×192 pixel format, we follow these steps:
- Select an Image: Choose the image you wish to convert from your device or cloud storage.
- Use an Online Image Resizer: Access an online image resizer that supports 192×192 pixel conversion.
- Upload the Image: Upload the original image file to the chosen platform.
- Set the Resolution: Manually input or select the desired resolution of 192×192 pixels.
- Choose the Format: Decide on the image file format (e.g., JPG, PNG, WEBP), considering the purpose of your image.
- Confirm and Convert: Review the settings and initiate the conversion process.
- Download the Converted File: After converting, download the new 192×192 pixel image to your device.
By attentively selecting the correct format and meticulously following the conversion steps, we ensure that the resulting image meets our resolution and quality requirements.
Optimizing for Web and Print

When preparing images for web and print, it’s crucial to consider the specific requirements of each medium to ensure the best quality. Image formats, resolution, and scaling play a significant role in how the final product appears across various platforms.
Differences in Image Formats for Platforms
Web platforms typically prefer images in formats like JPEG, PNG, or GIF due to their widespread support across browsers and efficient file sizes, which are ideal for quick loading on the internet. However, for print, we want high-quality images that often come in formats like TIFF or PDF. A quick comparison:
- Web: JPEG (lossy, small file size), PNG (lossless, supports transparency), GIF (limited color palette, supports animation)
- Print: TIFF (lossless, supports high color depth), PDF (portable, can contain vector data)
Considering the required display outputs, images meant for web should also account for different ISP speeds to ensure they load efficiently without compromising too much on image quality.
Understanding DPI and Image Scaling
When scaling images for print, the DPI (dots per inch) is a key factor; it determines the print size and quality of an image. The higher the DPI, the better the image quality in print. A 192 x 192 pixel image at 300 DPI results in a smaller, high-quality print, whereas the same image at 72 DPI would be larger with a lower quality. We typically use the pixels to print size calculator to accurately resize images:
- Web: DPI can be lower (typically 72 DPI)
- Print: DPI should be higher (300 DPI or more)
For web use where the DPI is not a critical factor, ensure the image file size is manageable to decrease loading times without losing significant quality. Image file size calculators help to balance quality and file size. Additionally, for print, consider using vector image formats like AI or SVG, as they scale without loss of quality, which is not possible with pixel-based formats such as JPEG or PNG.
Using EXR format could be beneficial in scenarios where high-dynamic-range imaging is needed, possibly for high-quality prints or specialized web applications that warrant enhanced image details.
Ensuring Image Privacy and Integrity

When resizing images to a resolution of 192px x 192px, we must prioritize the protection of image privacy and maintain the integrity of the original file. We understand that along with achieving the desired aspect ratio, such as 16:9, 4:3, or 1:1, the security and quality of images are paramount.
Protecting Images in the Digital Space
Digital images, when shared online, are vulnerable to unauthorized use and tampering. To guard against these breaches, strong encryption should be employed before transmitting them over the internet. We encourage the use of watermarking to assert ownership, and metadata management to keep a track of the image’s history and alterations. Uploading images to secure, privacy-focused platforms can maximize security, especially when sharing sensitive content.
When providing free image resizing services, we ensure they are without compromise to the privacy of the users. For instance, when using a free resize image tool, it shouldn’t store images on the server longer than necessary. Moreover, if working with formats like TGA, known for its high quality, maintain secure handling to prevent any quality degradation or data loss.
Best Practices for Image Storage
Storing images safely is as crucial as protecting them during transfers. For highest quality preservation, we opt for lossless compression formats that maintain image integrity. We also suggest organizing images in secure environments where access is tightly controlled and logs are maintained for any access or changes.
Regular backups are not negotiable and we advise using a combination of local and cloud storage solutions for redundancy. Cloud services should be vetted for their security policies. It’s essential to regularly update our storage security practices to stay ahead of potential threats, ensuring that our images remain private and unaltered.

