
Instructions on Using the Tool

When handling digital photos, it’s important to grasp details such as the image ratio, resolution, pixel density, and the method for producing a photo that measures 1800px by 700px. A photo that is 1800 pixels by 700 pixels boasts an 18:7 ratio, making it perfect for banner images or web headers. The quality of an image of these dimensions hinges on the resolution, which is crucial for achieving sharp and clear content across different devices.
Converting an average image to these dimensions without losing quality involves certain techniques to avoid stretching or distorting the picture. Resizing images while preserving pixel density—measured in pixels per inch (PPI)—is a matter of using the right tools and techniques. Understanding the interplay between image size, resolution, and pixel density ensures that the resulting photo maintains its clarity after conversion.
Key Takeaways
- We understand the importance of maintaining image clarity when adjusting resolution and size.
- We can confidently convert images to specific dimensions like 1800px by 700px while preserving quality.
- We keep the digital integrity of images by respecting ratio and pixel density during the conversion process.
Understanding Image Basics

When we deal with digital images, it’s essential to comprehend the aspects of image dimensions, pixels, and resolution. These elements directly affect the clarity, quality, and purpose of the image.
Image Dimensions and Aspect Ratio
Dimensions refer to the width and height of an image in pixels, and in this case, we’re considering an image that is 1800 pixels wide by 700 pixels high. The aspect ratio is the proportional relationship between the width and height of an image. It’s calculated by dividing the width by the height. For this image, the aspect ratio is 1800:700, which simplifies to about 2.57:1. This aspect ratio is non-standard, unlike common ratios like 16:9, which is typical for widescreen formats, or 4:3, a standard for traditional TV and computer screens, or even 1:1, which is a square.
Common Aspect Ratios:
- 16:9 – Widescreen
- 1:1 – Square
- 4:3 – Traditional TV/Computer
- 16:10 – Widescreen variation
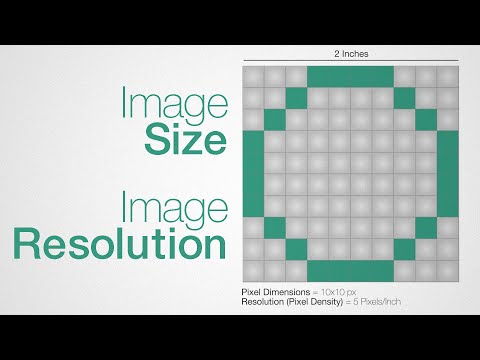
Pixels and Resolution
Pixels are the tiny squares that make up a digital image. The term “pixels” stands for “picture elements,” and the more pixels an image has, the more detail it can convey. The resolution is a measure of the pixel density, typically expressed in pixels per inch (PPI).
For our 1800×700 pixel image, if viewed on a screen with a PPI of 300 (common for high-quality prints), the print size would be 6 inches by 2.33 inches. A lower PPI would result in a larger print size but with less detail.
Effective Resolution Based on PPI:
- 300 PPI: 6 × 2.33 inches (High quality)
- 150 PPI: 12 × 4.67 inches (Medium quality)
- 72 PPI: 25 × 9.72 inches (Web/screen standard)
Understanding these basics enable us to optimize images for various platforms, ensuring they look sharp and clear wherever viewed.
Converting and Resizing Images

When we look to optimize our images for the web or for printing, it’s crucial to understand the process of resizing and converting images to different formats. Doing so allows us to achieve the desired resolution and file size without compromising quality.
Using Image Resizers
We can use various tools, including online image resizers or graphic software, to change the dimensions of our images effectively. To resize an image to 1800px by 700px, we select our desired output size, and the tool adjusts the image accordingly. Most online image resizers support common image formats such as JPG, PNG, BMP, and more, offering a straightforward method to obtain the resolution we need.
Maintaining Aspect Ratio
It’s important to maintain the aspect ratio to prevent distortion. When we resize an image, we ensure that the ratio of width to height remains constant. If our original image has a different aspect ratio than 1800:700, we might need to crop it after resizing to attain the exact dimensions without skewing the image.
Choosing the Right Image Format
After resizing, it’s essential to convert our image to an appropriate format. Each format—like JPG, PNG, WEBP, EPS, BMP, TIFF, SVG, and ICO—has its own advantages. Bitmap formats (JPG, PNG, BMP) are widely used for photographs, while vector image formats (EPS, SVG) are best for graphics that require scalability without loss of quality. Choice of format depends on the intended use; for web use, JPG or WEBP might be preferable due to their smaller file size, whereas PNG or SVG could be better for images requiring transparency or scalability.
Image Quality Factors

When we discuss image quality, we focus on several critical factors such as pixel density, image file size, and compression techniques, which all play a crucial role in the final output of a photo.
Pixel Density and Print Size
Pixel density, usually measured in pixels per inch (PPI), is fundamental in determining the quality of an image, especially when we print. The higher the PPI, the finer the detail in the print, resulting in a sharper image. For an 1800×700 pixel image, the print size can be calculated using a pixels to print size calculator. Here’s a basic example of how pixel density is related to print size:
- High PPI (300+): Ideal for professional-quality prints.
- Medium PPI (150-300): Sufficient for personal use.
- Low PPI (<150): May result in grainy or pixelated prints.
It’s crucial for us to select the correct PPI based on how we intend to use the image. Fine details require higher pixel densities, which means that for high-quality prints of an 1800×700 image, we should aim for a higher PPI.
Image File Size and Compression
Our image file size is directly affected by our choice of image file format and compression. Each format, such as JPEG, PNG, or TIFF, uses different methods of compression, impacting both the quality and the size of the photo.
- Lossless formats (e.g., PNG, TIFF): Preserve image quality, but result in larger file sizes.
- Lossy formats (e.g., JPEG): Reduce file size by compressing the image data, which may lower quality if overcompressed.
To control the balance between image quality and file size, we need to understand that higher compression can lead to visible artifacts in the image, detracting from its clarity. An image file size calculator can guide us in estimating the impact of different compression levels on the file size. By thoughtfully choosing our file format and degree of compression, we can ensure that we maintain the desired quality while keeping the file size manageable.
Additional Considerations
In optimizing and converting images to the specific dimensions of 1800px by 700px, we must also take into account the legal and storage aspects to ensure responsible use and easy retrieval.
Copyright and Usage Rights
When altering image sizes, such as when converting an image to fit the 1800px by 700px requirement, we must ensure that the copyrights and usage rights of the original image are respected. For instance, when posting on platforms like Instagram, it’s crucial to use either original content or content we have the rights to use. When using an aspect ratio calculator or image editing software, it’s wise to reference the terms of service to avoid infringing on intellectual property rights.
Image Storage and Accessibility
Storing our resized images effectively hinges on choosing the right format and location. Formats like GIF, PS (Photoshop), TGA, and EXR cater to various needs, from simple graphics to complex layers. Storing them in cloud storage comes with the benefit of accessibility from any device with an internet connection. This proves useful when we need to access our files quickly or receive feedback from peers who may be using different devices or screen sizes. Additionally, ensuring that the images are saved at the highest quality that the chosen storage can support, without unnecessarily inflating the file size, maintains the balance between quality and accessibility.

