
Instructions on Using the Tool

Transforming an image to adhere to precise pixel dimensions, for example, 165 pixels in width by 125 pixels in height, is a common necessity for multiple online applications and platforms that require images to meet exact size specifications. An image converter designed for 165px x 125px dimensions modifies the width and height of an image to match these specific pixel numbers. The dimensions of 165 by 125 pixels result in an aspect ratio of 1.32:1, an uncommon ratio that deviates from the standard aspect ratios typically seen in ordinary camera configurations or image sizes.
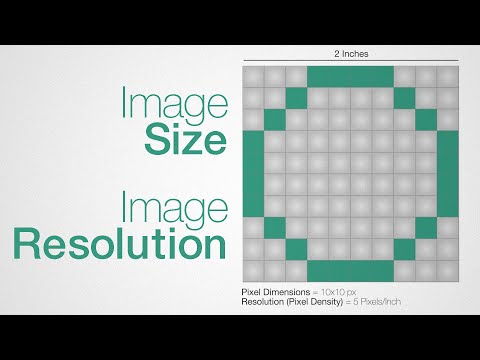
Resolution and pixel density are integral parts of image quality and detail. The resolution, defined by the number of pixels within an image, for a 165 by 125 pixel image is exactly 20,625 pixels. Pixel density, on the other hand, refers to the concentration of pixels on a display or within an image area and is measured in PPI (pixels per inch). Creating an image of 165px by 125px typically requires an image editor or a conversion tool that can resize images accurately without compromising the quality.
Key Takeaways
- A 165 x 125 Pixel Converter transforms image size to exact dimensions, with a unique aspect ratio.
- The total resolution of a 165 x 125 image is 20,625 pixels, and understanding pixel density is important for image clarity.
- Utilizing specific tools and adhering to best practices ensures images are converted effectively without quality loss.
Understanding Image Basics

When we talk about digital images, key aspects like resolution and pixel density are pivotal to both on-screen clarity and print quality. Our focus here will be on understanding how these concepts relate to the creation of a 165px x 125px image.
The Role of Resolution and Pixel Density
Resolution is a term commonly used to describe the width and height of an image in pixels. In our case, the resolution is 165 by 125 pixels. This determines the amount of detail an image holds; the higher the resolution, the more detail.
Pixel density, often measured in dots per inch (dpi), governs how closely packed the pixels are in an image. For example, if we print a 165×125 image at 300 dpi, the print size becomes 0.55 by 0.42 inches (165/300 by 125/300 inches).
Perfecting pixel density and resolution directly influences our image quality, greatly impacting both on-screen clarity and print sharpness.
Common Image Aspect Ratios
Aspect ratio represents the proportion of the width to the height of an image. It is expressed as two numbers separated by a colon.
The 165×125 image has an aspect ratio of 4:3, which is a common aspect ratio for images meant to reflect a more traditional look similar to standard non-widescreen TVs and computer displays.
Photos with a 4:3 aspect ratio tend to have a balanced look, which is visually pleasing for a variety of content, but it is important to choose an aspect ratio that best suits the intended use of the image.
In conclusion, by understanding the basics of resolution, pixel density, and aspect ratios, we can create images with the appropriate quality and format for their intended use.
Image Conversion Process

In this section, we’ll explore how to specifically convert images to a resolution of 165 pixels by 125 pixels and which image file formats are best for such conversions.
Steps to Convert Images to 165px x 125px
To resize an image accurately to 165px x 125px, follow these steps:
-
Choose an Image Resizer: Select an online image resizer that allows you to upload and resize your images. Make sure it supports various raster image formats such as JPG, PNG, or GIF.
-
Upload the Image: Click on the upload button to select your image file from your device. Ensure that the image is not larger than the allowed file size.
-
Set the Dimensions: Enter the desired dimensions of 165 pixels (width) by 125 pixels (height). Some tools offer a drag interface or allow you to enter dimensions manually.
-
Adjust the Aspect Ratio: If necessary, adjust the aspect ratio to maintain the proportionality of the image. Some tools might automatically lock the aspect ratio or allow you to edit it using a percentage scale.
-
Preview and Resize: Preview the resized image to ensure the quality is not compromised. If satisfied, proceed to apply changes.
-
Download the Converted Image: Once the image is resized, download it onto your device. Pay attention to the file size and format to ensure it meets your requirements.
Selecting the Appropriate Image File Format
Choosing the right image file format is crucial when resizing an image:
-
Raster Image Formats: For most web-related functions, formats like JPG, PNG, and GIF are sufficient as they support various color depths and complexities. JPG is best for photographs, while PNG is suitable for images needing transparency.
-
Vector Image Formats: If you need to resize images frequently and with different dimensions without losing quality, consider using vector formats such as SVG. These are ideal for logos, icons, or any graphics where scalability is key.
When converting images, always consider the aspect ratios and original resolution to avoid distorted outcomes. Our aim is to provide an image that serves its function without compromising its clarity and visual appeal.
Tools and Platforms
To optimize an image to a specific resolution, such as 165 x 125 pixels, we rely on various tools and platforms that are designed to handle our image conversion needs efficiently. Whether we need to maintain file formats like PNG, JPG, or SVG, or we’re looking to store our images in the cloud, there’s a solution out there for us.
Using an Online Image Resizer
When we want to resize our images quickly without the hassle of downloading software, we turn to online image resizers. These platforms are straightforward to use; we simply upload our image, select the desired dimensions—165px by 125px in our case—adjust the format if needed, and download the resized image. Some popular formats supported by these resizers include GIF, TIFF, BMP, ICO, and WEBP.
- Pros: Convenient, no installation needed, often free.
- Cons: Dependent on internet connectivity, file size limits.
Examples of online image resizers:
Exploring Software Solutions
For those of us looking for more advanced control or dealing with less common formats such as PS, TGA, EXR, or HEIC, dedicated image editing software might be the way to go. These programs offer robust features, including the ability to maintain pixel density and make use of an aspect ratio calculator. We often gravitate towards software solutions to ensure we get the highest quality conversion possible.
- Pros: Better control over image quality, more features.
- Cons: Requires installation, can be costly.
Well-known software solutions include:
- Adobe Photoshop
- GIMP
Our selection between an online image resizer or software depends on the specific task at hand and whether we prioritize convenience over advanced functionality.
Best Practices and Considerations
When converting images to a specific resolution, like 165px by 125px, we must ensure that quality is retained and the image remains fit for use, be it online or in print. Below, let’s explore some crucial aspects to keep in mind.
Maintaining Image Quality and Aspect Ratio
To maintain the image quality and aspect ratio, we follow these steps:
- Check Resolution: Ensure the original image has a resolution high enough to avoid loss of quality when scaled down.
- Respect Aspect Ratio: Use an easy to use converter tool that allows for aspect ratio locking to avoid stretching the image. This maintains the proper proportions.
Quality is impacted by several factors including pixel density and the compression algorithm used. To achieve the highest quality, the image should be saved in a format that minimally compresses the file, such as PNG, especially if we’re planning to print it.
Understanding Copyright and Usage Rights
When using images:
- Verify copyright: We ensure the use of an image is allowed by checking if it’s copyright-free or if we’ve obtained appropriate rights.
- Safe Linking: Only link to legitimate sites where images are confirmed to be copyright-free or we have appropriate permission. This prevents legal issues and respects the original creator’s rights.
Being confident in our knowledge about legalities concerning image use on platforms like Instagram or our own article, we must use copyrighted materials responsibly, adhering to the internet’s legal framework. If we’re providing a link to download images, we make sure it is an encrypted and secure one.
We always appreciate feedback from users to help us improve. Remember, every kilobyte counts when aiming for efficiency, especially in web contexts where loading times are counted in seconds.

