Originally posted on March 24, 2024 @ 2:55 am

Instructions on Using the Tool

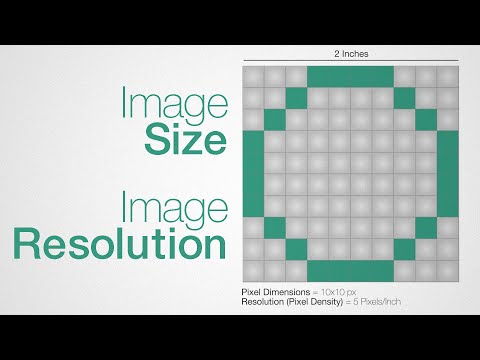
When working with digital images, understanding the nuances of resolution and size is critical. A frequent scenario requires converting or resizing photos to specific dimensions, such as a 1600 x 400 pixel image. To grasp what this entails, it’s essential to consider the aspect ratio, pixel density, and the resolution of the image. The aspect ratio is the proportional relationship between the width and height of an image, which in this case would be 4:1. This is a wide format often used for banners and panoramic views. The resolution of an image refers to the amount of detail it holds, typically measured in pixels per inch (PPI), while pixel density deals with how closely packed the pixels are on a display device, affecting the image’s clarity and sharpness when viewed at different sizes.
Resizing an image to a specific pixel dimension, like 1600px wide by 400px tall, may involve either scaling down a larger photo or enlarging a smaller one. Each action demands attention to maintaining image quality; for enlargements, this might require special software to ensure that the clarity is not compromised. It’s equally important to adopt best practices for quality preservation by understanding which file formats best maintain resolution, and how to effectively utilize image editing tools.
Key Takeaways
- Aspect ratio, resolution, and pixel density are key factors in image quality.
- Resizing to specific dimensions, such as 1600px by 400px, requires quality preservation techniques.
- Utilizing proper tools and formats is crucial for successfully converting or resizing images.
Understanding Image Basics
In this section, we’ll navigate through the essential components of images, which are fundamental in creating and manipulating graphics, especially in the context of a 1600 x 400 pixel image converter.
Explaining Aspect Ratios
The aspect ratio of an image is the proportional relationship between its width and height. For a 1600×400 image, the aspect ratio is 4:1. This means that for every 4 units of width, there is 1 unit of height. Aspect ratio is crucial in maintaining the integrity of images when scaling them up or down.
Resolution and Pixel Density
Resolution refers to the total number of pixels that make up an image, and it is often expressed as width × height. The image in question has a resolution of 1600×400 pixels. Pixel density, usually measured in dots per inch (dpi), indicates how closely packed the pixels are in an image. Higher dpi values correspond to finer, more detailed images.
Common Image File Formats
Multiple file formats are used to store images, each with its unique attributes and use cases. Common raster image formats include:
- JPEG (JPG): Highly efficient compression, widely used for photos.
- PNG: Supports transparency, lossless compression, ideal for web graphics.
- GIF: Supports animation, limited to a 256 color palette.
- TIFF: High quality, lossless compression, suitable for print.
- BMP: Uncompressed, large file sizes, seldom used in web contexts.
- WebP: Designed for the web, supports both lossy and lossless compression.
- ICO: Commonly associated with website favicons.
- EXR: High dynamic range imaging format, used in professional photography and digital imagery fields.
Vector formats include:
- SVG: Scalable Vector Graphics, resolution-independent, ideal for logos and illustrations.
- EPS: Often used for vector graphics in printing industry.
- Vector image formats allow for scalable graphics without loss of resolution, hence are preferred for designs that require resizing or detail preservation at varying scales.
How to Convert and Resize Images

When we talk about converting and resizing images, our objective is to ensure that the final product matches the desired dimensions, quality, and format. Whether you’re looking to display your image optimally on a website or preparing it for print, understanding the tools and methods is essential. Let’s explore how to achieve this efficiently.
Using Online Image Resizers
Online image resizers make it straightforward for us to resize images without the need for specialized software. An online image resizer operates from within your browser, allowing us to adjust an image’s width, height, and file size conveniently. To maintain the highest quality, it’s crucial to select an aspect ratio that corresponds with the original image. Common aspect ratios are 16:9, 4:3, and 1:1.
- Navigate to a reputable online image resizer.
- Upload your image file from your computer or cloud storage.
- Enter the desired dimensions or use a pixels to print size calculator.
- Apply these changes and download the resized image.
Optimizing for Web and Print
For web usage, image file size and resolution are key for fast loading times and image quality. An aspect ratio calculator is helpful when we need to adjust images to fit a certain area without distortion. For printing, resolution and print size need to be much higher because the printer quality demands higher pixel density.
-
For web:
- Lower the resolution to balance image quality with file size.
- Ensure the dimensions fit the website’s layout to avoid unexpected resizing.
-
For print:
- Use a higher resolution, typically at least 300 DPI.
- Use a pixels to print size calculator to ensure clarity in the larger format.
Conversion to Different Formats
Sometimes we need our images in different image file formats for various purposes. Converting to formats like JPEG, PNG, or TIFF can affect the file size and quality.
- Determine the format required based on the intended use.
- Use an online image resizer and converter tool.
- Be mindful of the format’s impact on image quality—a TIFF file, for example, retains more detail than a JPEG.
Dimensions, width, height, and file size are all considerations that we handle carefully to ensure the image meets our requirements after conversion.
Best Practices for Quality Preservation

When converting images, especially to a specific size like 1600px by 400px, it’s crucial that we preserve the quality of the image. This involves understanding the correct aspect ratios and resolution for the target device, while also choosing the right file format such as JPEG for size efficiency without significantly compromising the image quality.
Maintaining High Quality in Image Conversion
To maintain the quality during image conversion, it’s essential for us to use high-resolution source images. As we scale down, the image quality remains better than when enlarging a low-resolution image. Do not upscale images, as this will result in visible pixelation. Maintaining an aspect ratio of 4:1 ensures the image does not appear stretched or compressed. We must also consider the end-use platform, such as Instagram, which may apply further compression. Saving images as JPEG is often a good balance between quality and file size, but we should choose the highest quality setting to avoid noticeable loss.
Image Resolution for Different Devices
Different devices display images at varying resolutions, so we must consider the pixel density of these devices when converting images. For instance, a 1600px by 400px image requires a higher resolution for a desktop display to ensure crisp visual quality. On mobile devices, the same image can appear satisfactory at a lower resolution due to the smaller screen size. What’s critical is that we select a resolution that appears sharp across devices, acknowledging the power of high pixel density screens such as Retina displays.
Troubleshooting Common Issues

When creating a 1600px by 400px image, common issues might include aspect ratio discrepancies, large file sizes, and incorporating feedback effectively. We’ll address these concerns with practical solutions.
Resolving Aspect Ratio Discrepancies
Often, images don’t fit the desired 1600×400 ratio, causing distortion when forced into these dimensions. To resolve this, use an image editor that allows cropping while maintaining aspect ratio. Guideline for conversion:
- Open the image.
- Select the crop tool.
- Enter a custom ratio of 4:1.
- Adjust the crop area to the desired portion of the image.
- Apply the crop and save the file, preferably in a format like JPG or PNG for broad compatibility.
Reducing File Size Without Losing Quality
High-resolution images can have massive file sizes, making them impractical for web use. To reduce file size without significantly lowering quality:
- Choose the right format: PNG for images with transparency, JPG for photographs.
- Compress carefully: Use compression tools that allow you to select a compression percentage, keeping an eye on image clarity.
- Reduce resolution: If the DPI is higher than necessary, lower it to a standard web resolution of 72 DPI without changing the pixel dimensions.
Receiving and Implementing Feedback
Getting feedback on image use is crucial. When stakeholders suggest changes:
- Pinpoint the exact issue, be it related to resolution, file type, or image content.
- Test various formats like SVG, WebP, or ICO for specific use-cases, like logos or icons.
- Incorporate feedback in iterations, ensuring each change improves the final output.
Implementing these solutions confidently ensures your 1600×400 images meet technical requirements and are optimized for intended use.

