
Instructions on Using the Tool

Understanding the intricacies of image resolution and dimension is essential when dealing with digital imagery, especially for specific requirements like creating a 1600px x 1600px photo. A 1600 x 1600 pixel image converter is a tool that enables you to create an image with these precise dimensions. The ratio for such an image is 1:1, which means the height and width are equal, creating a perfectly square shape. This is often referred to as aspect ratio.
Resolution pertains to the number of pixels that compose the image, which directly affects the detail and clarity. In the case of a 1600px by 1600px image, the resolution would be 2,560,000 pixels in total. Pixel density, measured in pixels per inch (PPI), will vary depending on the size of the display or print, but the number of pixels remains constant. If you plan to use such an image for high-quality print, a higher PPI is recommended, whereas for web use, a lower PPI can suffice due to screen resolutions typically being lower than print resolutions.
Key Takeaways
- A 1600 x 1600 pixel image has a 1:1 ratio and consists of 2,560,000 total pixels.
- The desired pixel density depends on whether the image is intended for print or web use.
- Using a dedicated image converter tool can help achieve the exact dimensions and quality required for your 1600px x 1600px image.
Understanding Image Basics

When we consider image basics, two critical components must be examined: resolution and aspect ratio. These elements define the clarity of an image and its proportion in different mediums.
Image Resolution and Quality
Image resolution refers to the number of pixels that compose an image and is typically represented by the width and height. For example, an image with a resolution of 1600 x 1600 pixels means it has 1600 pixels horizontally and 1600 pixels vertically, totaling 2,560,000 pixels. This resolution plays a significant role in determining the image quality; the more pixels an image has, the finer the details and the higher the quality.
File formats like BMP, GIF, JPG, PNG, EPS, TIFF, WEBP, SVG, and ICO can contain 1600 x 1600 pixel images. However, the file size and quality can vary; vector image formats like SVG maintain quality regardless of scaling, whereas formats such as JPG can lose quality when heavily compressed or resized.
- Color plays a part in file size and quality as well, with image formats supporting different color depths and profiles which affect the overall appearance.
Understanding Aspect Ratios
The aspect ratio of an image indicates the proportional relationship between its width and height. A square image, such as a 1600 x 1600 pixel photo, has an aspect ratio of 1:1, meaning its height and width are equal. Aspect ratios are particularly important when adapting images for different displays or print formats to ensure they maintain the intended composition without distortion.
- Common aspect ratios include 16:9 for widescreens and 3:2 or 4:3 for standard photo prints.
Maintaining the correct aspect ratio is crucial for avoiding stretched or squashed images, which can significantly detract from image quality. It’s also worth noting that different image formats and dimensions may be more suitable for particular uses, such as web graphics (often in PNG, GIF, or SVG formats) versus high-resolution printing (where TIFF or high-quality JPG might be preferred).
How to Resize an Image to 1600px x 1600px
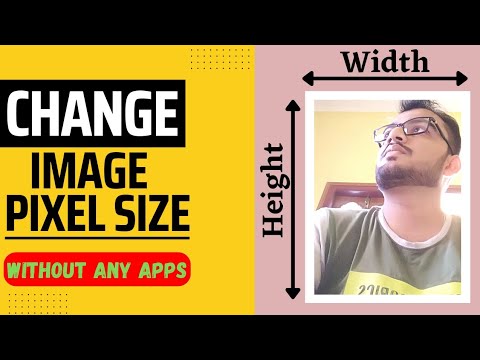
When we need to convert an image to a specific size, like 1600px by 1600px, we’re aiming to maintain quality while adjusting the image’s dimensions. This process is often required to comply with upload guidelines or to ensure visual consistency.
Using Online Image Resizers
Online image resizers are tools we can use directly in our web browsers. These are particularly user-friendly — we just select our image, input the desired dimensions, and let the website do the rest. We should ensure that the “Maintain Aspect Ratio” option is unchecked if we need the image to be exactly 1600px by 1600px, as keeping this option checked will preserve the original width-to-height ratio, which might not be a perfect square.
- Open your preferred online image resizer.
- Select the image you wish to resize.
- Enter ‘1600’ in both the width and height fields to set the specific size.
- If there is an option, choose the best quality setting to avoid losing quality.
- Click the resize button, and the tool will convert your image to the desired dimensions.
- Download the resized photo.
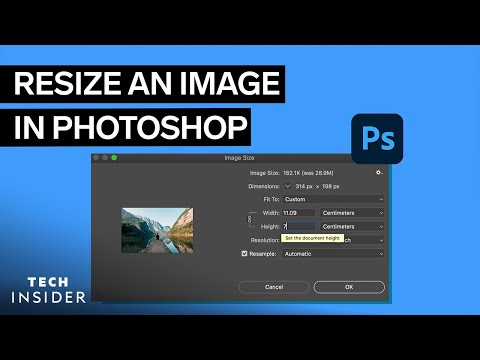
Using Photo Editing Software
If we prefer more control over the resizing process or want to make additional edits like crop, rotate, or flip, using photo editing software might be our best choice. We typically start by opening the image in the software, then we can easily input the desired dimensions and adjust the canvas size.
- Open the image with your chosen photo editing software.
- Look for the ‘Image Size’ or ‘Resize’ option in the menu.
- Uncheck ‘Maintain Aspect Ratio’ to enable free adjustment of the width and height.
- Input ‘1600px’ for both the width and height to achieve a 1600×1600 dimension.
- Check the software’s options for image quality control to ensure the best result.
- Confirm the changes and save the new image.
By using these methods, we can efficiently resize images to our required dimensions with minimal quality loss.
Best Practices for Image Conversion

When converting a 1600 x 1600 pixel image, it’s essential to focus on maintaining the original image quality and selecting the appropriate file format. These two factors are critical in achieving an optimal balance between image clarity and file size for both download and upload scenarios.
Maintaining Image Quality
To maintain image quality during conversion, we need to consider the end-use of the image. Whether for print or digital use, ensuring that the quality remains high is paramount. For software that specializes in image conversion, such as Adobe Photoshop (often abbreviated as PS), choices around image resizing and aspect ratio are important:
- Resolution: Keep the resolution at the highest number that your target device or platform can support to ensure the image does not appear pixelated.
- Compression: Apply compression carefully to minimize loss of detail, especially if the image is to be used in high-quality displays or prints.
It’s advisable to use cloud storage services that provide encrypted file transfer to preserve the privacy of your images during the conversion process.
Choosing the Right File Format
Different file formats suit different needs. For a 1600 x 1600 image, we recommend using formats that support high image quality:
- JPEG – Ideal for photographs and images with gradients, keep the quality slider between 70% and 90%.
- PNG – Best for images requiring transparency or for graphics with less color variation.
- TIFF – A preferred choice for archiving high-quality images since it’s lossless but results in larger file size.
The choice of software can also affect file format options. Free tools are available, but often have limitations in terms of features or support for formats. Always opt for trusted download sources to ensure your conversion tools are safe to use.
Remember, every conversion is a balance: aim to retain the maximum image quality while considering the file size and format that best suits your needs.
Tips for Sharing and Using Converted Images
When sharing 1600px x 1600px images, it’s essential to consider the platform’s requirements and secure sharing methods to maintain image integrity and protect privacy.
Image Use on Social Platforms
Instagram: For optimal display, ensure the image width and height are compatible. Our uploaded images should be less than 8MB to maintain a balance between quality and upload speed. Instagram compresses images, so uploading files just under the limit allows for the best resolution after compression.
Facebook: Images shared on Facebook are automatically resized, but for faster uploads, especially for users with slower internet speeds, pre-sizing photos to 1600px by 1600px on our mobile devices or through a web browser can help. Use the link provided by the platform after uploading to share with others.
Twitter: While Twitter allows up to 4096px by 4096px, we might want to resize for mobile use. Images with a 1600px side fit well within Twitter’s in-stream preview.
Ensuring Secure Image Sharing
-
Privacy Guaranteed: Before uploading to cloud storage or image sharing services, ensure they have policies that guarantee privacy and that images are deleted automatically after a set period.
-
Feedback Systems: Utilize platforms with feedback systems where you can receive input on the shared images’ resolution, display, and download speed. Adjust the images based on this feedback to improve their usability.
-
Download and Upload: Our images should be shared via secure URLs. Additionally, they should be optimized for download. Provide straightforward links for recipients to download the images directly from our chosen cloud storage service.
-
Multiple Operating Systems: The images we convert need to be compatible across Windows, Linux, and Mac systems. This makes sure that the images retain their quality and resolution regardless of the operating system used to view them.
By focusing on these specifics, we ensure that our converted images are effectively shared and used, maintaining their quality and the privacy of content across various platforms and devices.

