
Instructions on Using the Tool

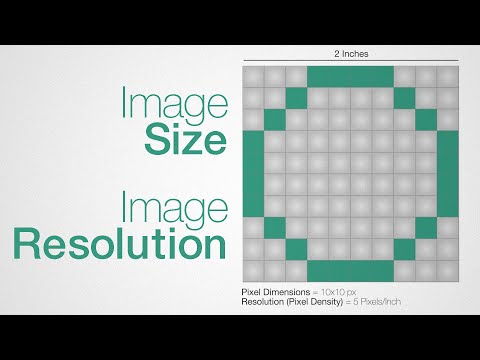
When working with digital images, understanding pixel dimensions like a 1400 x 1400 pixel image is crucial for various applications, such as creating album art for music platforms or ensuring crisp profile pictures on social media. The 1400px by 1400px measurement refers to the width and height of an image in pixels, which are the basic units of programmable color on a digital display. The ratio of such an image is 1:1, indicating that the width and height are equal, forming a perfect square. Resolution entails the detail an image holds, which is often measured in pixels per inch (PPI). Higher resolution means more pixels are packed into a given space, resulting in finer detail and sharper images.
Pixel density, closely related to image resolution, is the number of pixels per unit of physical space on a screen, and it influences how sharp an image will appear on various devices. To create or convert an image to 1400px by 1400px, one would typically use image editing software that allows the resizing and manipulation of pixel dimensions while considering factors like maintaining image quality and aspect ratio. It’s important to understand that changing pixel dimensions can affect the clarity of an image, especially when enlarging, because the software must interpolate new pixel data which can lead to a loss in image quality if not done carefully.
Key Takeaways
- A 1400 x 1400 pixel image has a 1:1 ratio, meaning its width and height are identical, creating a square.
- Higher pixels per inch (PPI) result in greater image resolution, enhancing image clarity and detail.
- Resizing an image to 1400px x 1400px must account for maintaining image quality, especially when enlarging.
Understanding Image Resolution and Ratio

When we discuss image resolution and ratio, especially pertaining to a 1400×1400 pixel image, we are referring to the clarity of the image as well as its proportions. The resolution indicates the amount of detail an image holds, while the aspect ratio describes the relationship between its width and height.
Aspect Ratio of 1400×1400
The aspect ratio of an image is its width divided by its height. For a 1400×1400 pixel image, the aspect ratio is 1:1, meaning it is perfectly square. Each side is equal, ensuring that the height and width are the same and your image does not get stretched or skewed.
Determining Pixel Density
Pixel density, often measured in dots per inch (dpi), refers to the number of individual pixels that can fit within a linear inch of an image. To determine the pixel density of a 1400×1400 image, consider the size of the output. For instance, if we print this image at 14×14 inches, the resulting resolution will be 100 dpi, which is lower than the standard for high-quality prints. For a sharp print, we would aim for at least 300 dpi, which would require the physical size to be smaller or the pixel dimensions to be increased.
Steps to Resize Images to 1400px x 1400px
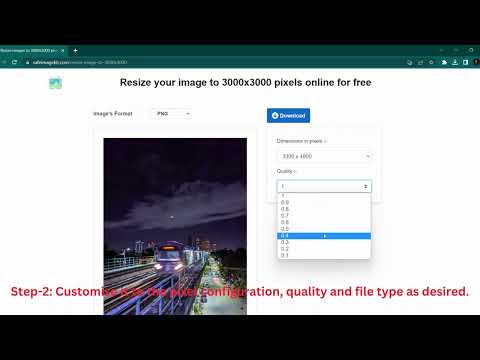
Resizing images to exactly 1400px by 1400px can be crucial for maintaining consistency across various platforms, and to ensure that your image retains its quality, it’s important to use the right tools and techniques. We’ll guide you through the process using different methods.
Using an Online Image Resizer Tool
To resize an image quickly, online image resizer tools are a convenient option. Here’s how we can do it:
- Select a Tool: Find an online image resizer that supports various formats like jpg, png, webp, gif, and tiff.
- Upload the Image: Use the tool’s upload feature, often allowing for drag and drop or file selection.
- Specify Dimensions: Enter 1400 for both width and height. Some tools may automatically maintain the aspect ratio, so check if there’s an option to crop if necessary.
- Download: Once resized, download the image. Ensure the site is safe and encrypted to protect our privacy.
Image Resizing Without Losing Quality
To maintain image quality after resizing, follow these steps:
- Choose the Right Format: Opt for formats like png or tiff for less quality loss compared to jpg.
- Avoid Over-Compression: If given the option, select a higher quality over a smaller file size to prevent pixelation.
- Use a Soft Resize: Some tools have smart resizing algorithms that smoothly resize the image without noticeable quality loss.
Adjusting File Format and Size for Different Platforms
Different social media platforms like Facebook, Instagram, and Twitter have specific requirements. Here’s what we should keep in mind:
- File Format: Convert the image to the platform-preferred format (usually jpg or png).
- File Size: Check each platform’s file size limit and compress the image if needed using a tool that minimizes quality loss. For instance, WebP often provides high-quality images with smaller sizes.
- Dimensions: Besides resizing to 1400px by 1400px, we may need to crop or adjust dimensions according to the recommended sizes for each platform.
By following these specific steps and considerations, we can effectively resize our images for various needs without sacrificing their integrity.
Technical Considerations for Image Conversion

When we convert a 1400 x 1400 pixel image, we need to consider the file format compatibility and how vector and raster images will be handled. This ensures the final image maintains its quality and is suitable for its intended use.
Supported Image File Formats
For a successful image conversion, we must ensure that the target format is supported. The most common formats include:
- JPEG (jpg): Best for photographs and images with gradients, but it suffers from lossy compression.
- PNG: Supports lossless compression and transparency, making it ideal for web graphics.
- GIF: Limited to 256 colors, it’s best for simple animations and graphics.
- WebP: A modern format providing excellent compression and quality features.
- TIFF: Ideal for high-quality prints due to its lossless nature, but results in larger file sizes.
- BMP: Uncompressed and therefore large in size, used mainly in Windows environments.
- TGA: Typically used for video games and animation due to its support for a wide color depth.
- EPS: A format for vector images often used in professional graphic design.
- SVG: Scalable Vector Graphics format, enables images to scale without loss of quality.
- ICO: Used for icons in Microsoft Windows, can contain multiple sizes within one file.
- EXR: Suited for high dynamic range images, commonly used in 3D applications and for special effects.
Handling Vector and Raster Images
When dealing with vector images (such as EPS and SVG), it’s crucial we preserve the image’s scalability. Vector formats are resolution-independent and can be downsized or enlarged without quality loss. To convert these formats into raster (bitmap) images like JPEG or PNG, we must rasterize them at the desired resolution while maintaining the aspect ratio.
For raster images, the consideration revolves around the pixels. Converting images like a JPEG to a square format, like a 1400px by 1400px thumbnail, may require cropping or adding padding to maintain the square aspect ratio. Here’s what we keep in mind:
- Pixel Density: Determines how sharp the image looks; higher density means better quality.
- Image Quality: Compression can affect the file size; we aim for a balance between quality and size.
- Downsampling: Reducing the image size from a larger original may be necessary while making sure to preserve as much detail as possible.
- MB to KB: Reducing file size for web use involves lowering the number of megabytes (MB) to kilobytes (KB).
- Color: Converting to black and white or handling color images while preserving color integrity is key.
Whether it’s a portrait, vertical, or a square image, we ensure the chosen file format aligns with the specific requirements of the image’s intended use while respecting dimensions, resolution, and aesthetics.
Frequently Asked Questions About 1400px x 1400px Images
What is the aspect ratio of a 1400px x 1400px image?
The aspect ratio for a 1400px by 1400px image is 1:1. This means the width and height are equal, creating a perfect square.
How can I convert images to 1400px x 1400px?
You can use an online tool that is free to use to resize images. Simply upload your photo, select image dimensions, and the tool will do the rest.
What is the resolution and dpi for a 1400px x 1400px image?
- Resolution: The resolution is 1400 pixels by 1400 pixels.
- DPI (Dots Per Inch): DPI can vary, but for web use, it’s typically 72 DPI, and for print quality, 300 DPI is standard.
| Use | DPI |
|---|---|
| Web | 72 |
| Print Quality | 300 |
Can I crop my photo to 1400px x 1400px on mobile devices?
Yes, most photo editing apps on mobile devices will allow you to crop images to any size, including 1400px x 1400px.
Are there any privacy guarantees when using online tools?
Reputable online tools ensure your privacy is guaranteed by not storing images on cloud storage services longer than necessary and often offer the option to delete images immediately after conversion.
What file formats can I convert to 1400px x 1400px?
Common formats like JPEG, PNG, TIFF, and others can be converted to 1400px x 1400px using various platforms available on the internet.
How do I save my converted image?
After converting the image, you can save it directly to your device or send it via email. Some tools may also offer to save it to cloud storage.

