Originally posted on March 25, 2024 @ 1:38 am

Instructions on Using the Tool

When working with digital images, understanding the specifics of resolution and ratios is crucial. A 128 x 64 pixel image converter is a tool that adjusts an image to have a resolution of 128 pixels in width and 64 pixels in height. This resolution gives us a 2:1 aspect ratio, which is twice as wide as it is tall. Pixel density is commonly measured in pixels per inch (PPI). The pixel density of an image can vary depending on the output device, such as a monitor or a print. While a higher PPI generally results in a higher-quality image, for specific designs like icons or simple graphics, a lower PPI might be sufficient.
Creating a 128px by 64px photo entails resizing an existing image or designing a new one to fit these dimensions. Various software tools and online platforms can assist in the conversion process. Properly resizing an image to this resolution requires attention to maintaining aspect ratio, choosing the right interpolation method to preserve image quality, and understanding the proper formats for different uses, such as JPEG for web or TIFF for print. It’s also essential to consider the end-use of the image, whether for social media platforms, which often have specific size requirements, or print materials, where resolution and image quality are typically more critical.
Key Takeaways
- A 128 x 64 pixel image converter changes an image’s resolution to a specific 2:1 aspect ratio.
- Resizing images to these dimensions must consider aspect ratio, interpolation methods, and appropriate image formats.
- The image’s end-use, including whether it’s for digital or print purposes, dictates the necessary resolution and quality.
Understanding the Basics of Image Resolution
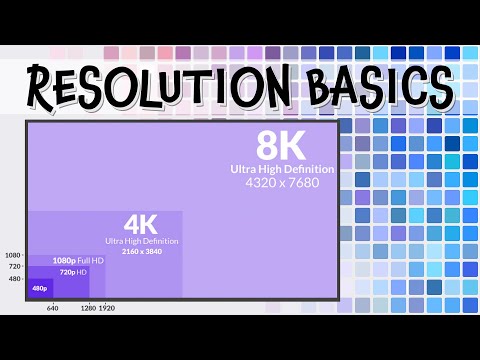
Image resolution is a pivotal factor that affects the quality and clarity of digital photos. We’re going to explore what this entails and why it matters.
The Concept of Image Resolution
Image resolution refers to the detail an image holds, which is directly proportional to the pixel count. Essentially, more pixels mean finer detail and higher clarity. The term “pixels” relates to the tiny dots of color that make up a digital image. For instance, a 128 x 64 pixel image has 128 pixels in width and 64 pixels in height, resulting in a total of 8,192 pixels. The dimension in pixels correlates to how many distinct points of color can be displayed.
Common Aspect Ratios and Their Uses
The aspect ratio describes the proportional relationship between the width and height of an image. The ratio 1:2 is the aspect ratio for a 128 x 64 pixel image, meaning the width is twice the size of the height. Common aspect ratios include 4:3, 16:9, and 1:1, catering to various display contexts like television screens, mobile devices, and social media platforms, respectively.
The Importance of Pixel Density
Pixel density, measured in dpi (dots per inch), indicates how closely packed the pixels are in an image. Higher dpi values, such as 300 dpi, often indicate sharper, higher image quality as there are more pixels per inch. The choice of pixel density should align with the intended use. For example, images intended for high-quality prints usually require a higher dpi, whereas images for web use are generally lower in resolution due to file size constraints and screen display capabilities.
How to Resize Images
In managing image dimensions for various applications, resizing is a fundamental skill.
Step-by-Step Guide to Resizing an Image
Firstly, we determine the desired size for the image — in this case, 128×64 pixels. Then, we upload the image to the resizing tool. After uploading, we enter the new dimensions (128×64) into the tool’s specified fields for width and height. We confirm the changes and proceed to resize the image, ensuring we save or download the converted file for use.
Selecting the Right Image Resizer Tool
When we choose an online image resizer, it’s important to select one that offers the ability to enter custom dimensions. A reliable resizer will support various file formats and maintain the aspect ratio to avoid stretching the image. Some free tools also allow batch processing, which can be convenient for resizing multiple images at once.
Maintaining Image Quality During Resizing
To maintain image quality during resizing, we ensure the resizer tool has options to adjust the compression rate and pixel density. By carefully managing these settings, we can avoid pixelation and preserve the clarity of the resized image. Additionally, some advanced tools offer image editing features to touch up the photo after resizing.
By following this guide, we can efficiently convert and resize images to suit our specific needs while maintaining quality.
Image Formats and Conversion

When dealing with digital images, it’s crucial to understand the diverse formats available and the methodologies for converting images to meet specific requirements.
Understanding Different Image File Formats
Various image file formats store data in distinct ways. Common formats include:
- JPEG (or JPG): Widely used for photographs due to its efficient compression, which reduces file size but can result in quality loss.
- PNG: Offers lossless compression, making it ideal for images with transparent backgrounds.
- GIF: Supports animated images with lossless compression but is limited to 256 colors, which is inadequate for full-color photographs.
- WEBP: A modern format designed for effective lossy and lossless compression, aiming to create smaller files with equivalent or higher quality than JPEG and PNG.
- BMP: A bitmapped format that stores color data for each pixel in the image without any compression, leading to large file sizes.
- TIFF: Common in the publishing industry, this format supports lossless compression and stores high-quality images.
- EPS: Generally used for vector graphics, which can be scaled without loss of resolution.
- ICO: A format for small icons used in software applications.
- SVG: A vector image format used for illustrations that need to scale without loss of quality.
Understanding the right format to use depends on the required image quality, the platform it will be displayed on, and the allowable file size. For detailed calculations concerning image file sizes, an image file size calculator can be a valuable tool.
How to Convert Between Image Formats
To convert images from one format to another, you can use various software tools or online services. The conversion process typically involves the following steps:
- Choosing the source image: Select the image you wish to convert.
- Specifying the desired format: Choose the target format based on your needs (e.g., GIF for animations, JPEG for photos).
- Adjusting settings: Some tools allow you to fine-tune the settings like resolution or color depth.
- Executing the conversion: Run the conversion tool or service.
It is important to note that converting to formats with lossless compression (like PNG or TIFF) preserves more of the image quality, whereas converting to lossy compression formats (e.g., JPEG or WEBP) can result in a reduced file size but potentially lower quality. If the highest quality is paramount, consider using vector image formats like EPS or SVG for graphics that aren’t pixel-dependent. When converting, always verify that the resulting image meets your resolution and pixel density requirements.
Optimization for Social Media and Print

When optimizing images for social media and print, it’s crucial to understand that each platform has its own preferred image specifications and print requires high-resolution images for clarity.
Best Practices for Social Media Platforms
On social media platforms like Facebook and Instagram, images often need to be resized and adjusted to fit predefined aspect ratios. A 128 x 64 pixel image is equivalent to a 2:1 aspect ratio, which may not be ideal for these platforms. For instance, Facebook generally favors images close to a 16:9 or 1:1 aspect ratio for the best display in feeds. Instagram offers a bit more flexibility but typically uses 1:1 for square posts, 4:5 for portrait posts, and 1.91:1 (which closely resembles 16:9) for landscape posts. To ensure images display correctly, use an aspect ratio calculator to adjust your images without distortion.
When resizing for social media, consider the following:
- For Facebook: Aim for a minimum size of 1200 x 630 pixels for shared images.
- For Instagram: Use 1080 x 1080 pixels for square images, 1080 x 1350 for portrait, and 1080 x 608 for landscape.
Privacy is another significant consideration. We recommend using cloud storage with strong privacy settings for storing your images prior to posting. And finally, always preview how your images render on a mobile device, as the majority of users will view your content on such devices.
Preparing Images for Printing
When transitioning from a digital display to a physical print, resolution and print size become key factors. A 128 x 64 pixel image would be very small and likely blurry when printed due to low resolution. Ideally, we want to ensure our images are at least 300 pixels per inch (ppi) when printed. Use a pixels to print size calculator to accurately convert your digital image dimensions to a physical print size without losing quality.
Here’s a brief guide for printing from a 128 x 64 pixel image:
- Determine the desired print size in inches.
- Ensure the image has a minimum resolution of 300 ppi for quality prints.
- Use a printer that can accurately reproduce the colors and details of your image.
Adjusting filters and color settings might be necessary to match the print closely to the on-screen version, as printers often interpret colors differently. Additionally, save a high-resolution copy of your image after editing so you can revert to it if needed, avoiding the loss of image quality that comes with successive edits.

