
Instructions on Using the Tool

When working with digital images, understanding the specifics of size and quality is crucial. A 1200 x 380 pixel image converter can transform your photos into this specific dimension, which may suit various web and print requirements. This size translates to a ratio of roughly 3.16:1, which is a wide aspect ratio not commonly used for standard photography but could be ideal for web banners, panoramic shots, or custom graphics. In terms of resolution, this dimension is considered high enough for clear web graphics but may not meet the requirements for high-quality print.
Pixel density, or the number of pixels per inch (PPI), is determined by the intended display or print size. For example, the same image will have a higher pixel density when printed on a smaller surface, leading to a sharper appearance. Adjusting the PPI appropriately is a part of the image conversion process that ensures the final image meets the expected quality standards. When creating a 1200px x 380px photo, various online tools and software are available to assist in resizing without compromising the image’s integrity. It’s important to use reliable tools and to understand the technical nuances to maintain quality.
Key Takeaways
- Aspect ratio and resolution are critical in ensuring an image fits intended purposes.
- Pixel density influences the clarity of an image on different media.
- Using proper tools and methods is essential for successful image conversion.
Understanding Image Basics

When we approach image editing and creation, two crucial elements we must consider are pixels and resolution, as well as the aspect ratio of the image.
Defining Pixels and Resolution
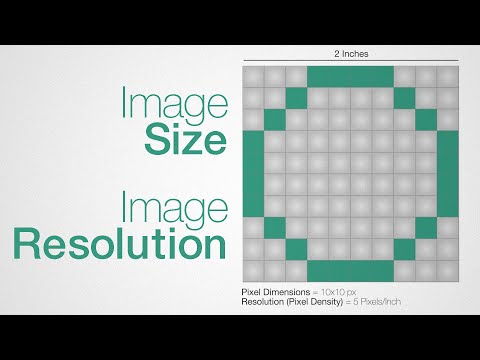
Pixels are the tiny squares of color that make up a digital image. Resolution refers to the size of an image in terms of how many pixels it contains, expressed as width by height. For instance, an image that is 1200 pixels in width and 380 pixels in height has a resolution of 1200×380. The pixel density, which is the number of pixels per inch (PPI), influences the clarity and detail of an image.
- Size: 1200px (width) x 380px (height)
- Resolution: High resolution usually provides more detail.
- Pixel Density: More pixels per inch results in a sharper image.
Importance of Aspect Ratio
The aspect ratio is the proportional relationship between the width and height of an image. It is another critical aspect that affects how the image will look on various devices or platforms. For our 1200×380 image, the aspect ratio is 1200:380, which simply means for every 1200 units of width, the height is 380 units.
- Aspect Ratio: 1200 (width) to 380 (height)
- Dimension Consistency: Maintaining aspect ratio ensures visual consistency across different viewing contexts.
Our understanding of image basics like size, resolution, and aspect ratio enables us to create, convert, and display digital images effectively.
Conversion Process Explained

In this section, we’ll guide you through the specifics of resizing images to a 1200px by 380px resolution, explaining the best practices for format selection and how the process impacts overall image quality.
Steps to Resize Images
To convert an image’s resolution to 1200px x 380px, follow these steps:
- Choose an Image Resizer: Select an online image resizer or software that allows pixel specification.
- Upload Your Image: Add the image file you wish to resize.
- Set Dimensions: Enter 1200 in the width field and 380 in the height field. This ensures your image matches the desired resolution.
- Apply Changes: Initiate the resize process and wait for the image resizer to adjust the dimensions.
- Download: Once the conversion is done, download the resized image.
Selecting the Right Image Formats
The format you choose for your image affects the file size and compatibility:
- Web-Friendly Formats: JPEG, PNG, and WebP are widely used and support varying levels of quality and file size.
- Vector Formats: For resizing without quality loss, consider SVG or EPS, as they are scalable to any size.
- Specialized Formats: TIFF and HEIC are used for high-resolution images, whereas ICO is for icons.
Impact on Image Quality
Resizing images affects quality in two ways:
- Decrease in Size: Reducing dimensions can increase pixel density, potentially improving perceived quality on smaller screens.
- Increase in Size: Enlarging an image often leads to a loss of clarity and sharpness because the pixel information is being stretched beyond its original resolution.
Bear in mind that the original aspect ratio and the resolution of the image you start with will influence the final output’s quality after resizing.
Technical Aspects of Image Conversion

When converting images, we must consider pixel density, optimal formats for different mediums, and how to effectively manage file size and compression. Each of these plays a crucial role in maintaining image clarity and ensuring the converted image serves its intended purpose.
Understanding Pixel Density
Pixel density, measured in pixels per inch (PPI) or dots per inch (DPI), is a key factor in image clarity. A 1200px by 380px image has a fixed number of pixels, and altering the pixel density affects its print size. For instance, at 300 PPI, considered high-quality print density, our image would measure 4 inches by 1.27 inches. Conversely, on screen, if our display is 96 DPI, the same image would appear larger because fewer pixels occupy each inch of the screen.
- Resolution Scale Calculator: Helps determine the new dimensions when altering PPI or DPI without changing the pixel count.
Optimizing for Web and Print
For web use, lower PPI images load faster, while retaining sufficient quality on displays. File Size and Compression are vital; using image file formats like JPEG or PNG, we can compress our image without significant quality loss for faster web loading times.
- Web Resolution: Typically 72 to 96 DPI.
- Print Resolution: Ideally 300 DPI for high-quality prints.
- Online Image Resizer: A tool we can use to adjust image size for web optimization while maintaining aspect ratio.
File Size and Compression
Managing file size while preserving quality is crucial. We aim to reduce the file size through compression algorithms that minimize the size without degrading the image. Lossless formats like PNG are larger but support transparency and are ideal for logos and images with text. Lossy formats like JPEG offer more compression but at a quality trade-off.
- Image File Format: Impacts the compression, quality, and file size.
- 2K Resolution: Equivalent to a horizontal resolution of approximately 2000 pixels; for a 1200×380 image, we are below 2K, but maintaining PPI is key.
Using these technical aspects properly, we can convert any image to suit particular requirements while preserving the intended quality and clarity.
Advanced Tips and Tools
In this section, we’ll explore the most efficient tools and methodologies to convert and modify images to a 1200×380 pixel resolution. We’ll focus on the use of advanced photo editing software and selecting the best online image resizer services for a precise and quality result.
Using Advanced Photo Editing Tools
For those of us seeking the highest quality outcome, advanced photo editing tools like Adobe Photoshop (PS) are indispensable. When working with images, especially when needing to upscale or downscale to specific dimensions like 1200px by 380px, Photoshop allows us to adjust the resolution and pixel density accurately. Here’s how we can ensure excellent results:
- Resolution Management: Use the ‘Image Size’ function to set the exact dimensions and resolution. Remember to maintain the resolution at 300dpi for the best print quality or 72dpi for web use.
- Pixel Density: If we’re preparing images for print, we cannot overlook pixel density. Use PS to inspect and modify the pixel density to avoid a grainy print.
- Sharpening Filters: After resizing, images might become slightly blurred. Apply sharpening filters to refine the edges and bring details into focus.
- Vector Image Formats: For logos and graphics within the photo, use vector formats to prevent quality loss when scaling.
Choosing Online Image Resizer Services
When on-the-go or lacking access to professional software, online image resizers are a lifesaver. Here’s what we should consider to find an online resizer that suits our needs:
- Speed and Accessibility: Choose a service that can resize our images in seconds and is easily accessible from any mobile device or desktop.
- Cloud Storage Linking: A resizer service that can link directly to our cloud storage saves us the hassle of multiple uploads and downloads.
- File Size Management: Opt for services that can efficiently manage the image file size, compressing large JPEGs to more manageable kilobytes without significant loss of detail.
- Free vs. Paid: Evaluate if the free options meet our needs or if a paid service offers significant advantages, especially when we are looking for professional results.

