
Instructions on Using the Tool

In the digital world, image resolution and pixel dimensions play a crucial role in how an image is displayed on various devices. A 112 x 112 pixel image is a specific square size that is often used for avatars, icons, or small thumbnails. The ratio of width to height in this case is 1:1, making it perfectly square. However, the resolution—that is, the amount of detail an image holds—does not solely depend on pixel dimensions. Rather, it’s determined in combination with the size at which the image is displayed, measured in pixels per inch (PPI) or dots per inch (DPI).
When it comes to converting an image to a 112px x 112px format, understanding the relationship between aspect ratio and resolution is key to maintaining the quality of the original image. The process requires a careful balance between cropping or resizing to avoid distortion. Various software and online tools are available to assist with this conversion, each offering different features to help you achieve the desired outcome.
Key Takeaways
- A 112px x 112px image has a 1:1 aspect ratio and its resolution varies with display size.
- Converting to this size requires attention to maintain image quality.
- Several tools are available to help resize images effectively.
Understanding Pixels and Image Resolution

When we discuss image quality, two critical terms often at the forefront are pixels and resolution. These concepts are fundamental when converting images to a specific size, such as 112px by 112px, and understanding them is essential for achieving the desired clarity and detail in a digital image.
The Concept of Pixels
Pixels are the smallest units of a digital image, often represented as dots on a computer screen. Think of pixels like the building blocks of any digital visuals; each one holds a piece of the overall image. The term ‘112 x 112 pixels’ describes both the width and height of an image, indicating that it contains 112 pixels from top to bottom and 112 pixels from left to right.
The aspect ratio, in this case, is 1:1 since the width and height are equal, creating a square shape. Knowing the pixel count gives us insight into the size of the digital image but doesn’t alone determine its clarity.
The Importance of Resolution in Images
Resolution refers to the detail an image holds and is usually measured in pixels per inch (PPI) or dots per inch (DPI). Essentially, resolution tells us how many pixels are condensed into a given space, affecting the print size and the sharpness of an image on various devices.
For example, printing an image with a resolution of 300 DPI will have a much finer level of detail than one at 72 DPI. This is because more pixels are packed into every inch of the print, resulting in a clearer and more detailed picture. Using a pixels to print size calculator can translate pixel dimensions into actual print sizes, helping us ensure that the final product is both the correct size and high quality.
In digital formats, resolution impacts how an image appears on different screens, which can range widely in pixel density. A 112px by 112px image might look crisp on a smartphone screen but could appear pixelated on a larger monitor if the resolution is not high enough.
Converting to 112 x 112 Pixel Format
Converting images to a 112 x 112 pixel format is a specific task that requires attention to ratio and quality retention. We ensure that during the conversion process, the essence of the original photo is maintained without compromising on pixel density and resolution.
Choosing the Right Conversion Tool
Selecting the appropriate conversion tool is essential. We prioritize free tools that offer a balance between user-friendliness and advanced features. When considering online options, it’s important that the tool supports various image formats such as JPEG, PNG, or GIF. Our top picks include software that allows us to resize images efficiently while ensuring the image quality remains high.
Steps to Convert an Image Without Losing Quality
-
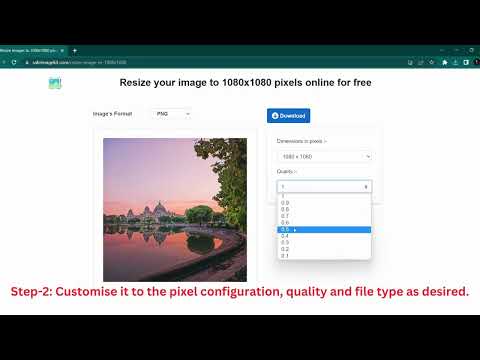
Open the conversion tool: Start by launching your chosen tool. Ensure it is compatible with the image format you wish to convert.
-
Upload the photo: Using the upload option, add your image to the platform. It’s crucial to convert without losing details, so check if the tool can handle high-resolution images effectively.
-
Enter dimensions: Input ‘112’ for both width and height fields to resize the image to 112px by 112px. Some tools automatically maintain the aspect ratio; uncheck this if necessary.
-
Adjust settings: Alter any additional settings for the best result. This may include adjusting compression rates or selecting specific resize image options to preserve pixel density.
-
Preview and convert: Before the final step, preview the image to ensure quality hasn’t been compromised. If satisfied, proceed to convert and then download the resized photo.
By following these steps meticulously, we can convert a photo to the specific size of 112px by 112px while maintaining the image quality using our selected online tools.
Exploring Image File Formats

In the realm of digital imagery, understanding the nuances of image file formats is crucial. These formats determine the image’s quality, compatibility, and use.
Raster vs Vector Image Formats
Raster Image Formats: Raster images are pixel-based. Each pixel holds specific color information, and the image resolution is fixed. Common raster formats include:
- JPG: Highly compressed, optimal for photographs.
- PNG: Supports transparency, ideal for web graphics.
- BMP: Uncompressed, preserves quality, results in large files.
- WEBP: Google-developed format, aims for high compression, and quality.
- TIFF: Used for scanning and printing due to its high quality.
- PS: Adobe Photoshop format, contains layers for editing.
- TGA: Often used in video games and animations.
- EXR: High dynamic range imaging used in visual effects and CGI.
Vector Image Formats: Vector images use geometric shapes and lines. They are infinitely scalable without losing quality. The SVG format is prevalent, convenient for logos and illustrations viewable on various devices without distortion.
Common Image File Formats and Their Uses
JPG:
- Web: suited for websites due to small file size.
- Print: not ideal due to compression artifacts.
PNG:
- Web: preferred for logos and images requiring transparency.
- Print: usable, but not standard.
WEBP:
- Web: faster loading times for websites.
- Mobile: supports animations, rivaling GIFs.
TIFF:
- Professional Printing: respected for archival quality images.
- Publishing: used in desktop publishing for its non-lossy quality.
BMP:
- Historical: less common due to file size, more of an archaic format.
SVG:
- Web: excellent for responsive design elements.
- Apps: scalable icons and UI elements without pixelation.
Best Practices for Online Image Resizing
When we resize images online, it’s critical to maintain the original aspect ratios and ensure image quality, while not compromising our privacy.
Maintaining Image Proportions
To ensure images don’t appear stretched or squashed, we must keep consistent aspect ratios during the resizing process. An aspect ratio calculator can aid in determining the new dimensions that preserve the original image’s proportions. For example, if we resize an image meant for a printer’s specific resolution requirements, we use the dimensions that match our printer’s aspect ratio to maintain clarity and detail.
Ensuring Image Quality and Privacy
When resizing an image to a dimension such as 112px x 112px, achieving the highest quality is a priority. We select image files carefully, considering the image file size calculator to balance between quality and upload speed or storage limits. It’s important to use an online image resizer that doesn’t compress images too much, leading to pixelation or loss of detail.
For privacy, we opt for resizers that guarantee our images aren’t stored permanently on cloud storage or servers. Reading the privacy policy or choosing tools that process images locally on our device can safeguard our data.

