
An image converter designed to resize pictures to exactly 100 x 100 pixels serves to modify the size of photos into an exact square, where both the width and the height measure 100 pixels. This tool is crucial for several uses, including creating profile images for social media platforms, as well as designing custom avatars for forums and gaming sites. With a dimension ratio of 1:1, a 100px by 100px image ensures that all sides are equal in length, creating a precise square. This uniformity keeps the content’s aspect ratio intact, preventing any distortion.
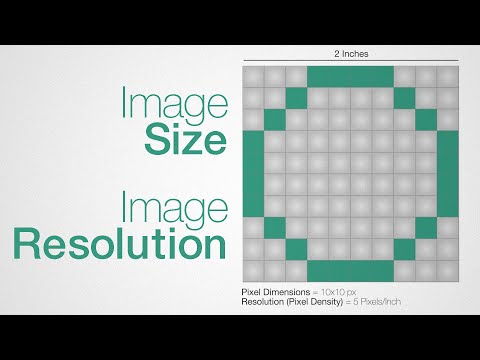
Considering resolution and pixel density, a 100 x 100 pixel image holds a total of 10,000 pixels. Pixel density, which is often measured in pixels per inch (PPI), will vary based on the size of the display it’s being viewed on. For example, if this image is displayed on a physical medium like a screen or a printed photograph, the actual size can change, which affects how sharp the image appears. As a digital image, it fits into web design and mobile applications where compact, square images are often required. To create a 100px by 100px photo, one can use image editing software or an online conversion tool that rescales the image to the desired dimensions, paying careful attention to maintain image quality.
Creating a 100px by 100px image may involve cropping or altering the original photograph, which requires some understanding of image editing principles. This process is simplified with step-by-step guides or automated tools that manage the technical aspects for you. Additionally, optimizing images for various uses involves tweaking file formats, compression levels, and understanding the implications these changes have on image quality and load times. For users requiring more control over their image adjustments, advanced tips can help take the editing process further, addressing issues like aspect ratios, varying screen resolutions, and maintaining visual fidelity across different platforms.
Key Takeaways
- Converting to a 100 x 100 pixel size maintains a 1:1 ratio.
- Resolution and pixel density impact the converted image’s quality.
- Creating a proper 100px x 100px image involves editing and optimization techniques.
Understanding Basics of Digital Images
Before we dive into the specifics, it’s important to understand that digital images are made up of pixels, and factors like pixel dimensions, aspect ratios, and pixel density determine their quality and how they are perceived on various devices.
Pixel Dimensions and Image Quality
Pixel dimensions measure an image in terms of width and height and directly influence its quality. A 100 x 100 pixel image consists of 10,000 individual pixels. The more pixels an image has, the higher the level of detail and the better the image quality when viewed at its native size. However, scaling an image up significantly can lead to pixelation, which reduces perceived quality.
Aspect Ratios and Their Importance
The aspect ratio of an image describes the proportional relationship between its width and height. It’s commonly expressed as two numbers separated by a colon, for instance, 1:1 for a square image. Aspect ratios are crucial in maintaining the correct display of images without stretching or squishing them. They play a key role in design and layout consistency across various media platforms.
Resolution and Pixel Density Explained
Resolution refers to the number of pixels displayed per unit of area and is often measured in DPI (dots per inch) for print and PPI (pixels per inch) for screens. Pixel density affects how crisp and sharp an image appears, and greater pixel density usually translates to higher-quality images. With a 100 x 100 pixel image, if the resolution is set to 100 PPI, the image would measure exactly one square inch when displayed onscreen.
Step-by-Step Guide to Converting Images
Before we dive into the specifics, it’s important to understand that converting images to a 100×100 pixel size involves choosing the right tool, resizing the image accurately, and ensuring the image format and file size are appropriate for your needs.
Choosing the Right Software or Online Service
When we need to convert images to a 100×100 pixel format, the first step is to select the right software or online service. There are numerous options available, some of which are free and others that require a subscription. Popular software choices include Adobe Photoshop and GIMP, both of which offer precise control over the resizing process. For online services, websites like PicResize and Simple Image Resizer are convenient for quick conversions without the need to download software. It’s crucial to choose a service that supports a wide range of image formats like JPEG, PNG, GIF, BMP, and more.
Uploading and Resizing Your Image
Once you’ve chosen your software or service, the next step is to upload your image. Be sure to check the maximum file size allowed by the online service if you’re using one. For resizing the image, look for the option to input custom dimensions and enter ‘100’ for both width and height to achieve a 100×100 pixel size. It’s important to maintain the aspect ratio if the original image isn’t square to avoid distortion. Some tools offer the option to crop your image to fit within the 100×100 pixel frame.
Adjusting Image Formats and File Size
After resizing, you may need to adjust the image format for your intended use. If you’re working on web graphics, formats like JPEG, PNG, or WEBP may be preferred due to their wide browser support and balance between quality and file size. For icons or logos, ICO or SVG might be more appropriate. Always aim to find the balance between image quality and file size; smaller files are faster to load but may lack detail. Before finalizing, always preview the image to ensure it meets your quality criteria and save it in your desired format.
Optimizing Images for Different Uses
When preparing images for various platforms, we must consider factors like dimension, resolution, and image integrity. Optimizing for web entails reducing file size while maintaining quality, whereas print preparation involves ensuring suitable resolution and dimensions for clarity.
Web Optimization and Print Preparation
For web optimization, we focus on reducing the image file size to enhance page loading speeds, crucial for user experience and search engine rankings. Images must be resized to their intended display dimensions on the web, typically smaller than their original size. A common practice is to crop the image to the appropriate aspect ratio and then resize it to the required width and height, like a 100px x 100px dimension for thumbnails.
Print preparation, conversely, demands high-resolution images, usually at 300 dots per inch (dpi), to achieve print size accuracy and fullness of detail. It is essential to maintain the image’s native resolution and increase its dimension as needed without upscaling, as this can degrade quality.
Maintaining Image Integrity: Rotation, Cropping, and More
To maintain image integrity, we must be meticulous with adjustments such as rotation, cropping, and flipping. Rotating an image should preserve its quality, and re-sampling should be minimal to prevent pixelation. Cropping should be done cautiously to ensure the focal point remains and the image maintains its message. Flipping an image can be used for aesthetic or layout purposes but must be evaluated for any unintended changes in meaning or composition.
Images must be optimized not only for internet use but also keeping in mind the image dimensions required for high-quality prints. We ensure that our images convey the intended message across all mediums, whether it’s a digital display or a tangible photograph.
Advanced Tips and Considerations

When converting images to a 100px x 100px format, we must consider technical details beyond just resizing. Working with the right image formats and understanding the implications for privacy and security are key to successful image conversion.
Working with Vector Image Formats
Vector image formats, such as SVG, are crucial when we aim for scalability and quality. Unlike raster images, vectors are not tied to pixels and can be scaled to any size without loss of resolution. To maintain a clear and sharp image at 100px x 100px, it’s essential to start with a vector format if possible. This ensures that when the image is downscaled to the smaller size, it retains its quality. For instance, icons and logos often demand such precision and would benefit from vector to raster conversion before resizing.
Privacy and Security When Using Image Converters
When using online image converters, our privacy and security should be non-negotiable. We must select services that guarantee the privacy of our files and explicitly state that content is deleted automatically after conversion. This is particularly significant if we’re working with sensitive images. Moreover, ensuring that any transfer of our images over the internet is secured, usually via an HTTPS link, guards against unauthorized access to our files. For added security, opting for converters that operate on cloud storage we control can alleviate many common security concerns, as we can manage who has access to the data.

