A zero-downtime website server migration is achievable, but it follows a specific order of operations: (1) plan and audit your current environment, (2) take verified full backups, (3) build and test a staging environment on the new host, (4) lower DNS TTLs and execute a controlled cutover during a low-traffic window, (5) preserve SSL, redirects, and the SEO elements that hold your search equity, and (6) monitor uptime and validate functionality before decommissioning the old server. Skipping any phase causes post-migration ranking loss and revenue drops. That is why this website server migration checklist treats every phase as a gated checkpoint with explicit rollback criteria.
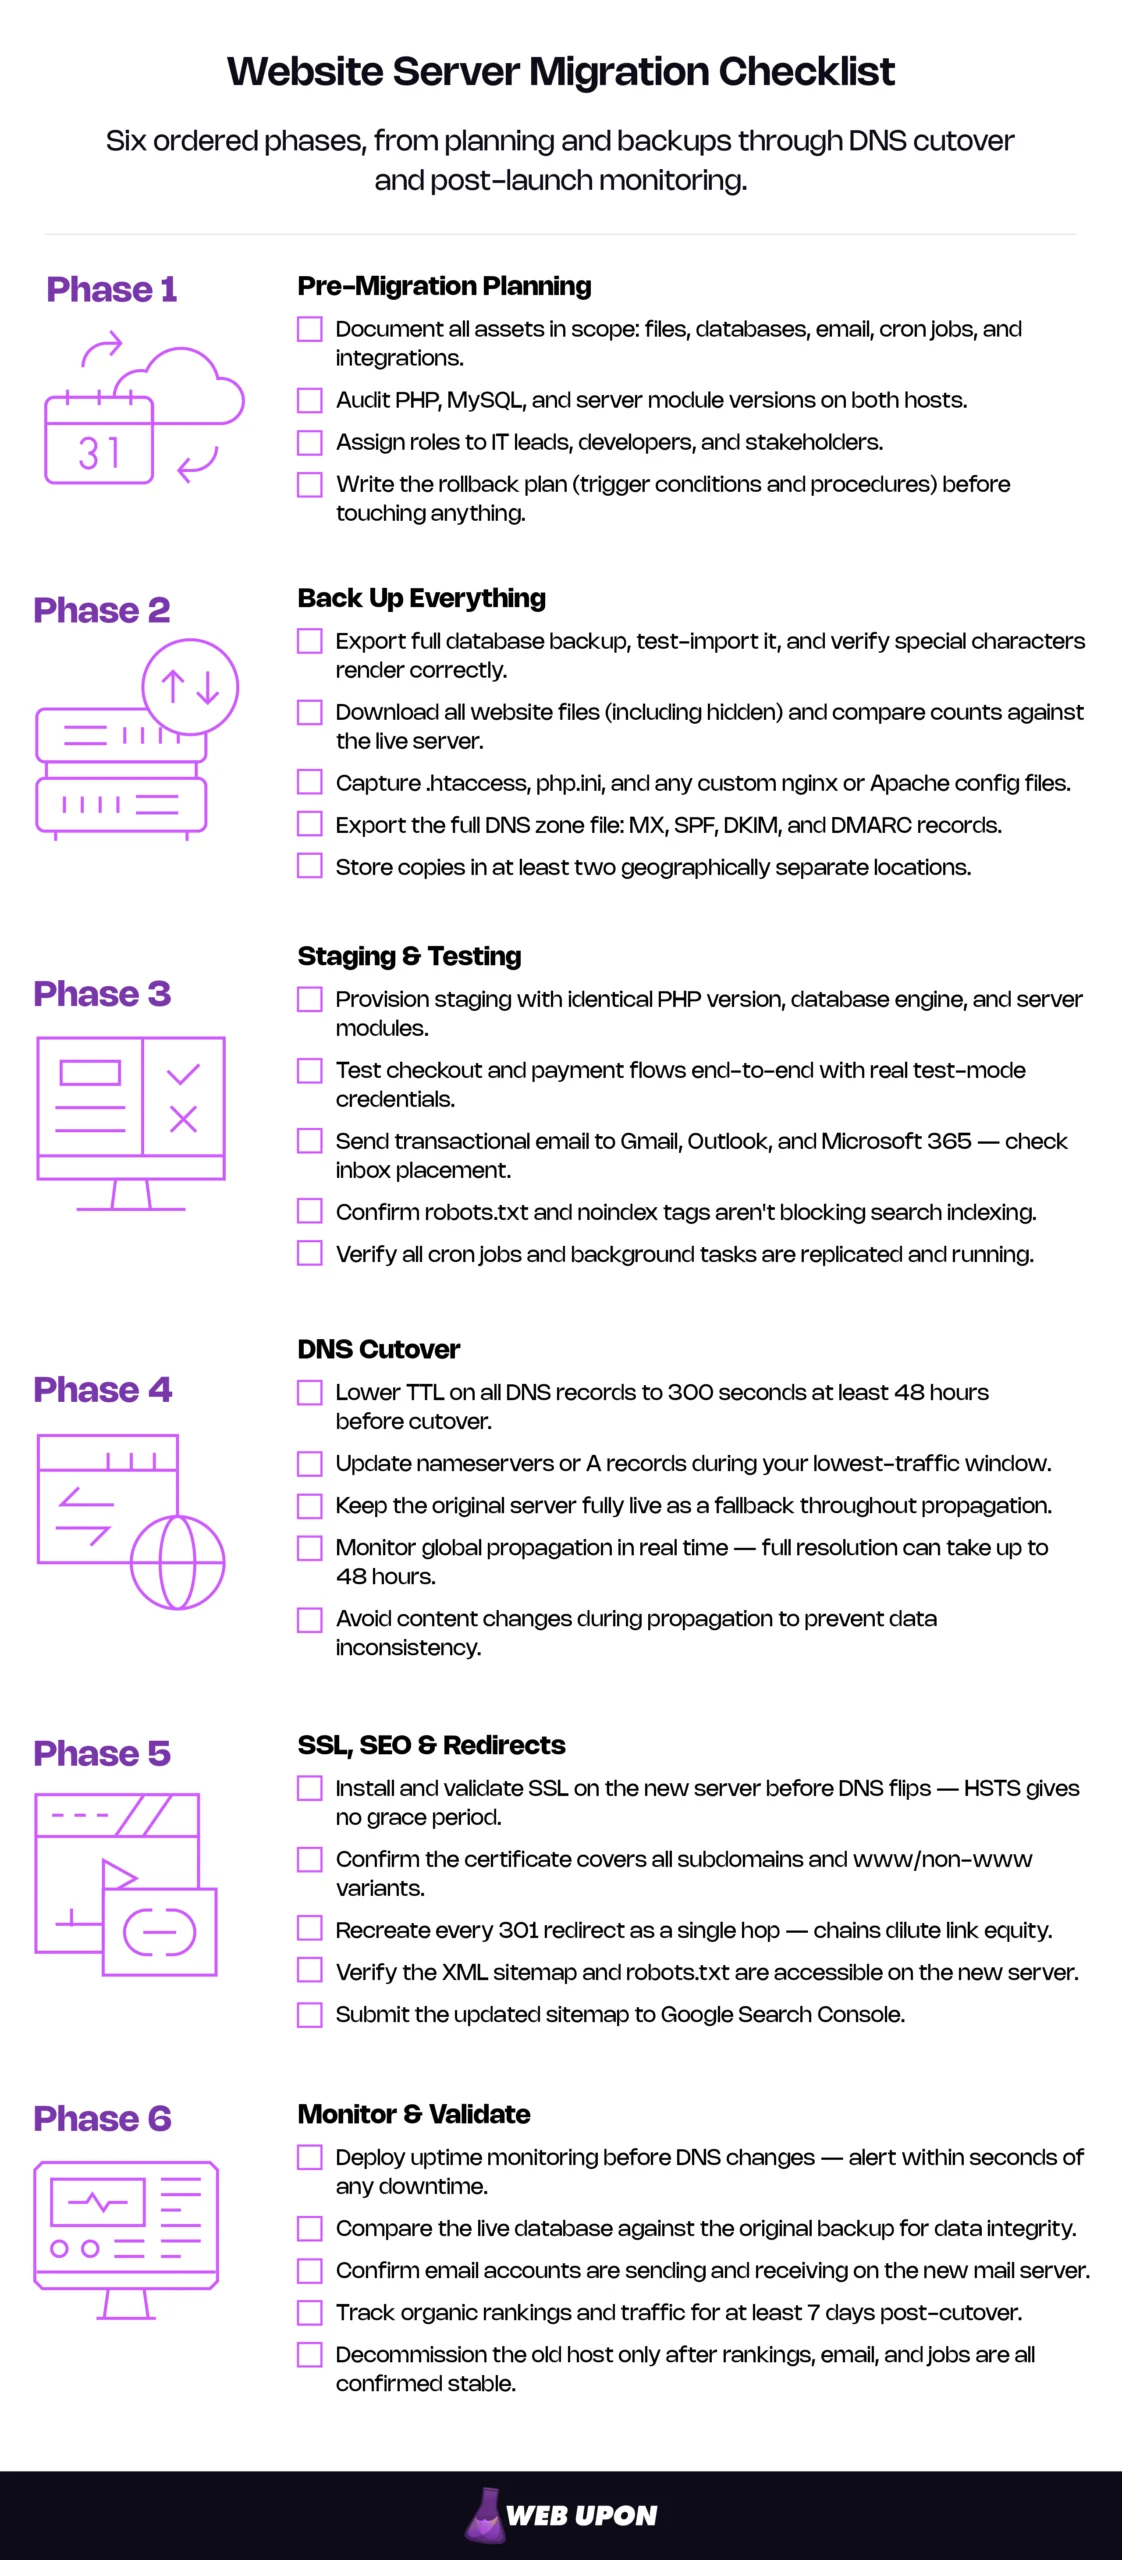
The Six Phases of a Zero-Downtime Website Server Migration at a Glance
Each phase of this zero-downtime website hosting transfer process has a defined purpose and a defined rollback trigger — the condition that tells you to stop, return to the previous environment, and try again rather than push forward.
| Phase | What You’re Doing | Rollback Trigger |
| 1. Pre-Migration Planning | Defining scope, auditing the environment, writing the rollback plan | Incompatible source and destination environments |
| 2. Backup Everything | Full database, files, config, and email backups in multiple locations | Backup integrity check fails |
| 3. Staging & Testing | Building a mirror environment and validating compatibility | Critical functionality breaks in staging |
| 4. DNS Cutover | Lowering TTLs and switching nameservers during low traffic | Propagation issues or connectivity errors at cutover |
| 5. SSL, SEO & Redirects | Preserving HTTPS, redirects, and search equity | Search Console errors or redirect loops detected |
| 6. Post-Migration Monitoring | Uptime monitoring, data integrity validation, decommissioning | Any data loss or extended downtime within 72 hours |
Phase 1 — Pre-Migration Planning: Build Your Blueprint Before Touching a File
Migrations rarely fail because of bad hardware. They fail because someone started moving files before anyone wrote down what was being moved, who owned what, or what it would take to declare the work complete. Planning is the only phase that determines whether the next five succeed.
Define Your Migration Goals and Scope
The goal of this section is one artifact: a written scope that names every asset in motion and every person responsible for it.
- Identify the exact reason for switching providers — performance, cost, scalability, support, or compliance — because the reason determines the success metric.
- Document every asset in scope: website files, databases, email accounts, cron jobs, third-party API integrations, and configuration files.
- Establish realistic migration timelines that account for DNS propagation delays and unexpected compatibility issues.
- Assign clear roles across IT leads, developers, and stakeholders before any work begins.
Audit Your Current Hosting Environment for Compatibility Risks
Version mismatches between source and destination environments are the most common cause of post-migration breakage — the kind that doesn’t surface until a customer reports a broken form or a payment that never processed.
A site running on PHP 7.4 will technically load on PHP 8.2, but deprecated functions like each(), removed extensions like mcrypt, and stricter type handling cause specific pages or plugins to fail without throwing visible errors. The same risk applies to MySQL or MariaDB version jumps — MySQL 8 made caching_sha2_password the default authentication plugin, which breaks older clients and connectors that don’t support it — Node.js major versions, and Apache-to-nginx transitions where .htaccess rules don’t carry over without translation. The audit isn’t about cataloging what you have — it’s about producing a side-by-side compatibility matrix the receiving host’s support team can confirm before you commit.
- Inventory server configuration: PHP version, database engine and version, server-side modules, and firewall rules.
- Identify plugin conflicts, custom CMS dependencies, and third-party integrations that may break.
- Document all active cron jobs, scheduled tasks, and background processes that must be replicated.
- Flag legacy code or deprecated functions the new provider may not support out of the box.
Create a Rollback Plan Before Migration Begins
A documented rollback plan, written before cutover, is what lets a team commit to the change with confidence. Teams that get migrations right write the rollback plan first.
- Define the trigger conditions that would force an immediate rollback — connectivity failure, data corruption, payment errors, or extended downtime past your acceptable threshold.
- Document step-by-step rollback procedures so any team member can execute them under pressure.
- Establish a maximum acceptable downtime threshold as your rollback decision deadline. Without one, “let’s give it another fifteen minutes” becomes “let’s give it another four hours.”
- Communicate the rollback plan to all stakeholders before migration day so leadership understands the safety net is in place.
With your plan documented, the next non-negotiable step is creating verified backups.
Phase 2 — Back Up Everything: The Non-Negotiable Foundation of a Safe Migration
A backup you haven’t verified is a wish, not a backup. Teams that lose data during migration almost always have backups; what they don’t have is evidence those backups will restore. Integrity-tested backups in geographically separate locations are the standard.
Perform a Full Database Backup and Verify Its Integrity
The database is the artifact most likely to be corrupted, most likely to grow past the limits of your backup tool, and most likely to fail on restore for reasons that don’t appear in any error log.
- Export a complete database backup using cPanel, phpMyAdmin, or mysqldump for larger databases.
- Verify the backup by performing a test import into a local or staging environment before proceeding.
- Back up all database configuration files, including connection strings and environment-specific variables.
- Store multiple copies in geographically separate locations: local drive, cloud storage, and a secondary external server.
A successful import is not the same as a verified restore. Two failure modes survive a clean import. The first is character encoding mismatches: a site originally created with utf8 collation and restored into a utf8mb4 environment will silently corrupt emoji, smart quotes, and non-Latin characters because the two character sets use different maximum byte lengths per character. The second is stored-procedure or trigger ownership issues, where the procedure imports cleanly but won’t execute under the new database user. Verify by spot-checking pages with user-generated special characters and by running any reports that depend on stored procedures.
Back Up Website Files, Server Configurations, and Email Accounts
The files are the visible asset. The configuration files and email accounts are what keep the business running around the website — and they are routinely forgotten.
- Use an FTP client or file manager to download a complete copy of all website files, including hidden files and folders.
- Back up server-level configuration files such as .htaccess, php.ini, and any custom nginx or Apache configurations.
- Export all email accounts, filters, forwarders, and mailbox data to prevent communication disruption.
- Confirm backup completeness by comparing file counts and directory sizes between the live server and your backup copy.
Document Email and Authentication Records Before You Touch DNS
The most painful post-migration failures are not website failures. They are email failures that go undetected for days — sales leads quietly bouncing, password-reset emails landing in spam, billing notifications never reaching customers — because the records that govern mail flow live in DNS. SPF, DKIM, and DMARC are TXT records that authenticate outbound mail; messages that fail those checks at major mailbox providers can be marked as spam or rejected outright.
- Export the full DNS zone file from the current registrar, including MX, SPF (TXT), DKIM (TXT), DMARC (TXT), and any custom CNAMEs used for email or transactional providers.
- Note the TTL on every record so you can restore the original behavior if rollback becomes necessary.
- Capture screenshots of email forwarders, mailbox quotas, autoresponders, and webmail configurations before access is revoked.
- Identify any third-party services — sales tools, support desks, ESPs, CRMs — that authenticate against the domain via DNS records.
Your Backup Is Not Complete Until:
- The database has been test-imported and key pages with special characters render correctly.
- File counts and directory sizes between the live server and the backup match.
- Server configuration files (.htaccess, php.ini, custom server configs) are captured.
- The full DNS zone file and all email authentication records are exported and version-stamped.
Backups protect you from the worst-case scenario. Your staging environment prevents that scenario from happening in the first place.
Phase 3 — Staging Environment Setup and Compatibility Testing: Validate Before You Migrate
Building a staging environment for migration is the highest-leverage step in the entire process. Every issue discovered here is a problem that won’t reach customers — and every issue you skip is a problem your customers will discover for you.
Build a Staging Environment That Mirrors Your New Hosting Provider Exactly
A staging environment that doesn’t match production isn’t staging. It’s a sandbox that produces false confidence.
- Provision the staging environment on the new host using identical configuration settings as the planned live environment.
- Install the same PHP version, database engine, and required server modules to ensure a true compatibility check.
- Point the staging environment to a temporary URL or subdomain so testing doesn’t affect the live domain.
- Configure SSL on staging to test HTTPS functionality before the DNS cutover.
Migrate Website Files and Database to Staging First
The goal is a working mirror — complete enough that every test in the next section can run against it.
- Transfer all website files using a secure FTP client or SSH-based file transfer protocol.
- Import the database backup and update all configuration files with the new credentials.
- Update the CMS configuration file (wp-config.php for WordPress, .env for Laravel and most modern frameworks, settings.php for Drupal) with the new server’s database connection details.
- Replicate all cron jobs and scheduled tasks in the new control panel before testing begins.
Execute a Thorough Testing Phase to Catch Every Breaking Point
The temptation is to test what you can see — pages load, forms render — and call it done. The work is to test what runs underneath: the integrations, the queues, the silent processes that hold the business together.
- Test all critical functionality: forms, checkout processes, login systems, media uploads, and dynamic content rendering.
- Verify that all internal links, redirects, and URL structures resolve correctly within staging.
- Confirm plugin conflicts are resolved and all third-party integrations authenticate and communicate properly.
- Run performance benchmarks to compare page load speeds against the original host’s baseline.
Five Test Categories Migrations Often Miss
- Payment and checkout flows. Test with real test-mode credentials end to end. Payment gateway integrations frequently fail silently when the receiving host’s outbound IP isn’t whitelisted, or when SSL chain configuration breaks API handshakes.
- Transactional and marketing email deliverability. Send a real test email to a Gmail address, an Outlook address, and a corporate Microsoft 365 or Google Workspace address. Inbox placement, not delivery, is the metric that matters.
- CDN and caching layer behavior. Verify that purge mechanisms, cache headers, and any edge logic behave identically on the new origin.
- Search and indexing tags. Confirm that robots.txt, noindex meta tags, and canonical URLs are configured intentionally. Staging environments are routinely shipped to production with noindex still enabled — once Googlebot crawls a page carrying that tag, it drops from search results entirely.
- Scheduled background work. Test cron jobs, queued jobs, webhook receivers, and any cleanup or report-generation tasks. These usually run overnight, which means a misconfiguration won’t surface until 24+ hours after cutover.
| Functional Tests | Infrastructure Tests |
| Forms and form submissions | SSL certificate and chain validation |
| Checkout and payment flows | Redirect rules and chains |
| Login and authentication | Third-party API integrations |
| Media uploads and downloads | Performance benchmarks |
| Dynamic content rendering | Cron jobs and background tasks |
| Internal search functionality | CDN cache and purge behavior |
If your staging tests are surfacing more issues than your team can confidently resolve, this is the right moment to bring in a migration partner — before DNS changes lock you into the new environment.
Once staging passes every test, you’re ready for the moment that determines whether users notice the migration at all.
Phase 4 — DNS Strategy and Cutover Execution: The Moment That Determines Your Downtime
DNS is the lever. It controls whether users see the old site or the new one, and the strategy you choose for the DNS cutover determines whether downtime is measured in seconds or hours.
Lower Your DNS TTL Values 48 Hours Before Migration
TTL — time-to-live — tells the internet how long to remember the answer to “where does this website live?” A lower TTL means the internet asks again sooner, which is exactly what you want during a migration. Google’s hosting-change guidance recommends lowering TTL ahead of a move so new settings propagate to ISPs more quickly.
- Reduce the TTL on all DNS records to 300 seconds (5 minutes) at least 48 hours before the planned cutover.
- A lowered TTL ensures DNS propagation completes in minutes rather than hours once nameservers are updated.
- Audit and document all existing DNS records (A, MX, CNAME, TXT) precisely before making any changes.
- Confirm your domain registrar allows TTL modifications and that changes have fully propagated before migration day.
Lowering TTL is the right move, but it’s not a guarantee. DNS settings are typically cached by ISPs based on the TTL value, and some ISPs and corporate network resolvers ignore that value entirely, refreshing on their own schedule — typically every 24 to 48 hours. This is why “propagation may take up to 48 hours” remains true even when you’ve done everything correctly. The TTL reduction guarantees fast resolution for the majority of users; the planned dual-server overlap window protects the rest.
Execute the Cutover During Your Lowest-Traffic Window
The cutover itself is anticlimactic if the planning was right — a single change at the registrar that begins the propagation clock.
- Schedule the cutover during the lowest-traffic period identified through your analytics data.
- Update nameservers or DNS A records at the registrar to point to the new hosting provider’s server IP.
- Keep the original hosting environment fully live and operational during the entire propagation window as a live fallback.
- Monitor propagation in real time using DNS-checking tools to track global resolution status.
Manage the Propagation Window to Protect Users and Search Engines
During propagation, both servers may be serving real traffic — which means both environments need to be functional, synchronized, and supervised.
- Understand that propagation can take minutes to 48 hours depending on ISP cache refresh cycles.
- Avoid making content changes during the propagation window to prevent data inconsistency.
- Notify your team and stakeholders so support staff can handle user-reported access issues proactively.
DNS Cutover Timeline:
- T-48 hrs — Lower TTL to 300 seconds. Confirm propagation of the TTL change itself.
- T-0 — Update nameservers or A records at the registrar. Cutover begins.
- T+5 min — Early propagation. Most users on cooperative resolvers reach the new host.
- T+48 hrs — Full global propagation. ISPs that ignored TTL have refreshed.
Even a flawless cutover can quietly destroy your search visibility if SSL, redirects, and SEO elements aren’t preserved.
Phase 5 — SSL, SEO, and Redirects: Protecting Search Equity Through the Migration
To preserve search rankings during migration, you have to protect three elements at once: SSL, redirects, and crawl signals. Ranking loss after migration almost always traces back to one of three causes: a misconfigured SSL certificate, broken 301 redirects, or a missing or blocked robots.txt or sitemap. Each is preventable. Each is also invisible until it isn’t.
Install and Validate SSL on the New Server Before DNS Cutover
The SSL certificate must be installed and valid on the new server before DNS resolves to it. This is not a “we’ll fix it within the hour” item.
- Install the SSL certificate on the new host before flipping DNS so HTTPS is active the moment traffic arrives.
- Test SSL installation on staging to confirm there are no mixed-content warnings or certificate chain errors. Modern browsers don’t simply warn on mixed content — they auto-upgrade or block insecure subresources outright, which can break page rendering before a user notices anything is wrong.
- Verify HTTPS redirects are correctly configured in the server config and .htaccess on the new host.
- Confirm the certificate covers all subdomains and domain variations (www and non-www) to prevent browser security warnings.
If the original site was serving HSTS headers — HTTP Strict Transport Security — browsers that have already cached the policy will refuse to load the site over HTTP for the duration of the policy’s max-age. The certificate on the new host must be valid the moment DNS resolves, not “shortly after.” There is no graceful fallback. HSTS is a one-way door, and a missing or misconfigured certificate at cutover can lock returning visitors out for hours, even after the technical fix is deployed.
Audit and Preserve All Redirects to Protect SEO and Traffic
Every 301 redirect on your current site is a path search engines have learned. Break the path, and you break the equity that path carries.
- Export a complete list of all existing 301 redirects from the current environment before migration begins.
- Recreate every redirect rule precisely in the new server’s configuration files or CMS redirect manager to maintain link equity.
- Test every redirect chain on staging to confirm they resolve correctly and do not create redirect loops.
- Recognize that broken redirects directly cause traffic loss and ranking drops that can take months to recover.
Recreating each rule is necessary but not sufficient. The trap is the chain. A URL that previously resolved through a single 301 may, after migration, resolve through two or three hops as new redirects — HTTP-to-HTTPS, non-www-to-www, trailing-slash normalization — get layered on at the new host. Every additional hop dilutes link equity and slows page load. The standard is one redirect per URL. After cutover, run a crawl on a representative sample of inbound-link URLs and confirm each resolves to its final destination in a single 301.
Conduct a Post-Migration SEO Audit to Confirm Search Visibility Is Intact
- Crawl the live site on the new host using a site auditing tool to identify broken links or missing pages.
- Verify your XML sitemap and robots.txt are accessible and correctly configured on the new server.
- Submit an updated sitemap to Google Search Console and monitor crawl activity for indexing anomalies.
- Track organic rankings and traffic in the days following migration to detect any SEO impact.
A formal post-migration SEO audit is the highest-confidence way to confirm nothing was lost.
DNS has propagated, SSL is live, and redirects are firing correctly. The migration isn’t finished until you’ve proven, with evidence, that nothing was lost.
Phase 6 — Post-Migration Monitoring and Validation: Confirming Zero Downtime Was Achieved
The first 72 hours after cutover are when silent failures emerge. Emails routing to the old server because an MX record was missed. Cron jobs that didn’t re-enable. Intermittent SSL errors that only show up for users on specific browsers. Monitoring is what turns “we think it worked” into “we know it worked.”
Deploy Uptime Monitoring Immediately After Cutover
Monitoring should be running before DNS changes, not after. The first hour after cutover is the hour you most need data on.
- Configure an uptime monitoring service to alert your team within seconds of any downtime.
- Monitor server response times and HTTP status codes for at least 72 hours following cutover.
- Set up performance dashboards to compare metrics between the old and new environments.
- Establish escalation protocols so any downtime alert triggers an immediate response from the IT lead.
Validate Data Integrity and Full Functionality on the Live Server
The staging tests proved the new environment can run your site. The live tests prove that it is.
- Perform a final data integrity check by comparing the live database on the new server against the original backup.
- Test all functionality on the live domain after propagation completes, replicating the full staging test suite.
- Verify all email accounts are sending and receiving correctly on the new mail server.
- Confirm all cron jobs are executing on schedule and that no background processes were lost.
Decommission the Old Hosting Environment Only After Full Validation
The old host stays live until you’ve earned the right to cancel it. Earning that right means evidence: rankings stable, no support tickets traced to migration, all background work running, and at least a full week of normal traffic patterns.
- Maintain the original environment in a fully operational state for at least 7 to 14 days post-migration as an emergency fallback.
- Only cancel the old subscription after confirming zero data loss, full functionality, and stable search rankings.
- Archive a final snapshot of the old environment before decommissioning as a long-term disaster recovery reference.
- Document every step of the completed migration to create an institutional knowledge asset for future migrations.
A successful migration isn’t the moment DNS resolves. It’s the moment, two weeks later, when you cancel the old host knowing nothing was lost.
If your team is preparing for a migration and the stakes feel higher than your in-house experience, talk to the Web Upon team about a migration review.

