Originally posted on March 19, 2024 @ 5:50 am

Instructions on Using the Tool

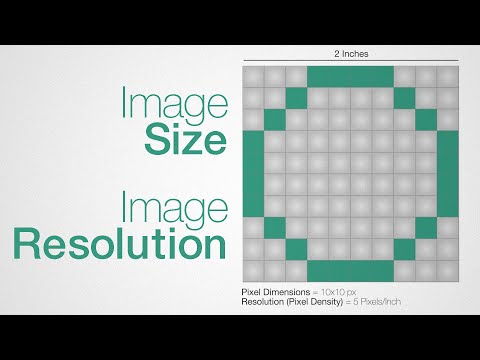
Grasping the nitty-gritty of image specs, like ratio, resolution, and how packed those pixels are, is a big deal if you’re messing around with images, especially those tiny 50 x 50 pixel ones. Imagine a perfect square; that’s what we mean by a 1:1 ratio. Now, think about resolution as how crammed full of details your picture is. With a 50 by 50 pic, you’ve got 2500 tiny dots making up your image. And those dots? They aren’t just tossed in haphazardly. Pixel density, which smart folks measure in pixels per inch (PPI), tells you how cozy those pixels are getting in there. It’s all about making your image as sharp and clear as a sunny day. For anyone diving into digital art or tweaking photos, knowing these tricks can make your images pop off the screen! Stick around, and you’ll see just how much of a difference these details can make.
Creating a 50px by 50px photo involves resizing an existing image or creating a new image with these dimensions. This process is handled through image editing software or online image converters which provide the appropriate tools to alter an image’s size without compromising its quality. Additionally, one must consider the file format most suited for the image’s end-use, whether it’s for web graphics, icons, or any other specific requirement.
Key Takeaways
- A 50 x 50 pixel image has a square ratio and a resolution of 2500 pixels.
- Tools such as image editing software or online converters enable resizing to the required 50px by 50px dimensions.
- Choosing the correct file format is integral for image optimization and use.
Understanding 50px by 50px Images

When we talk about 50px by 50px images, we’re specifically referring to images that have a width and height of 50 pixels each. These dimensions are crucial for certain web and graphic design scenarios.
Image Resolution and Quality
Resolution is a term that describes the number of pixels in a given area of an image. For a 50px by 50px image, the resolution implies a total of 2500 pixels. The pixel density, usually measured in dots per inch (DPI), affects the image’s quality. Higher DPI values mean more detail in the print version of the photo, but on digital platforms, images are displayed according to pixel dimensions. Image formats like JPEG, PNG, or GIF support 50px by 50px dimensions.
- Quality: A 50px image has limited quality due to low resolution.
- Image Formats: Common web formats that support this resolution.
- Resolution: 2500 total pixels (50px width * 50px height).
Aspect Ratio and Dimension Consistency
The aspect ratio refers to the proportional relationship between the width and height of an image. A 50px by 50px image has an aspect ratio of 1:1, which is a perfect square. Consistently maintaining these dimensions across various platforms ensures that the image remains unchanged in appearance.
- Aspect Ratio: 1:1 (width : height).
- Dimension Consistency: Crucial for maintaining image uniformity across uses.
How to Resize and Convert Images
When we’re looking to prepare images for the web or other digital mediums, it’s crucial to be able to effectively resize and convert these images without compromising quality. Here’s how we can achieve that:
Choosing the Right Image Resizer Tool
Finding the right image resizer tool is essential for maintaining image quality. There are numerous tools available—some are free, while others are part of paid software suites. When selecting an image resizer, we should look for features such as the ability to adjust the dimensions, crop, and convert image formats such as JPG, PNG, BMP, GIF, WebP, EPS, and ICO. User-friendly interfaces can make the process easy to use for both novice users and more advanced ones.
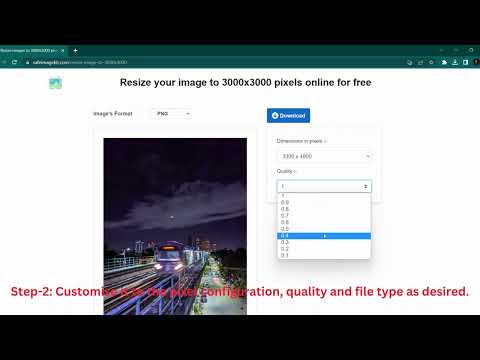
Step-by-Step Guide to Resizing Images
- Upload: Begin the resizing process by uploading the image to our chosen resizer tool.
- Resize Image: Next, we enter the desired output size. For a 50×50 pixel image, input ’50’ for both width and height.
- Adjust: If necessary, we can fine-tune the image using cropping or aspect ratio settings to maintain the correct composition.
- Preview: Before finalizing, we preview the image to ensure the quality remains high despite the new size.
- Download: Once satisfied with the changes, we proceed to download the now resized image.
File Format Conversion
After resizing an image, we may need to convert it to a different file format depending on our needs. Image converter tools typically offer a range of output formats, such as JPG, PNG, BMP, GIF, WebP, EPS, and others.
- Convert: In our image tool, we select the desired format from the available options.
- Download: After the conversion, we download the image in its new format, ready for use.
By following these guidelines, we make the process of resizing and converting images easy and efficient, ready for whatever project we have at hand.
Image Use and Optimization
When we optimize images for the web and print, we focus on retaining the highest quality while ensuring efficient loading times. Our goal is to balance visual clarity with performance across devices and platforms.
Ensuring Highest Quality for Web and Print
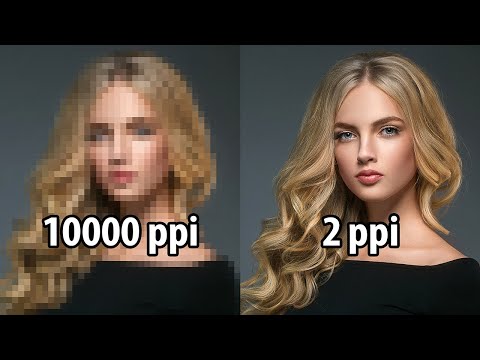
To maintain the highest quality for images, especially when dealing with a 50 x 50 pixel dimension, we need to consider the aspect ratio and resolution. Common aspect ratios like 16:9, 4:3, 1:1, and 3:2 can significantly affect the appearance of images across different devices. For web and print, we must also consider the conversion of pixels to print size to maintain precision. Using tools such as an image file size calculator or a pixels to print size calculator allows us to determine the best file size that doesn’t compromise quality.
- Web: We aim for an image resolution that accommodates a variety of devices, optimizing images to look sharp on high-resolution screens while keeping the file size manageable.
- Print: We strive for the highest quality by ensuring that the resolution is high enough for the print size. For a 50 x 50 pixel image, this would mean ensuring at least 300 pixels per inch (PPI) for crisp output.
Maximizing Image Load Speed and Efficiency
To maximize image load speed and efficiency on websites, we thoroughly examine file sizes and link optimization. Here’s our approach:
-
File Size Reduction:
- Compress images: We reduce image file sizes without sacrificing quality, aiming to cut down load times significantly.
- Appropriate Format: Choosing the right format, such as JPEG, PNG, or WebP for the right context, helps in balancing quality and file size.
-
Efficiency:
- Lazy Loading: Implementing lazy loading ensures images are downloaded just before they are needed, rather than on initial page load, improving the page’s load time in seconds.
- CDN Usage: We utilize Content Delivery Networks (CDNs) to serve images faster by hosting them closer to the end-user.
By judiciously applying these strategies, we ensure that our images are both of the highest quality and efficient to load. This creates an optimal experience for website visitors, whether they are browsing on a laptop, tablet, or smartphone.
Privacy and Security Considerations
In this section, we focus on the critical aspects of protecting your images during and after conversion to 50px x 50px format, and how data handling practices of services should align with privacy standards.
Protecting Your Uploaded Images
When we use image conversion tools, protecting our uploaded images is essential. It’s important to ensure that the service employs robust encryption methods during the upload process. This prevents unauthorized access to our images as they travel over the internet. Additionally, we must look for guarantees that our images are deleted automatically after a specific period. This way, once we download the converted images, we can be confident that they won’t be stored indefinitely and are at less risk of being compromised or misused.
How Services Handle Your Data
We need to consider how the conversion services handle our data. A trustworthy service will articulate in their privacy policy that our privacy is guaranteed. They should clearly describe their procedures for handling the files we upload, including how long the files are kept before being automatically deleted. Services should also specify if our data will be used only for the conversion process or if it will have other applications. Transparency here is crucial so that we have confidence in how our data is managed.

