Originally posted on March 21, 2024 @ 4:05 am

Instructions on Using the Tool

When creating digital images, understanding pixel dimensions and resolution is crucial for ensuring the desired quality and clarity. A 32 x 32 pixel image converter helps in transforming photos into a specific small resolution, often used for avatars, icons, or small graphics on websites and applications. The term “32 x 32 pixels” means that the image is 32 pixels wide and 32 pixels tall, resulting in an area of 1,024 pixels. The resolution in this context refers to the amount of detail an image holds, with a 32 x 32 dimension being relatively low in detail due to the small number of pixels. Pixel density, measured in pixels per inch (PPI), is another crucial concept; it determines how closely packed the pixels are within the physical dimensions of an image. As PPI increases, so does the quality of the picture, because there’s more information (pixels) in the same physical space.
Optimizing an image for a 32 x 32 pixel resolution while maintaining the best possible quality requires careful consideration of the original photo’s aspect ratio and composition. Using an online image converter to resize photos to a 32 x 32 dimension is a straightforward process that involves selecting the correct tool and specifying the desired output size. These converters often allow users to maintain the aspect ratio of the original image while resizing, essential to prevent distortion. In certain cases, one may also need to crop the photo to fit the 32 x 32 pixel frame properly, a task that these tools can help with. Understanding the implications of converting high-resolution images to such a small size is key to avoiding significant quality loss and ensuring the final image meets the necessary criteria.
Key Takeaways
- A 32 x 32 pixel image is defined by its width and height in pixels, impacting the level of detail and quality.
- To convert an image to 32 x 32 pixels, we utilize online tools that can maintain the aspect ratio and quality during resizing.
- Keeping the original photo’s aspect ratio and pixel density in mind is fundamental for a high-quality 32 x 32 pixel conversion.
Understanding Pixel Dimensions and Image Resolution
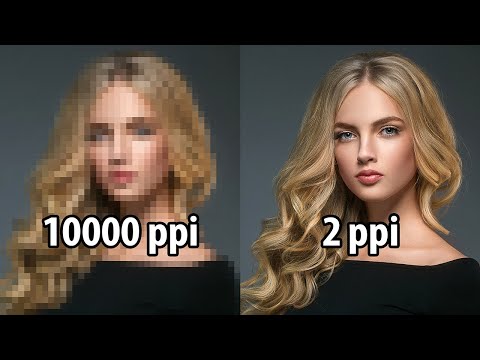
When we talk about pixel dimensions and image resolution, it’s important to understand that these factors directly impact the quality and clarity of an image. The dimension of an image, expressed in pixels (px), signifies its size while resolution pertains to the detail an image holds, commonly measured in pixels per inch (PPI).
Pixel Density and Image Quality
Pixel density, also known as resolution, is crucial in defining the quality of an image. For a square image that is 32×32 pixels, we’re looking at a total of 1,024 pixels. In the context of pixel density:
- A high-resolution image typically means more pixels are packed into a given space, producing greater detail.
- If we maintain the same image size but increase the resolution, the pixels decrease in size, making the image appear sharper.
The Role of Aspect Ratio in Image Conversion
The aspect ratio describes the relationship between the width and height of an image. For a 32×32 px image, the aspect ratio is 1:1, which is a perfect square:
- Changing the aspect ratio can distort the image if not resized proportionally.
- Maintaining a consistent aspect ratio is essential in image conversion to preserve the original design and layout.
Remember, when converting an image to 32×32 pixels, we are adjusting its dimension along with considering its aspect ratio and resolution to ensure it meets the specific quality requirements.
Choosing the Right Image Resizing Tool

When we look to transform images into a specific dimension such as 32px by 32px, selecting the appropriate resizing tool is paramount for maintaining image quality and achieving the desired outcome efficiently.
Software vs. Online Tools
In our search for a suitable image resizer, we must decide between downloadable software and online tools. Software options often offer more advanced features and higher processing speeds, as they utilize our computer’s resources. However, these may require installation and occasional updates. On the other hand, online tools provide convenience and accessibility from any device with an internet connection. They are typically user-friendly and do not consume storage on our devices. It’s essential to consider the level of functionality and frequency of use when choosing between the two.
- Software Resizer Tools: Typically offer more powerful features and work offline.
- Pros:
- Higher processing speed
- Advanced features like batch processing
- Cons:
- Requires installation and updates
- Pros:
- Online Resizer Tools: Accessible and easy to use without any downloads.
- Pros:
- No installation needed
- Can be used on any device
- Cons:
- Internet-dependent
- May lack advanced features
- Pros:
Features of an Efficient Image Resizer
An efficient image resizer tool should be robust in its feature set and accommodate various image adjustments with ease. Key features we look for include the ability to crop, rotate, and resize images to exact dimensions like 32px by 32px. Additionally, providing a preview option before finalizing the change is crucial for user satisfaction. Functionality to maintain the correct aspect ratio and pixel density is fundamental to prevent image distortion. Here’s a quick checklist:
- Must-Have Features:
- Accurate resizing to specific dimensions (e.g., 32px by 32px)
- Crop and Rotate functionalities
- Preview changes in real-time
- Maintain image quality and proper aspect ratio
By focusing on these integral attributes, we can choose an image resizer tool that delivers quality results promptly and effortlessly.
The Image Conversion Process

When we aim to resize an image to a specific resolution of 32 x 32 pixels, it’s essential to consider the ratio, pixel density, and how to maintain image quality. Our precise approach ensures that the converted images meet your requirements with clarity and precision.
Step-by-Step Guide to Resizing Images
- Choose the Right Software: We select a software tool that provides a resize option and supports precision editing.
- Input Image Dimensions: We specify the target dimensions for width and height, in this case, 32 x 32 pixels.
- Adjust the Resolution: If necessary, we alter the dots per inch (DPI) setting to match the desired pixel density without affecting the quality.
- Apply the Resize: With the parameters set, we proceed to resize the photo, ensuring that the aspect ratio is maintained to avoid distortion.
Example Command:
resize -width 32 -height 32 -resolution 300dpi source.jpg output.png
Tips for Maintaining Image Resolution and Quality
- Preserve Aspect Ratio: Always keep the original aspect ratio to prevent stretching or squashing the image.
- Understand DPI Settings: Higher DPI values usually mean better print quality, but for on-screen use, a DPI setting of 72 might be sufficient.
By following these guidelines, we make sure the conversion process results in a high-quality, 32 x 32-pixel image with the intended level of detail and clarity.
Advanced Topics and Considerations

When delving into the intricacies of 32 x 32 pixel image converters, we must carefully consider file formats and their compatibility, as well as the implications for privacy and security during the image resizing process.
File Formats and Compatibility
Regarding file formats, the choice can significantly impact the file size and quality of a 32px x 32px image. Common formats include:
- PNG: Offers transparency and lossless compression but typically results in larger file sizes.
- JPEG: Provides smaller file sizes with lossy compression, which may reduce quality.
- WebP: Aims to provide high-quality images with smaller file sizes, supporting both lossy and lossless compression.
- GIF: Ideal for simple graphics and animations but limited to 256 colors.
- ICO: Mainly used for favicons, supporting small image sizes.
It’s crucial to choose the proper format based on the need for transparency, animation, or the best quality-to-size ratio, ensuring compatibility across different platforms and devices.
Privacy and Security in Image Resizing
When resizing images to a 32 x 32 pixel format, privacy and security are paramount. To protect sensitive data:
- Consider de-identification of images to prevent recognition, especially when handling facial photographs.
- Ensure that the image resizing process is secure and that any temporary files created are encrypted and deleted automatically after use.
- Use trusted applications and libraries that adhere to privacy standards and safeguard user data throughout the image conversion process.
By focusing on these advanced considerations, we ensure our image conversions are not only technically sound but also respectful of privacy and security requirements.

