Originally posted on March 21, 2024 @ 4:07 am

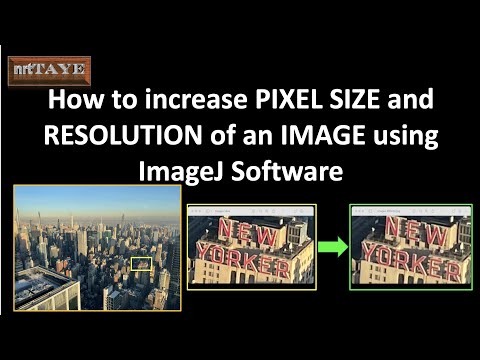
Instructions on Using the Tool

When discussing image specifications, the dimensions 320 x 240 pixels often come up, especially in reference to digital images and video content suited for specific display screens or devices. This dimension defines the resolution of an image, with 320 pixels in width and 240 pixels in height. It reflects a 4:3 aspect ratio, which is a common standard for many older computer monitors and television screens. Moreover, understanding pixel density–the number of pixels per inch (PPI)–is critical for ensuring that images appear sharp and clear on various displays, ranging from mobile devices to large screens.
Using a dedicated 320 x 240 pixel image converter can be invaluable for anyone looking to resize images specifically to this dimension, which can be particularly useful for creating content tailored to devices that use this resolution. Converting and resizing images to fit the 320px by 240px format requires an understanding of the basics, such as maintaining image quality during the process. There are various online and offline tools available for this purpose, which can efficiently convert images to the desired resolution while preserving or optimizing file size and quality for the intended application.
Key Takeaways
- We identify the 320 x 240 pixel dimension as a resolution with a 4:3 aspect ratio, relevant to many display types.
- We utilize converters to resize images to these dimensions, emphasizing the importance of pixel density for image clarity.
- We employ tools and techniques to maintain or enhance image quality and optimize file size during conversion and resizing.
Understanding Image Basics
Before diving into the specifics of a 320 x 240 pixel image converter, it’s crucial to grasp the fundamental concepts such as resolution, aspect ratio, and image formats. These elements are integral to image quality and practical usage across different mediums.
Resolution and Its Importance
Resolution refers to the number of pixels that compose an image. It’s typically represented by the width and height of the image in pixels. Higher resolution images contain more pixels, which can lead to better quality and detail. For instance, a 320 x 240 pixel image has a resolution of 76,800 pixels in total.
- Pixels: The smallest unit of an image displayed on a digital screen.
- Quality vis-à-vis Resolution: Higher resolution does not always equate to better visual quality. It depends on the sizes at which the image is viewed or printed.
Aspect Ratios Explained
The aspect ratio is the proportional relationship between an image’s width and height. For a 320 x 240 image, the aspect ratio is:
- 4:3 (which simplifies to a ratio of 1.33:1, calculated as 320/240).
This ratio affects how an image will stretch or shrink when applied to different formats or devices without distortion. Maintaining the correct aspect ratio is essential for the image to look as intended.
Image Formats and Their Uses
Images can be saved in various formats, each with its unique characteristics and uses.
-
Raster Formats (such as BMP, PNG, JPG, GIF, and TIF): These contain pixel data and are widely used for web graphics, photographs, and digital artwork. They differ in terms of compression, quality, and transparency support.
- JPEG: Great for photographs, does not support transparency.
- PNG: Ideal for web graphics, supports transparency.
- GIF: Used for animated images.
-
Vector Formats (like EPS, SVG, and AI): They comprise scalable paths and are best for logos and illustrations because they can be resized without losing quality.
-
Specialized Formats (such as TGA, EXR, and ICO): Used in specialized fields like video editing, game design, and icons for software applications.
Choosing the right format is a balance between an image’s final use-case, quality demands, and file size constraints.
How to Convert and Resize Images

In the realm of digital imagery, it’s essential to understand how to manipulate images to fit various specifications. Converting and resizing images, in particular, requires a clear grasp of resolution and dimensions. Let’s explore the practical methods involved.
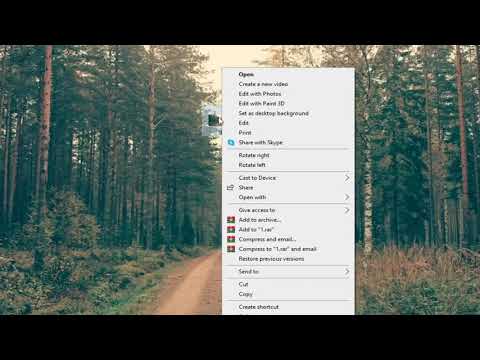
Using Online Tools for Image Conversion
For swift and straightforward image conversion, online tools prove to be extremely useful. With these tools, we can convert our photos to different formats like JPEG, PNG, or GIF without the need for complex software. To convert an image, we typically upload the photo to the tool’s webpage, select our desired output format, and let the tool process the conversion.
Step-by-Step Guide to Resizing Photos
When resizing images, the steps we follow are critical to maintaining the quality of the photo.
- Choose an image resizer: We select an online image resizer or software that suits our needs.
- Upload the photo: We upload our image to the platform.
- Input dimensions: We specify the new size, in this case, 320 x 240 pixels.
- Maintain aspect ratio: To prevent distortion, we make sure to maintain the aspect ratio, which for a 320 x 240 image is 4:3.
- Review: Before applying the changes, it’s crucial to preview the image.
- Resize: We proceed to resize the image. Once done, it’s available for download or further editing.
Choosing the Right Format for Conversion
The final format of our image is key, especially when considering its end-use. JPEG is excellent for photos due to its compression capabilities, while PNG is preferable for images that require transparency. For animated images, GIF is the format of choice. We must weigh these options carefully to ensure the image serves its purpose once converted and resized.
Optimizing Image Quality and File Size

When working with images like a 320px x 240px photo, our focus is on achieving the best balance between image quality and file size. This includes considering the image’s dimensions, resolution, pixel density, and storage requirements.
Balancing Quality and File Size
We must be mindful that high-quality images often come with larger file sizes, which can be an issue for website loading times and occupy more space on our servers or cloud storage. To maintain a balance, we use lossy compression techniques for formats like JPEG, which reduce file size by simplifying the image data, thus affecting the quality slightly. On the other hand, lossless compression methods are better for formats like PNG, where we need to preserve fine details, but this tends to result in a larger file size.
By adjusting the dimensions (320px by 240px) and resolution (dots per inch, DPI), we can alter the file size accordingly. For on-screen display, a DPI of 72 is often sufficient, whereas printing might require a DPI of 300 or higher for a sharp image.
Understanding Pixel Density
Pixel density, measured in DPI (dots per inch) or PPI (pixels per inch), is crucial for both display and printing scenarios. For displays, a lower pixel density is usually acceptable, since screens have a fixed number of pixels and our viewing distance typically compensates for lower densities. In contrast, printers necessitate a higher pixel density to produce clear and sharp images without visible pixelation.
When we prepare images for the web or digital use, we aim for a resolution that provides a good quality image without unnecessarily increasing file size. For print, our goal is to match the printer’s optimum DPI setting to ensure the best possible quality of the final printed image. Adjusting pixel density is a key step toward optimizing both the visual image quality and image file size.
Practical Applications and Tips
In our pursuit of optimal image handling, we must understand the practicality of a 320×240 pixel converter. This tool affects the aspect ratio, pixel density, and resolution—crucial attributes that contribute to image quality on various platforms.
Finding the Right Resolution for Web Use
When preparing images for web use, we aim for a balance between quality and load time. Aspect ratios like 16:9 or 1:1 are common in web design, and using a pixels to print size calculator can help us understand how our images will scale. The WebP image file format is ideal for the web due to its high-quality, yet small file size. It allows images to load faster without sacrificing clarity.
Preparing Images for Print
For print, resolution and color accuracy are paramount. A 320×240 pixel image may be adequate for small prints, but we often require a higher resolution image to avoid pixelation. Vector image formats are beneficial here, as they can scale without losing quality. When aiming for the highest quality, we utilize a higher pixel density—measured in pixels per inch (PPI)—to ensure that the printout captures every detail just as intended.
Secure Image Conversion Practices
As we select images to convert or resize, ensuring the security of our content is crucial. Opt for an encrypted online image resizer to safeguard privacy. When we download the converted image, especially a free service, we verify that the site is reputable and maintains the quality of our JPEG or other format files. Here, color fidelity and avoiding any unwanted compression during the process are our top priorities.
Throughout these practices, we consider the aspect ratio calculator a handy tool for maintaining the correct proportions. Whether we’re optimizing for web usage with a responsive 4:3 aspect ratio or crafting a print with a 1:1 square format, understanding and applying these tools and tips can significantly enhance our image preparation process.

