Originally posted on March 24, 2024 @ 2:00 am

Instructions on Using the Tool

Converting an image to a specific resolution such as 1546px by 423px requires understanding various image properties like ratio, resolution, and pixel density. The aspect ratio of an image is a significant factor; for this dimension, the aspect ratio is roughly 3.66:1, which means the width is a little over three and a half times longer than the height. It is not a common resolution for standard image formats, which makes it unique for specific uses.
Resolution refers to the number of pixels that make up the image on a display. A higher resolution means there are more pixels per inch (PPI), resulting in a sharper and more detailed image. The pixel density plays a crucial role in determining how an image will appear on various devices, as screen sizes and resolutions can vary greatly.
To create or convert an image to 1546 pixels by 423 pixels, one would typically use an image editing tool. This process may involve resizing the image, as well as cropping it to fit the desired dimensions. During this process, maintaining the image quality is paramount, as changing the dimensions can sometimes lead to a loss of clarity or introduce unwanted artifacts if not done correctly.
Key Takeaways
- Aspect ratio and resolution are key when converting to 1546px x 423px.
- A higher pixel density results in better image clarity and detail.
- Proper techniques are critical to retain image quality during conversion.
Understanding Image Dimensions and Aspect Ratios

When we talk about image dimensions like 1546px by 423px, we are referring to the width and height of an image in pixels. Understanding these dimensions is crucial for maintaining the integrity of the image when displayed on various devices.
The Significance of 1546px by 423px
The dimensions 1546 pixels in width by 423 pixels in height define the shape and size of an image. In this case, the width is significantly larger than the height, suggesting a panoramic or banner-like shape. This particular size is often used for cover photos on social media platforms or website headers, where the wide, short format provides a suitable display area for branding or visual storytelling. The choice of these dimensions directly influences how the image will appear on different screens, as it must adapt to diverse aspect ratios and resolutions.
Calculating Aspect Ratios
An aspect ratio represents the proportional relationship between an image’s width and height. To calculate it, we divide the width by the height. For a dimension of 1546px by 423px, the aspect ratio calculation would look like this:
[ \text{Aspect Ratio} = \frac{\text{Width}}{\text{Height}} = \frac{1546px}{423px} \approx 3.66:1 ]
This is a unique aspect ratio, not commonly found in standard formats like 16:9 or 4:3. For instance, 16:9 is typical for widescreen displays, while 4:3 is a standard for traditional television and computer screens. A 1:1 aspect ratio is square, often used for profile pictures or social media posts.
The non-standard aspect ratio of 1546px by 423px requires careful attention when adapting the image for displays with different aspect ratios to avoid distortion. It’s essential to use aspect ratio calculators or editing software that maintains the correct proportions during the resizing process, ensuring that the original composition and visual impact remain intact.
Converting Images to Specific Resolutions
When we discuss converting images to specific resolutions, we’re looking at adjusting the pixel dimensions of an image to match the desired width and height, which, in this case, is 1546px by 423px. This process involves online tools that resize and convert image files to various formats while aiming to maintain the highest quality possible.
Online Image Resizers and Converters
For converting images to a resolution of 1546px by 423px, we can use various online image resizers and converters. These tools typically support a range of image formats, including jpg, png, gif, tiff, bmp, svg, eps, ico, webp, and heic. To resize images, we simply upload our image, specify the new resolution, and the resizer adjusts the image accordingly.
- Steps to resize:
- Select an online image resizer.
- Upload the image file.
- Set the desired resolution (1546×423 pixels).
- Choose the output format (jpg, png, etc.).
- Click the resize button to process the image.
Many free image resizers ensure the resized image maintains the highest quality, although sometimes there’s a trade-off between file size and image quality. After resizing, we can then download the image for our use.
File Formats and Conversion
Not only can images be resized, but they can also be converted between different file formats depending on our needs. Each format has its characteristics; for instance, jpg is widely used for photographs, png supports transparency, gif is best for simple animations, and formats like tiff and bmp are used for images that require no compression and high quality.
- File format features:
- jpg: Best for photos.
- png: Supports transparent backgrounds.
- gif: Ideal for animations.
- tiff, bmp: No compression, highest quality.
When converting image formats, we take into consideration the purpose of the image and the platform on which it will be displayed. This helps us ensure we retain the image’s resolution and quality during the conversion process.
Optimizing Image Quality and File Size
When working with an image of 1546 x 423 pixels, it’s crucial to understand that the balance between resolution and file size affects the quality. We’ll guide you through the process to achieve the best possible visual clarity without unnecessary bulk in your image files.
Balancing Resolution and Quality
Resolution refers to the number of pixels in an image, which is a direct indicator of its potential sharpness and detail. A 1546 x 423 image comprises 653,838 pixels. Higher resolution generally means more detail, but it also results in a larger file size. When we increase an image’s resolution without changing its physical dimensions, we boost the pixel density—the number of pixels per inch (PPI)—which enhances the quality of the image on a screen.
However, there is a tipping point where additional pixels no longer improve quality to the naked eye, especially when considering the screen or display’s pixel density (PPI) capabilities. The key is to choose a resolution that retains the highest quality without creating an unnecessarily large file. This involves saving images in formats that compress the file size without losing much quality, like JPEG or PNG, and adjusting the image’s resolution based on the intended display or output medium.
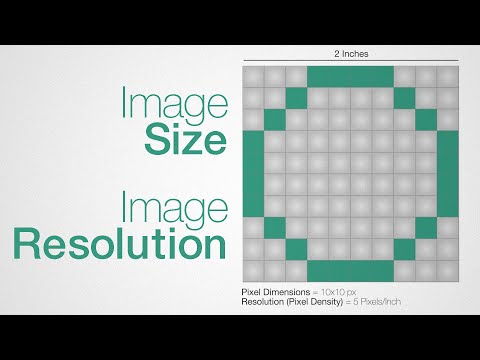
Understanding Pixel Density
Pixel density is measured in pixels per inch (PPI) and is key to the perceived quality of an image. It relates directly to how crisp and detailed an image appears on a given screen or output device. For example, the 1546 x 423 image, when displayed on a standard monitor or display with a resolution of around 100 PPI, would appear rough and lack detail, as this resolution is below many modern display standards.
For a quality display on most devices, including mobile phones and tablets, we want a higher PPI—ideally something closer to 300 PPI, which is often seen in print materials and is referred to as ‘print quality.’ Understanding the ISP’s (image service provider’s) guidelines for their display technologies will help ensure that our image maintains the highest quality on any chosen platform, particularly if it is to be scaled or printed. We aim to match our image’s resolution and pixel dimensions to the display‘s specifications.
By accurately adjusting pixel density and selecting the right balance between resolution and file size, we ensure our images display sharp and clear, while keeping the file size under control. This optimization keeps our images looking professional across various devices and platforms.
Best Practices for Image Conversion and Privacy

When we talk about converting images, especially to specific dimensions like 1546 x 423 pixels, it’s essential to ensure that the integrity and privacy of our content are not compromised. We need to consider several factors such as pixel density, resolution, and the ratio of the image to maintain its quality.
Choosing the Right Tools: Select converters that reputable developers offer. Use tools that explicitly state they do not keep copies of your files or use them for advertising purposes.
Image Resolution and Quality: It’s important to maintain the image quality, which is dependent on resolution and pixel density. A resolution that matches the intended display device is crucial for best results. Consider the percentage of scaling to avoid distortion.
Data and Privacy Considerations: When uploading images to an online converter, consider if the service retains your images. For us, it’s better to use services that prioritize privacy and state that they do not retain, share, or mine data from our uploads.
| Factor          | Suggestion                                    |
|-----------------|-----------------------------------------------|
| Conversion Tool | Choose privacy-respecting, non-ad converters |
| Image Quality   | Maintain resolution, consider pixel density   |
| Data Privacy    | Use services that delete our data after use   |
- Security: Ensure that the online platforms we use have secure connections (https). We should avoid using public Wi-Fi while uploading images due to potential security vulnerabilities.
Efficiency: Conversion should be quick and accurate. Look for services that can provide real-time conversions without lag, which ensures efficiency in our workflow.
By following these guidelines, we safeguard our images’ quality and our privacy on the internet.

